2BizBox® Manual |
Go back to 23.0 Main |
The M3 Manufacturing Execution System (MES) Quick Start Guide is designed to help administrators and shop-floor employees quickly set up and use the M3 system for production scheduling, reporting, quality control, alarms, and wage calculation. It outlines roles, system features, and step-by-step instructions for efficient operation.
• System overview: M3 MES supports production scheduling by date and employee/group, real-time shop-floor reporting with mobile scanning, quality control with inspection checkpoints, production alarms with multi-level handling, and automatic performance wage calculations. There are two main user roles: administrators and shop-floor employees.
• Quick start roadmap: Administrators complete initial setup including system switch activation, employee authorization, optional configuration of wages, quality control, and alarms, followed by task scheduling and dispatch. Employees log in, access the workshop console, find tasks, start timing, enter quantities, and finish reporting.
• Logging in: Users access the system via a recommended browser, enter credentials, and administrators access the full menu while employees use the Workshop Console. Mobile browsers supportscanning work order QR codes for direct reporting access.
• Administrator first-time setup: Key steps include enabling necessary system switches for real-time reporting, scheduling by date, wage calculation, quality control, preparation stages, and auto-reporting of QC. Employee reporting authorization is managed by assigning work centers. Optional configurations cover employee groups, performance wages, QC items, alarm categories, and defective items.
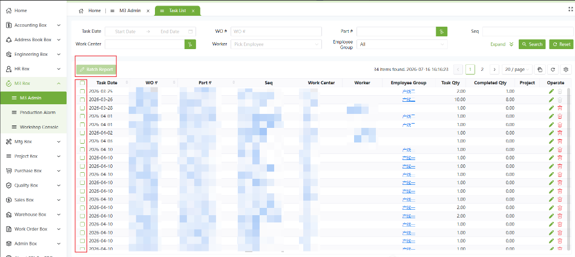
• Scheduling and task dispatch: Two modes exist depending on whether scheduling by date is enabled. Without it, tasks are assigned to work centers with date ranges but no daily quantities. With it, daily output quantities are assigned to employees or groups per date. Labels and QR codes can be printed for mobile scanning. Task lists enable batch reporting by administrators or team leaders.
• Administrator data queries and reports: The system provides time records, wage reports, QC records, alarm records, andschedule or work order progress tracking, all supporting filtering, editing, and export functions.
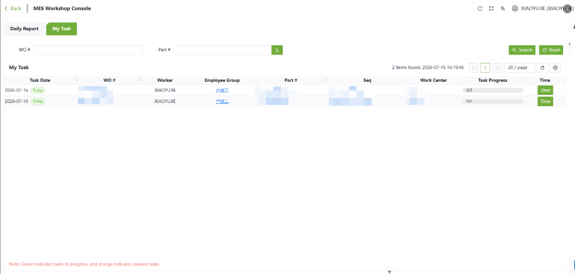
• Employee daily reporting: Employees access assigned tasks, start timing, and report qualified quantities with defect input if needed. Drawings, process instructions, images, and material details are viewable. Preparation stages can be timed separately if enabled. QC items must be filled when enabled, with warnings for out-of-spec values and options to upload photos.
• Production alarms: Employees can send alarms for exceptions by selecting categories, describing issues, and attaching photos. Handlers receive notifications and manage alarms by confirming, resolving, or transferring to higher levels with descriptions and attachments. All related alarms are trackable.
• FAQ highlights: Troubleshooting covers task visibility linked to scheduling and authorization, missing QC items requiring configuration and enabling, wage report data dependent on wage settings, scanning issues related to label origin and permissions, and alarm category usage requiring preset handlers.
M3 is a Manufacturing Execution System (MES) for production companies. Built around the main workflow of "Schedule -> Dispatch Tasks -> Employee Reporting -> Data Analysis", it helps your company achieve:
There are two types of users:
Role |
Main Work |
Main Entry |
Administrator |
System setup, scheduling & dispatch, batch reporting, data queries |
M3 Admin |
Shop-floor Employee |
Receive tasks, report & time work, fill in QC, send alarms |
Workshop Console -> MES Workshop Console |
Administrator, first-time use (about 10 minutes):
(1) Log in -> (2) Turn on setting switches -> (3)Authorize employee reporting -> (4) (Optional) Configure performance wage / QC items / alarm categories -> (5) Schedule and dispatch tasks
Employee, daily use (ready in about 1 minute):
(1) Log in -> (2) Open MES Workshop Console -> (3) Find today's task (or scan)
-> (4) Click "Start" to time -> (5) Enter qualified qty -> (6) Click "Finish" to submit
|
Tip: The employee pages also work on mobile browsers. You can scan a work order QR code with your phone to jump straight into the reporting page.
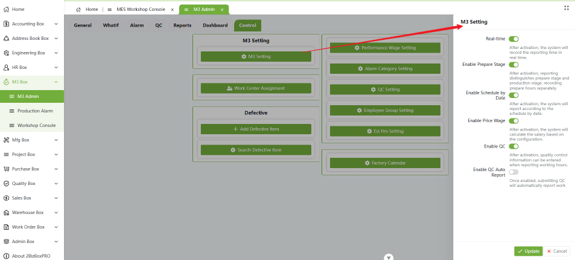
Go to M3 Admin -> Control (M3 Setting) and turn on the switches your company needs:
Switch |
Effect When Enabled |
Recommendation |
Real-time |
Reporting uses "Start / Pause / Finish" timing mode; the system records work time automatically |
Enable if you need accurate work time |
Enable Schedule by Date |
Tasks and quantities can be assigned to specific dates and specific employees/groups when scheduling |
Enable if you dispatch work by day |
Enable Price Wage |
Automatically calculates wages by piece/time rate and opens the "Wage Report" |
Enable if you have piece-rate wages |
Enable QC |
Employees must fill in preset inspection items when reporting |
Enable if you need in-process inspection |
Enable QC Auto Report |
Reporting is completed automatically after the employee submits QC data |
Enable when QC submission equals reporting |
Enable Prepare Stage |
Reporting distinguishes a "prepare stage" from a "production stage" and records prepare hours separately |
Enable for long setup times such as mold change or machine adjustment |
 |
Go to M3 Admin -> Control -> Work Center Assignment:
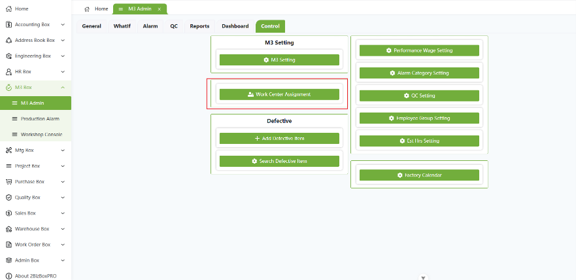 |
Employees without authorization cannot report on the corresponding work center.
This configuration is only meaningful when "Enable Schedule by Date" is on. If not enabled, skip to 4.4.
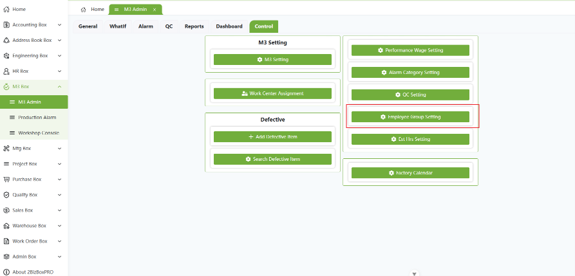
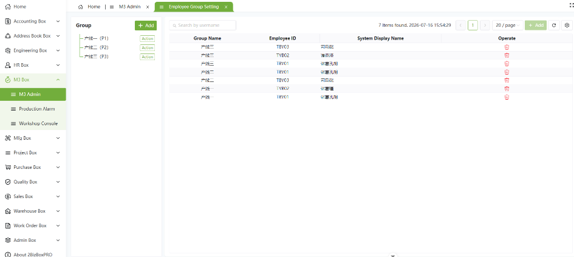
go to Control -> Employee Group Setting to organize employees into groups by shift/production line. You can then dispatch a task to an entire group when scheduling.
 |
 |
If Schedule by Date is not enabled, the core permission mechanism is the "Reporting Authorization" described in 4.2: employees can only report on work centers they are authorized for, and employee groups are irrelevant.
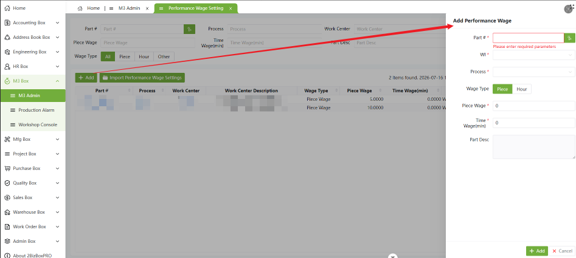
Go to Control -> Performance Wage Setting:
After an employee finishes reporting on that operation, the system calculates the wage automatically based on actual quantity or time.
 |
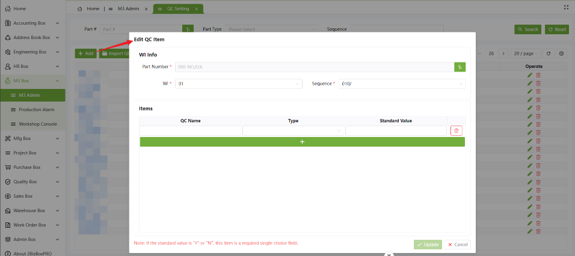
Go to Control -> QC Setting:
 |
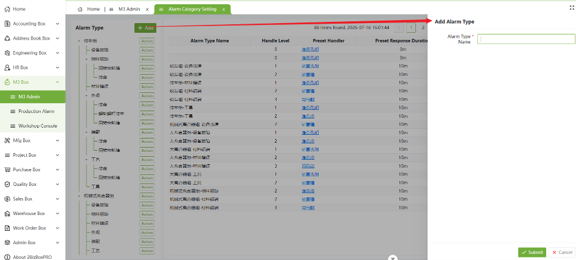
Go to Control -> Alarm Category Setting:
 |
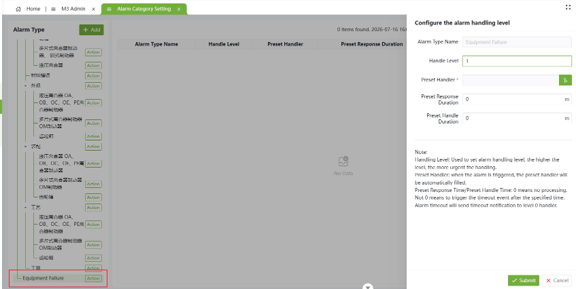 |
The level-1 handler is the first person to respond to an alarm. If they cannot resolve it, the alarm can be transferred to the level-2 handler, and so on.
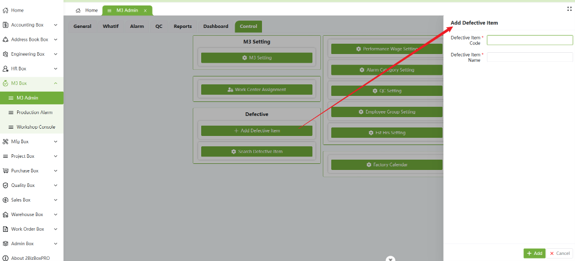
Go to M3 Box -> Control -> Defective Items to maintain common defect types (code + name). Employees can select them directly and enter the quantity of each defect type when reporting.
 |
5. Scheduling and Task Dispatch
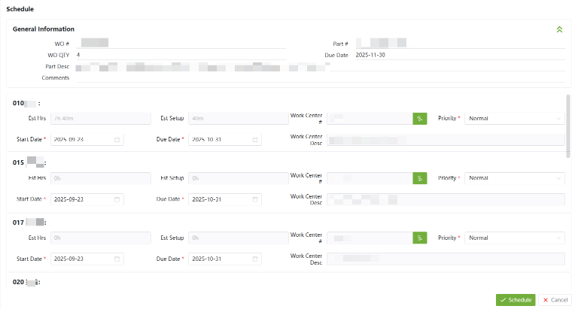
The scheduling interface depends on whether "Enable Schedule by Date" is on. The two modes operate entirely differently.
Scheduling is centered on assigning operations to work centers. Dates serve as auxiliary information (operation start/end dates); the system does not allocate specific quantities per day.
 |
|
Scheduling is centered on allocating a daily output quantity to each employee or group for each date.
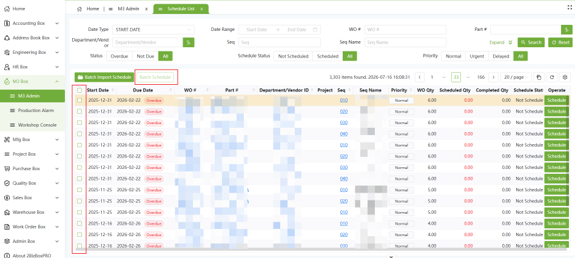 |
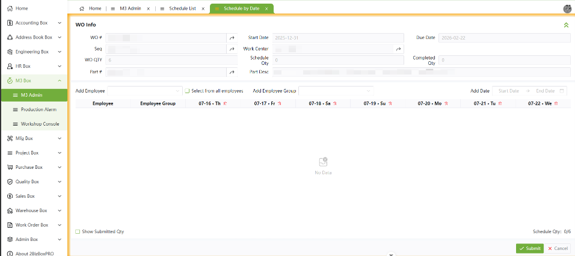 |
You can track progress anytime on the Schedule Progress / WO Progress pages.
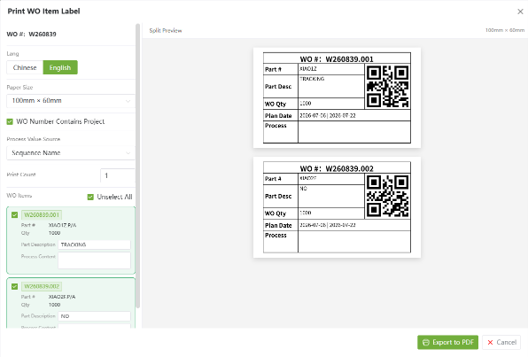 |
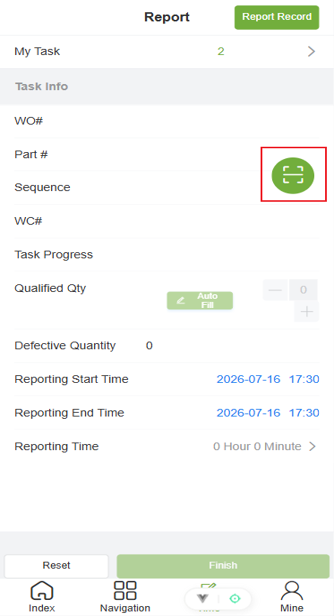 |
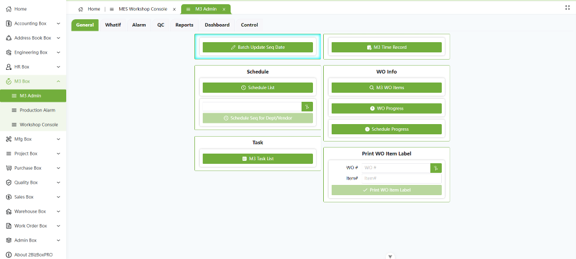
Go to M3 Admin -> General -> M3 Task List:
 |
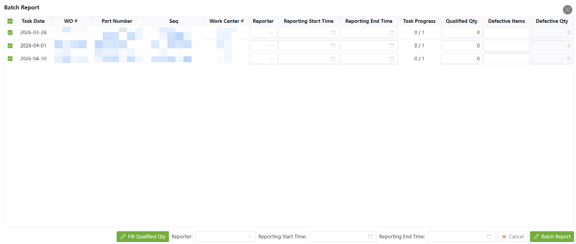 |
Batch reporting suits scenarios where employees cannot operate the system themselves and a team leader reports on their behalf. Administrators can also use the "Add Report" function on the console to report for a single employee.
Function |
Location |
Description |
Time Record |
General -> M3 Time Record |
Query each report's submission status, start/end time, reported quantity, and corresponding wage; supports editing and export |
Wage Report |
Reports -> Wage Report |
Query piece/time wages by date and employee, separated into unapproved/approved; supports Excel export |
QC Record |
QC -> QC Record |
Enter a work order number to query each part's inspector and content under that operation |
Alarm Record |
Alarm -> Production Alarm Record |
View all alarms' category, level, sender, handling status, and response/handle time; supports filtering by status |
Schedule Progress / WO Progress |
General |
Track the overall completion progress of schedules and work orders |
 |
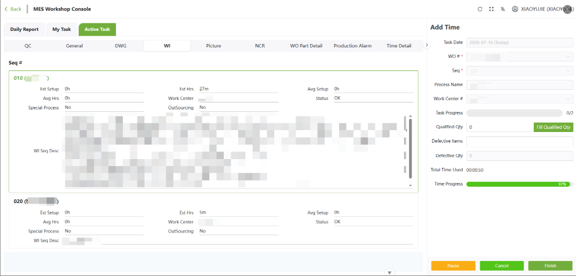
Click Time -> Start/(Prepare) -> My Task -> Time,enter the detail page.
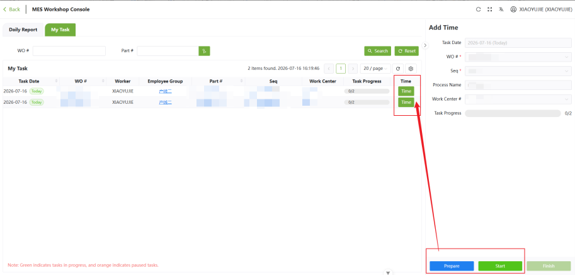 |
The steps above apply when real-time reporting is enabled. If it is not enabled, employees can skip the timing steps and simply click Report to submit their work directly.
In the detail area on the right of the reporting page:
 |
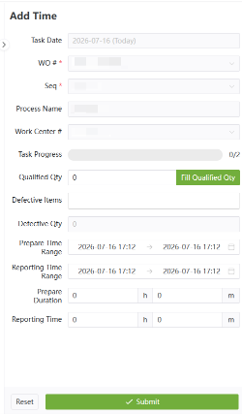
When real-time reporting is off, employees fill in the reporting start/end time, duration, and qualified qty directly, then click Submit.
 |
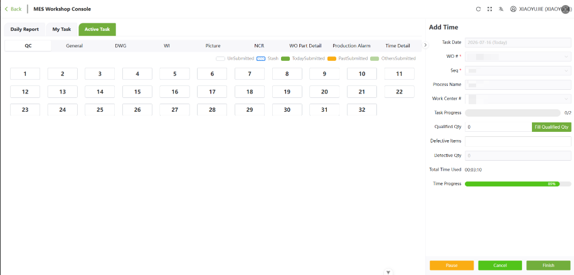
If "Enable Prepare Stage" is turned on: in real-time mode, click Prepare first to start计时 for preparation work (such as mold change or machine adjustment). Once preparation is complete, click Start to begin production timing. Preparation reporting and production reporting run in parallel — you can directly start production reporting without waiting for preparation to finish. In non-real-time mode, you will additionally need to fill in the preparation time range and duration.
 |
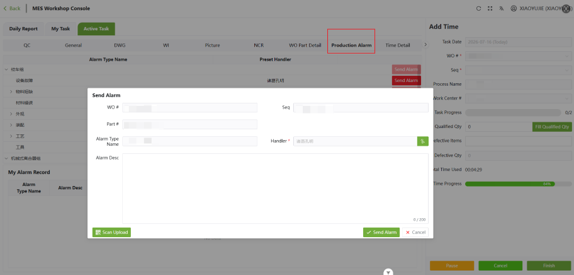
Sending an alarm (for exceptions such as equipment failure or material shortage):
 |
Handling an alarm (by the alarm handler):
All alarms related to you (those awaiting your handling and those you have handled) can be queried on this page.
Q1: An employee cannot see tasks?
Schedule by Date is on: Check: (1) Has the administrator finished scheduling and dispatched to this employee/group? (2) Is the task date today?
2. Schedule by Date is off: Check: Has the employee been granted the corresponding work center in "Reporting Authorization"? (Only operations on authorized work centers are visible to the employee.)
Q2: No QC items appear when reporting?
QC items are matched by "part number + operation". Confirm the administrator has configured check items for that part/operation in QC Setting and has turned on the Enable QC switch.
Q3: The wage report has no data?
Confirm the Enable Price Wage switch is on and that piece/time unit prices are set for the corresponding part/operation in Performance Wage Setting. Wages are calculated automatically based on actual quantity/time after the employee reports.
Q4: Scanning does nothing?
Confirm you are scanning a WO label or reporting QR code printed by the system and that the browser has been granted camera permission.
Q5: An alarm category cannot be clicked when sending?
Only alarm categories configured with a Preset Handler can be sent. Please ask the administrator to add a handler in Alarm Category Setting.