2BizBox® Manual |
Go back to 13.0 Main |
Found on a balance sheet under the heading Current Liabilities, accounts payable is an accounting entry that represents an entity's obligation to pay off a short-term debit to its creditors. At the corporate level, AP refers to short-term debt payments to suppliers and banks.
In 2BizBox, Accounts Payable is made to Vendors, from a PO or a Receiver. In the AP sub module of the Accounting Box, you can make AP, add payments, search for AP and make AP reports.
In principle, an Account Payable is made after goods are received with a vendor’s invoice. The most common way to make an AP is from a Receiver (or Receiver Items). Sometimes, when a Vendor’s Invoice arrives later, you may make an AP Accrual instead, also from the Receiver. Finally, if there is no PO/Receiver for some reason, you may still make AP for the Vendor directly.
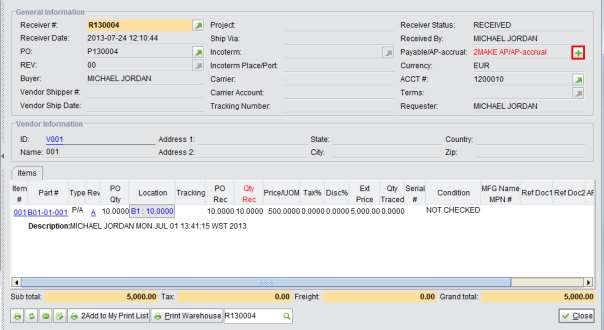
When a Receiver is created after receiving a PO to the warehouse, AP can be directly added to the Receiver Properties. Click “+” to make AP for the receiver. If “Use AP Accrued” is checked in the Control Panel, you may choose to make an AP or an AP-accrual.
 |
Then, the “Make AR for Receiver” interface will open. In the “Make” interface, you cannot edit items. Click “Cancel” at the bottom right corner to stop creating the AP.
Vendor’s Invoice differs from the Receiver Total, you can fill in the actual charge in “Vendor Invoice Total.”
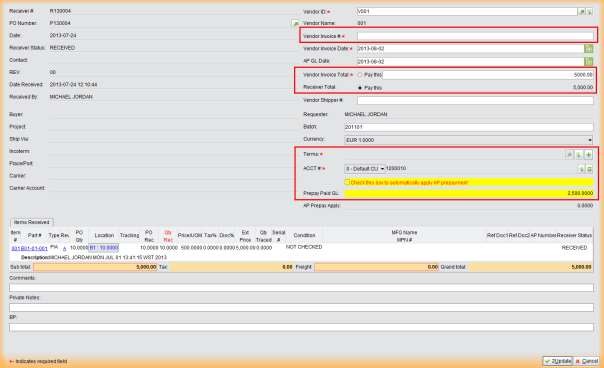 |
If the Vendor Invoice Total is inconsistent with the Receiver Total, the system will notifiy the user with a pop-up dialog box. Click “Yes” to continue.
 |
Other than making AP with Receiver properties, you may use the “Make AP” function under the “General” tab of the AP sub module to search for Receivers without AP.
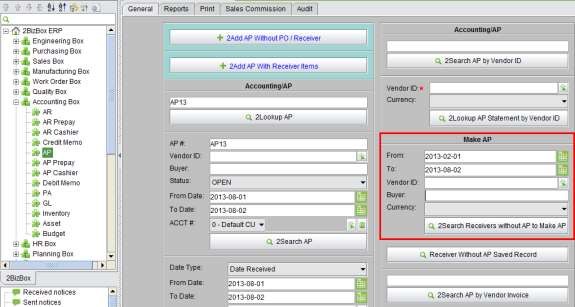 |
You can search for Receivers by date, Vendor ID, Buyer and currency. In the search results, click a Receiver # to open the Make AP for Receiver interface as shown above. Click the “Save” button at the top right to save the search results. You may view these saved result by clicking “Receiver Without AP Saved Record.”
 |
If made from a Receiver, an AP matches only one Receiver. If you want to pay the vendor by combining several Receivers, you can use “2Add AP With Receiver Items” to make an AP.
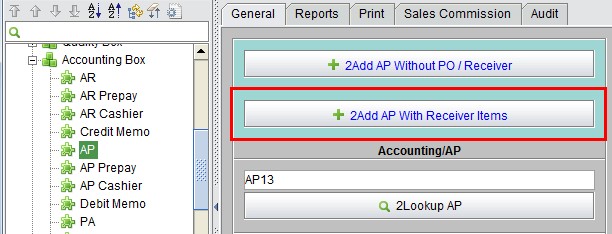 |
Click “2Add AP With Receiver Item” to start searching for Receivers by Vendor ID, Currency, Buyer and Date.
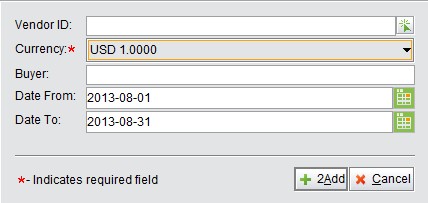 |
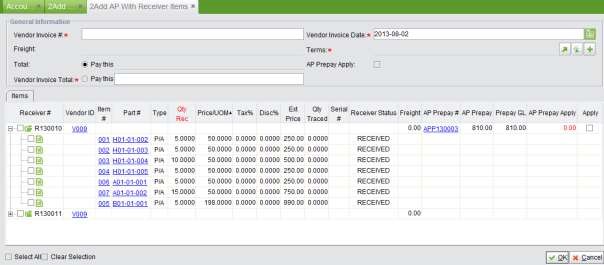
Click “2Add” to view all Receivers within the criteria with Items expanded. Click “+” to expand the Receiver and check items for the AP. You are required to fill in the Vendor Invoice #, Terms, and Total. If there are AP Prepayments made for the PO, you can check “AP Prepay Apply” in the General Information to apply all AP Prepay in items, or check “Apply” at the end of each item manually.
Click “OK” at the bottom right corner to make AP for all selected Receiver items.
 |
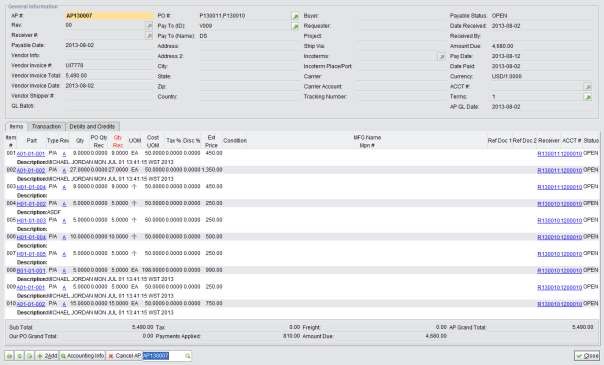
You will receive an AP with Items from different Receivers as below:
 |
For some Accounts Payable that have no matched PO or Receiver in the system, you may create an AP from
“2Add AP Without PO/Receiver” under the “General” tab of “Accounting Box –AP.”
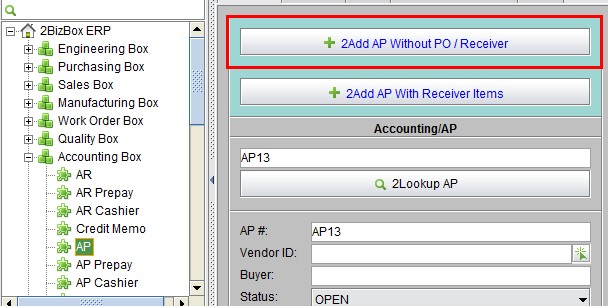 |
Click this button to open the adding interface, where you will need to fill in the following information:
After the above information is filled out, click “2Add” to make the AP with the item “N/A.”
When a Vendor charges less or more during business and you accept the over/undercharge, there will be variance between the PO amount and the Vendor’s Invoice. A warning message will be displayed, but you can still continue to post the invoice. The variance, therefore, can use an account to record Vendor Payment Variance Account in the Company Accounting Settings.
After the payment is transferred to the Vendor, the accountant need to make these payments ontime in 2BizBox . There are multiple ways to add the AP Payment in the system.
To quickly add a payment, click “Accounting Info” at the bottom of the AP Properties to make the payment.
Under the “Accounting Info” tab, the Total Paid and Total Due amounts of the AP are shown. Click “2Add Payment” to open the payment window.
If there is still AP Prepay not applied in the AP, check “Apply AP Prepay” to apply it.
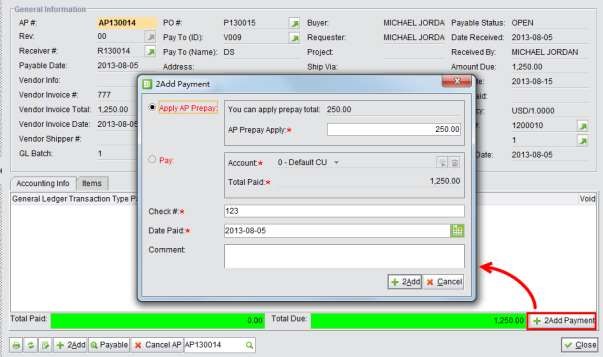 |
Fill in the Check# and Date Paid, then click “2Add” to make the payment. The GL Transactions will be generated and displayed under the “Debits and Credits” tab.
 |
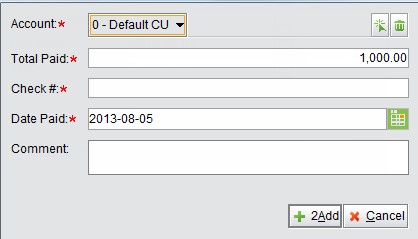
If there is no AP Prepay to apply, then you can make the payment directly. Fill in the due amount and other information, then click “2Add” to submit the payment.
 |
If the payment is made in a foreign currency, you will need to fill in the exchange rate. The default displayed exchange rate will be the starting exchange rate set in the “Accounting Period.” “Exchange Gain & Loss” will also be recorded in the GL if there is variance between the two exchange rates.
If a payment is mistakenly added, click the “Void” button in Accounting Info to void the payment.
 |
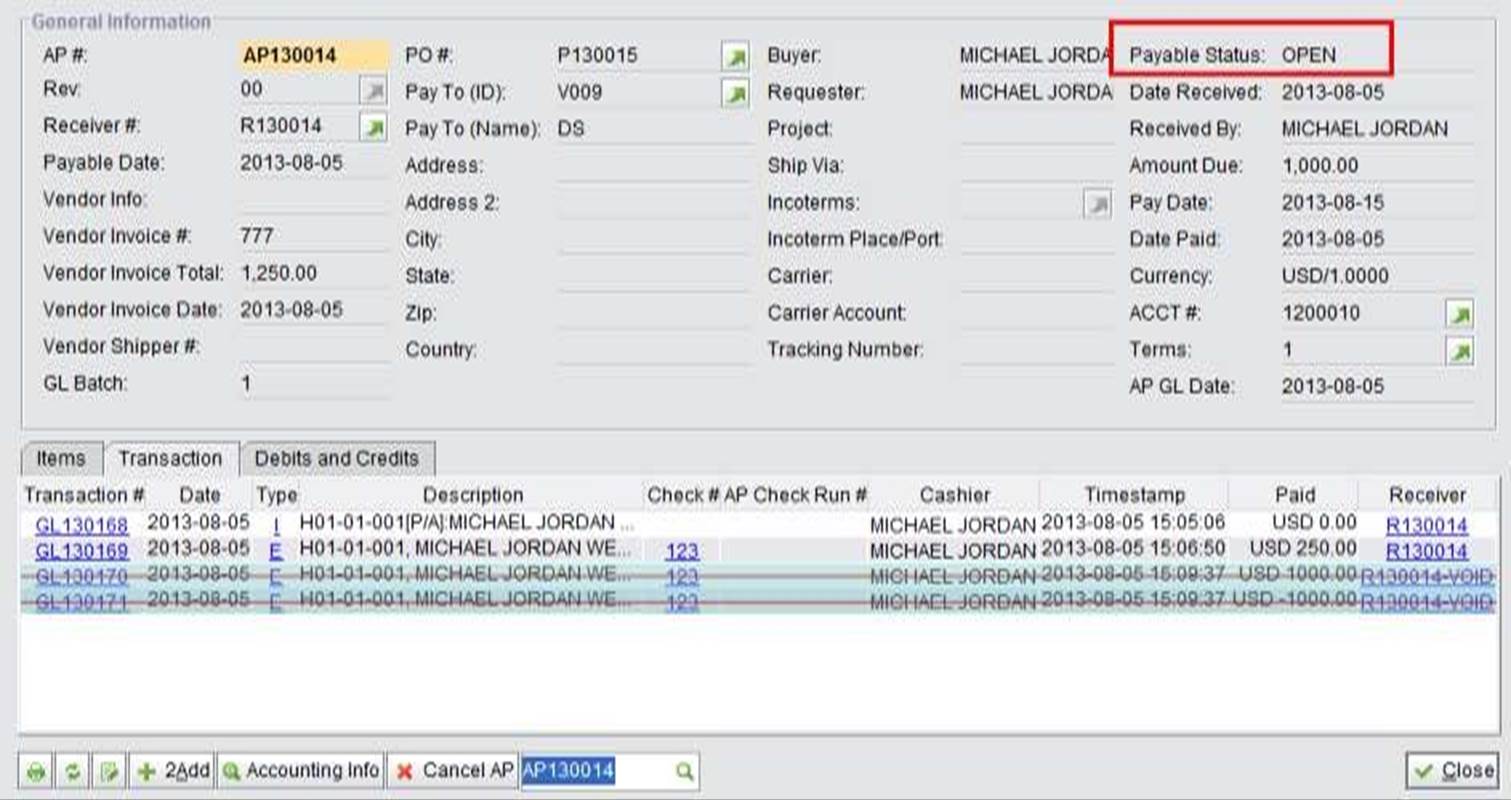
AP Status will reopen after the payment is voided. The void GL can also be viewed in the “Transaction” tab. When all GL Transactions are voided, you can click “Cancel AP” to cancel the entire AP.
 |
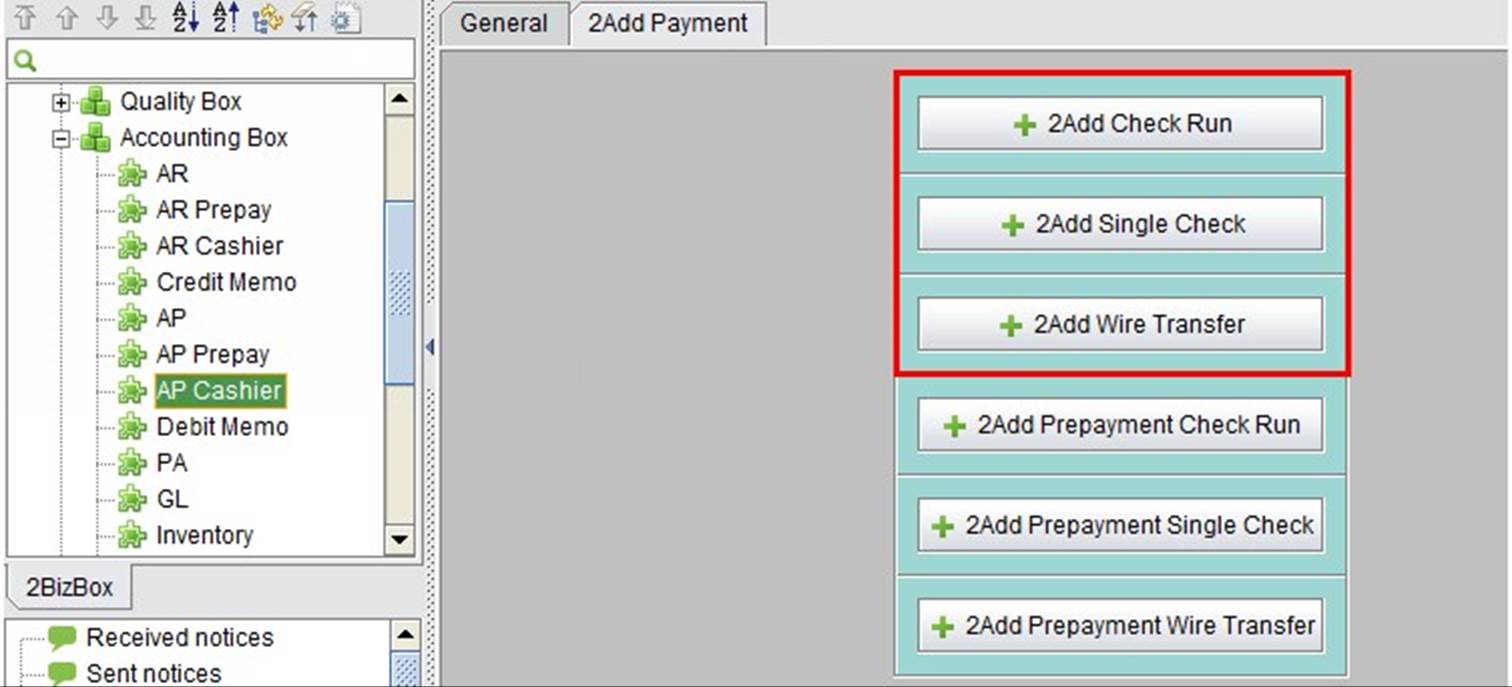
In the AP Cashier sub module, you can add AP Payment by Check Run, Single Check and Wire Transfer under the “2Add Payment” tab.
 |
Payments made by checks can be added in batch by using the “2Add Check Run” under the “2Add Payment” tab. Click the button to open the adding interface to set search conditions for AP (Debit Memo) by Vendor ID, Due Date and Company Unit, then click “2Add” to view APs within the search criteria.
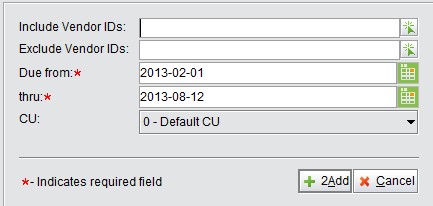 |
In the “2SetUp Payments for AP” interface, check AP and Debit Memo to make the payment. If the AP has not applied APP, you need to first apply the prepayment. Then, click “2SetUp AP Payment” in the bottom right corner.
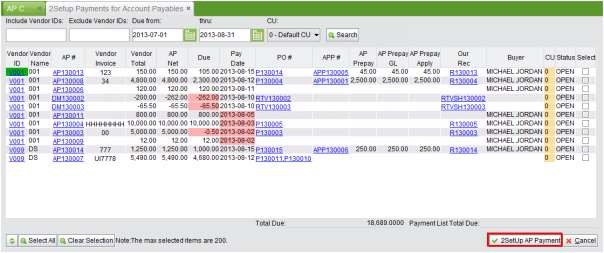 |
In the next screen, fill in the amount paid by Check for each AP or Debit Memo in the column “Check Run Total.” At the bottom, Check# is filled out according to the default settings. You can also use your own Check Numbers. Then, click “2Make Payment for AP Check Run” to go to the next screen.
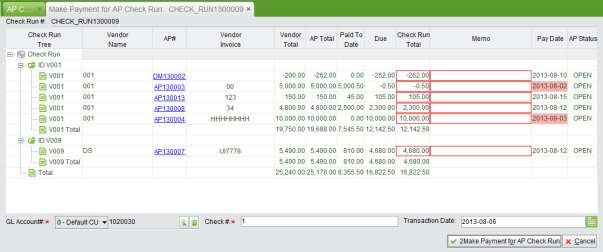 |
In the next screen, click “Back” to return to the previous screen; click “Cancel” to cancel the whole operation; click “OK” to confirm all information and commit and finish the payment.
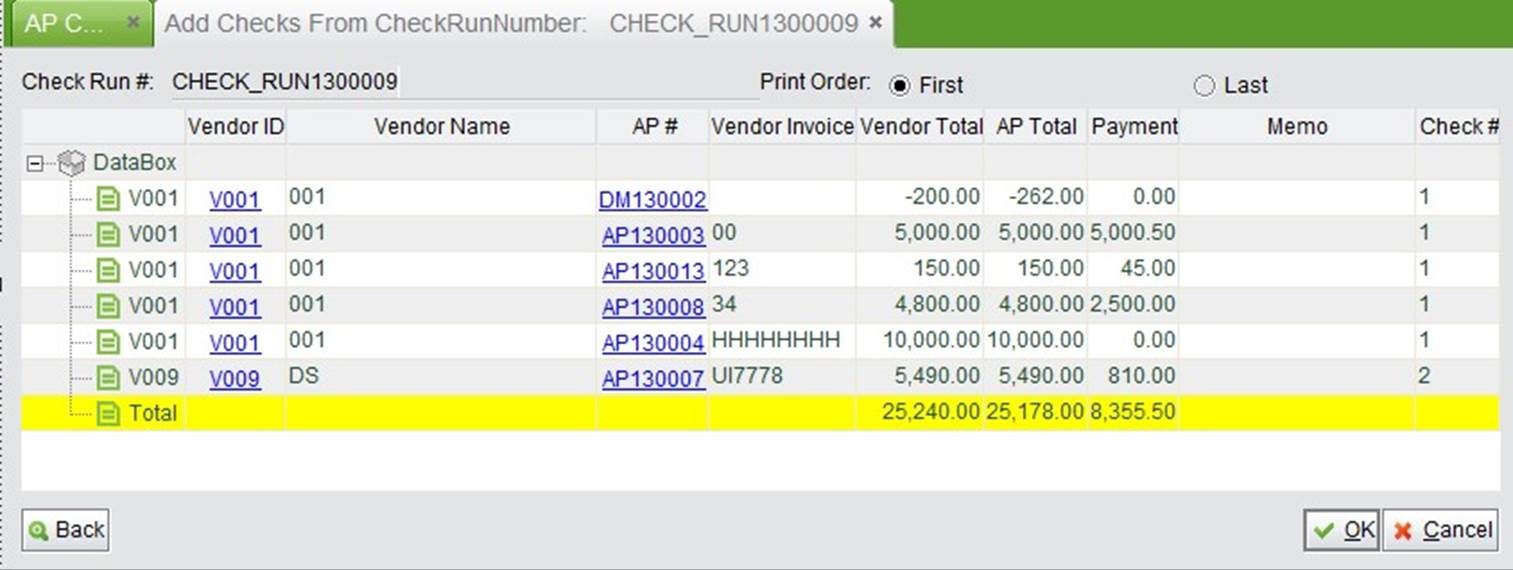 |
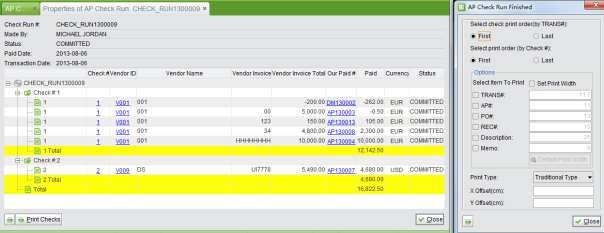
A print window will appear for you to set and print the check run.
 |
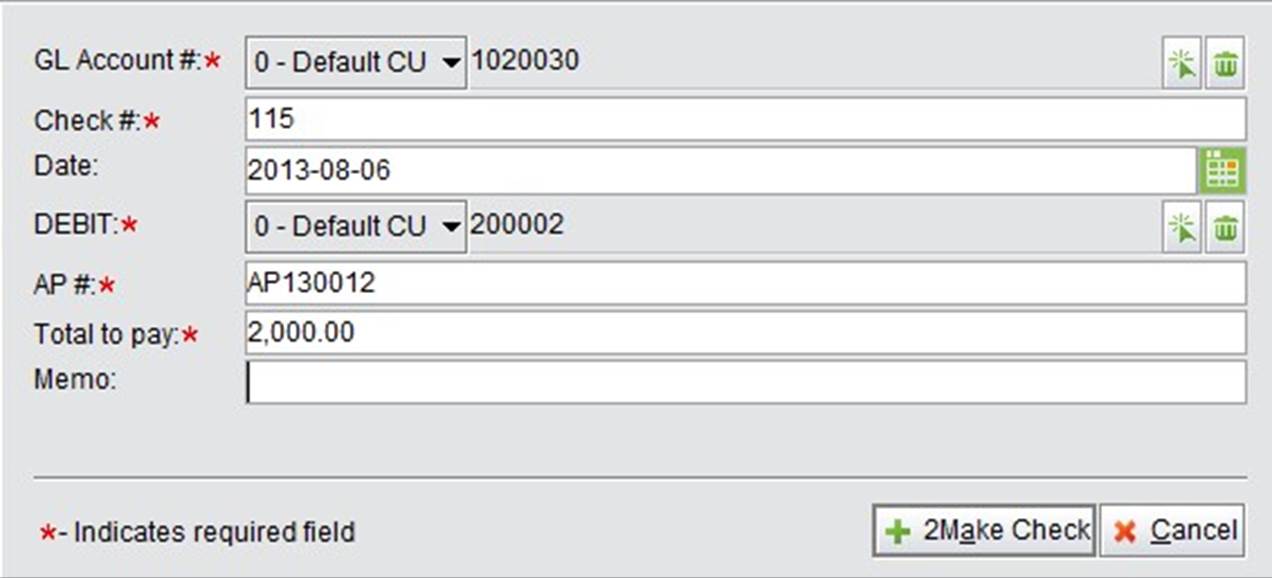
For a single payment, you can add a single check. Click “2Add Single Check” to enter the basic information for the check, including GL Account, Check#, Date, Debit Account#, AP#, and Total Amount. Then, click “2Make Check” to make the check directly. Here, the “Total to pay” will be filled by the AP# automatically.
 |
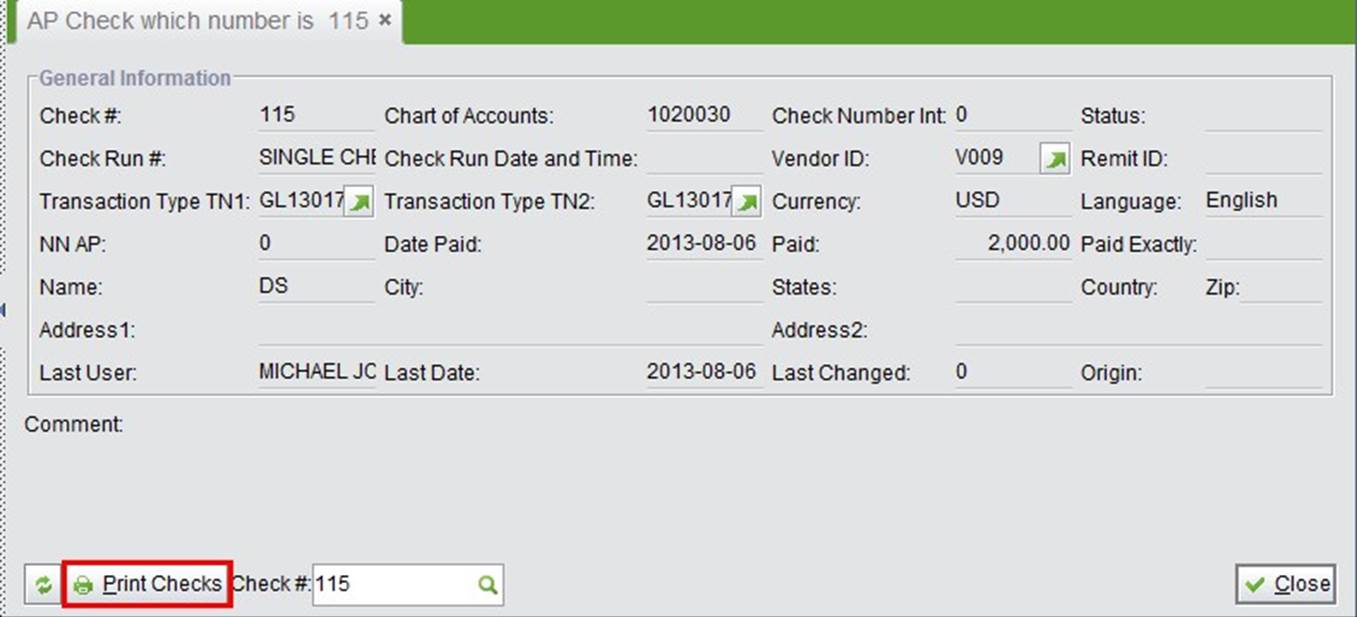
The single check generated is shown below. You may click “Print Checks” to print it.
 |
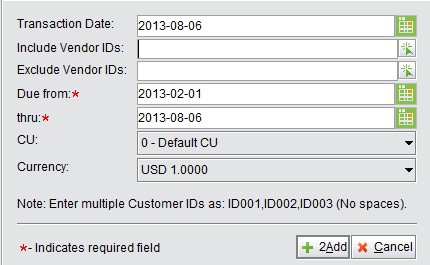
For payments made by wire transfer, you can add the payment with the “2Add Wire Transfer” function. In the adding interface, use Vendor ID and due date to search for the AP and DM to add, then click “2Add” to view the search results.
 |
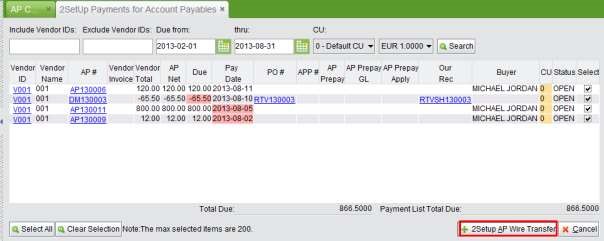
In the search results, check the AP and DM payment made by wire transfer, then click “2SetUp AP Wire Transfer” to open the setup interface.
 |
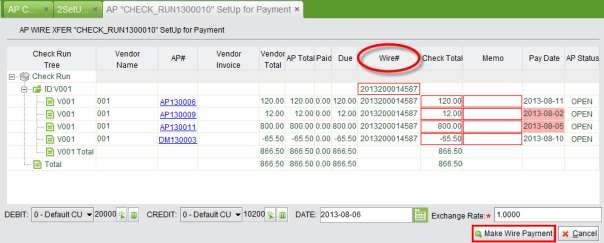
The setup interface sorts AP by Vendor ID. You may give each vendor the same wire# if the payments are made in a batch. The exchange rate can be set for foreign currency payments at the bottom, as well as accounts and date. When you are finished, click “Make Wire Payment” to go to the next screen.
 |
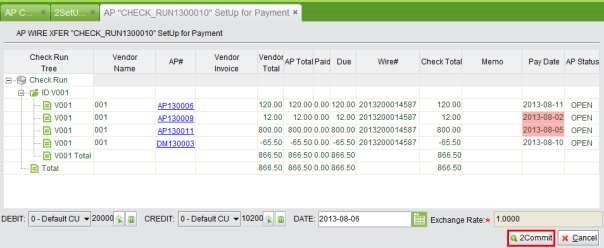
Confirm all the information and click “2Commit” to commit all payments.
 |
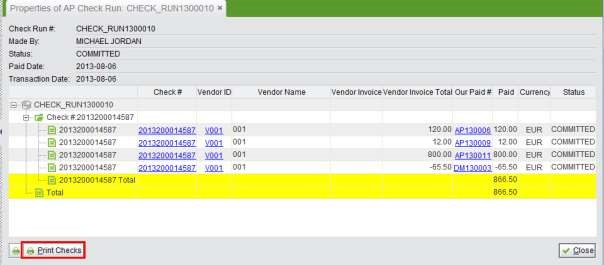
The print window will open for printing the check run.
 |
This is the basic lookup function. Fill in the AP# and click the button to view the AP.
This is comprehensive search function for AP including AP#, Vendor ID, Buyer,AP Status, AP From and To Date, and AP Account #. The search results display all AP within the search criteria, and will show the AP statistics in different currencies.
This is a comprehensive search function for AP Items, including search functions like Date Type, Date Range, Part# & Type, Product Code, Vendor ID, Vendor Invoice, AP Item Status and Account #. The search results display all AP Items within the search criteria, and will show the statistics in different currencies.
Fill in the keywords of a Vendor ID to search for AP (DM and PA) of the Vendor in all statuses.
Use this function to view the Statement of an assigned vendor. Select a Vendor ID and currency, then click this button to view the statement with all AP, DM and APP that are still due up to the current day.
Fill in the keywords of a Vendor Invoice to search for AP (DM & PA) in all statuses.
This is a report to view all OPEN AP (including DM) of specified vendors. Fill in the keywords of the Vendor ID you wish to search for, and click the button to view the report. At the bottom of the report, Total Paid, Total Due and Grand Total are shown in different currencies.
This is a report to view all Past Due AP (including DM) of specified vendors. Fill in the keywords of the Vendor ID you wish to search for, and click the button to view the report. At the bottom of the report, Total Paid, Total Due and Grand Total are shown in different currencies.
AP Aging is a report showing how long the Accounts Payable have been outstanding. You can filter Vendor IDs by setting Include Exclude IDs, then click “AP Aging” to view the report. The search results break down AP into categories by length of time outstanding.
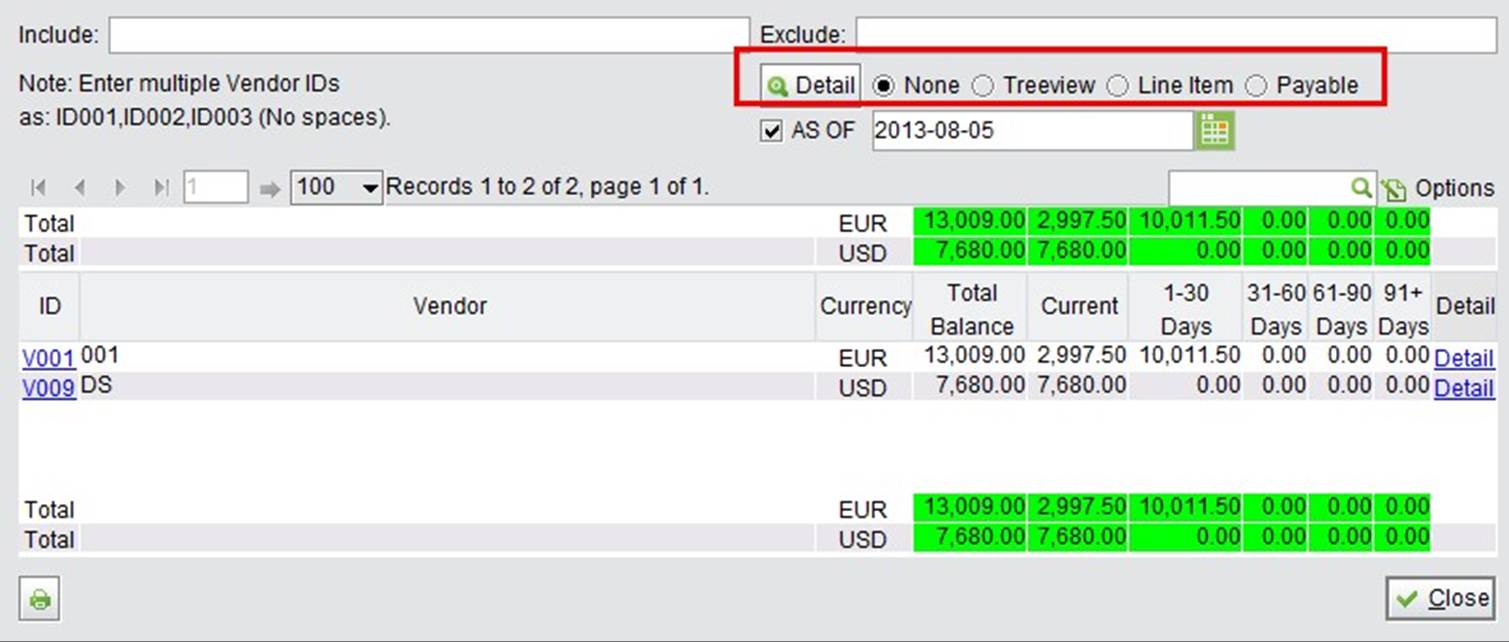 |
The basic report is sorted by vendors. If you fill in a date and check the “AS OF” option, then click “Detail,” the search results will show AR as of the date entered.
At the top right of the screen, you can manage the viewing search result details by “Treeview,” “Line Item” or “Payable.” Select an option, then click “Detail” to view the search results.
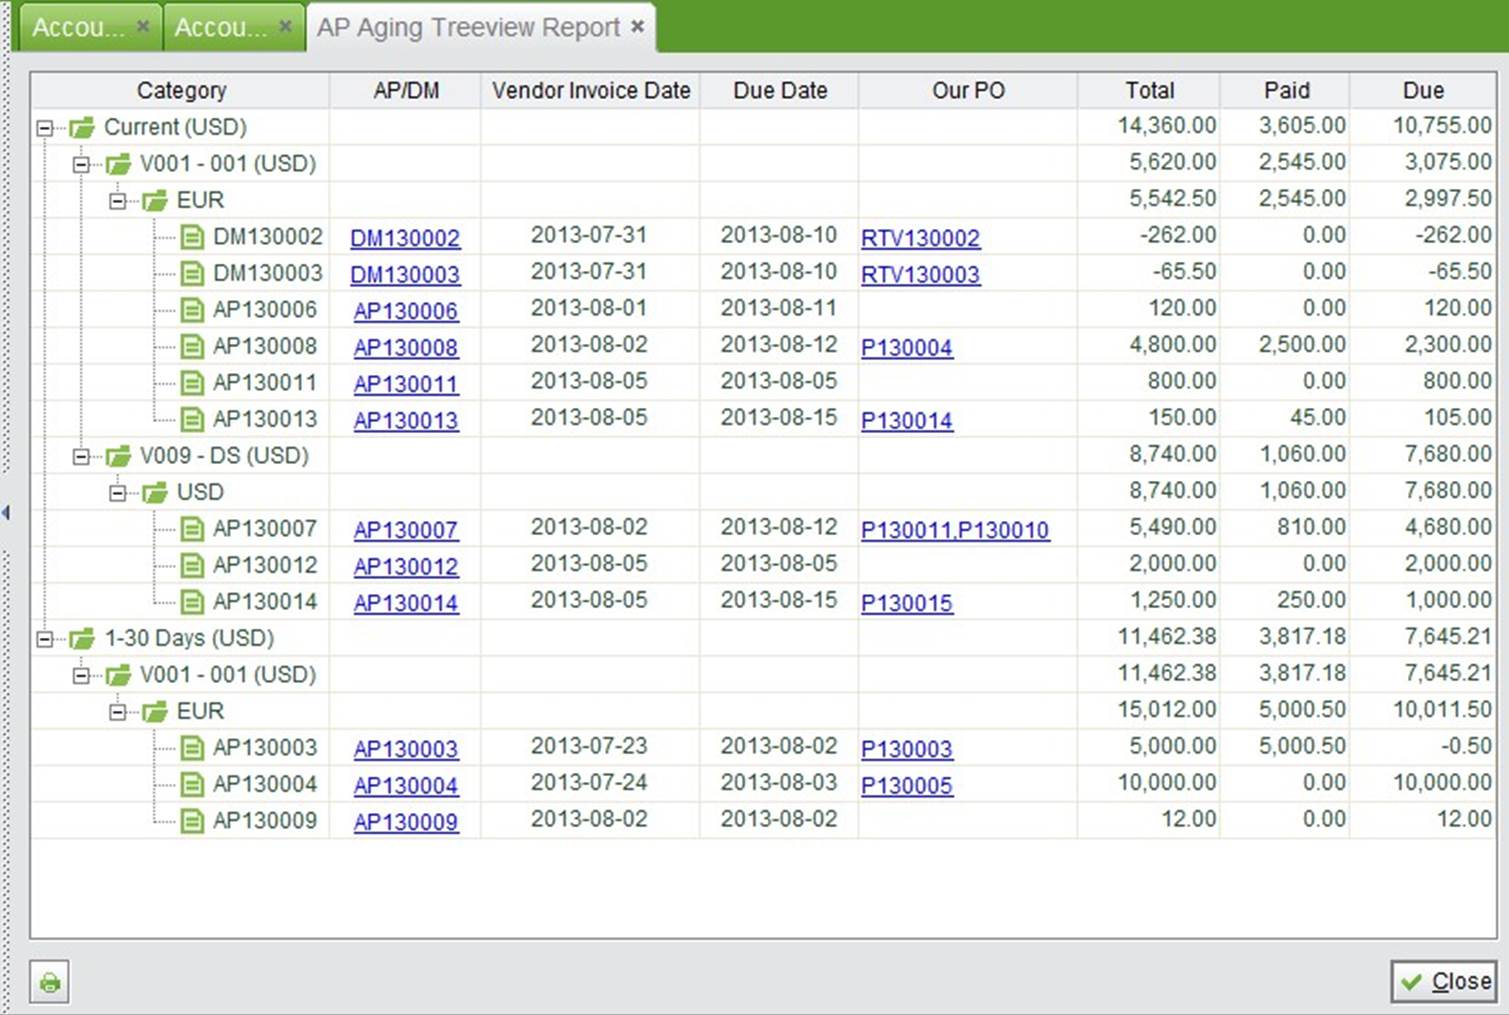
An AP Aging Treeview Report shows AP in the tree category with the sequence from “Aging Period” – “Vendor ID” – “Currency.”
 |
Selecting “Line Item” and clicking “Detail” will show the AP Aging Report by AP Items, including the item’s detailed information such as quantity ordered, quantity received and due amount.
Selecting “Payable” and clicking “Detail” will show the AR Aging Report by AP Numbers (and Debit Memo if there is any). In each line, you can see the “Total Due,” “Amount Paid” and “Balance Due” of the AP. Click “Detail” to open the Vendor’s Statement.
This is a Purchase Tax Report displaying the total tax of each vendor by Vendor. You can set a zip code in the Address Box and a purchase tax rate in the Control Panel.
Use the Date Type, Date Range, Vendor ID and AP status to view the total purchase amount between your company and a vendor. In the search results, each Vendor’s subtotal is summarized. Click “Detail” to view all AP of the vendor.
Under the “Sales Commission” tab of “Accounting Box – AP” are two reports to show Sales Commission by Accounts Receivable. Sales Commission is calculated by the Commission Percent defined in the Sales Code, which can be added and managed in the Sales Box. The Sales Code can be related in the Sales Order when a SO is updated, therefore the commission portion is taken to the Invoice and paid to the salesperson.
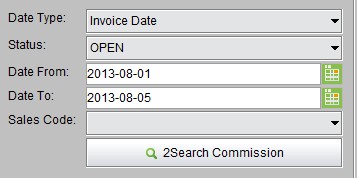
“2Search Commission” is a report that shows Sales Commission by Invoices. Fill in the Date Type (Invoice Date, Due Date. Pay Date), Invoice Status, Date Range and select a Sales Code, then click this button to view the results with item details and total commission.
 |
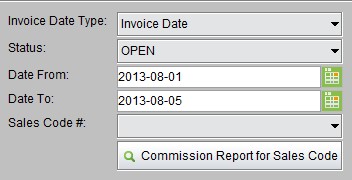
A “Commission Report for Sales Code” is a report that summarizes sales commission by sales code. In the search results, each line displays a Sales Code and its detail. Click “Commission Total” to view the Invoices related to the Sales Code.
 |
Fill in the AP#, Vendor ID, Currency and Start Date, then click the button to search for Accounts Payable that need to be audited, including AP and Debit Memos for which Total Transaction E doesn’t equal Total Transaction I, AP Grand Total doesn’t equal Vendor Invoice Total and Net Payable doesn’t equal the calculated result.