2BizBox® Manual |
Go back to 12.0 Main |
As an essential part of quality control, inspection refers to activities that involve the measurement, tests and gauges of one or more characteristics of a good or service and comparing these results with specified requirements to determine whether conformity is achieved for each characteristic. The Inspection Report in 2BizBox is such a document to verify that a part, whether made or purchased, is in good condition prior to being placed in the warehouse or released for shipment.
In 2BizBox, it is compulsory that an Inspection Report is related to a Purchase Order or a Work Order. A setting is provided in the Control Panel to determine whether an Inspection Report is obligatory. Meanwhile, three types of inspection can be selected for a Part in order to further increase quality control. When an Inspection Report is created, you can add inspection content and create a Non Compliance Report if there are any unqualified parts. Serva Software LLC can set its inspection settings according to quality control demands.
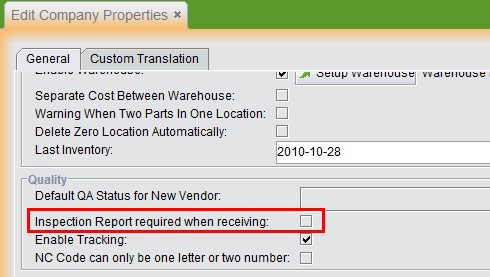
Check the “Inspection Report required when receiving” option to ask for an Inspection Report when receiving a Purchase Order or a Work Order.
 |
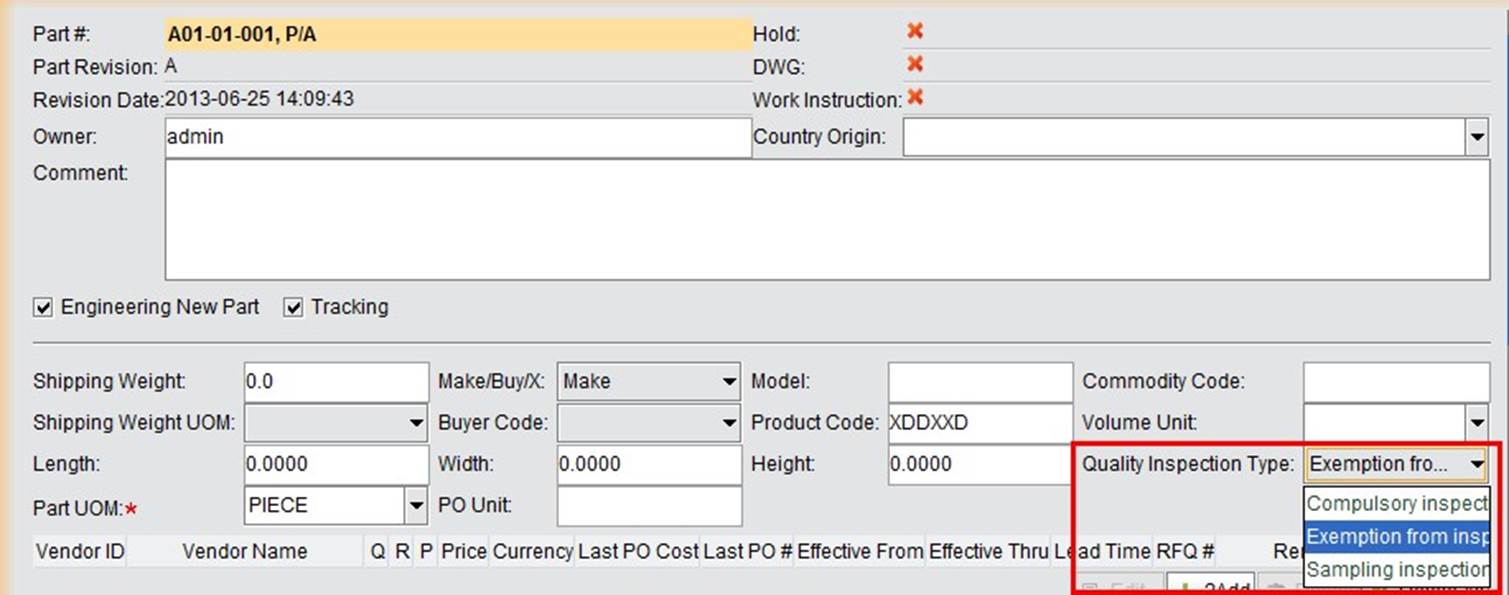
“Quality Inspection Type” options can be set when updating a part:
Notice: If “Inspection Report required when receiving” has not been checked in the Control Panel, Part Inspection Types are not effective.
 |
Click “2Add IR” under the “General” tab of “Quality Box - IR” to start adding an Inspection Report:
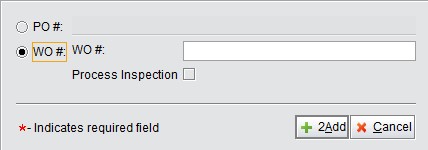 |
As you can see from the adding interface, an Inspection Report must be created from a PO or a WO. Fill in the PO#/WO# and click “2Add” to create an IR. Check “Process Inspection” if you are adding an Inspection Report for an In-Process Work Order.
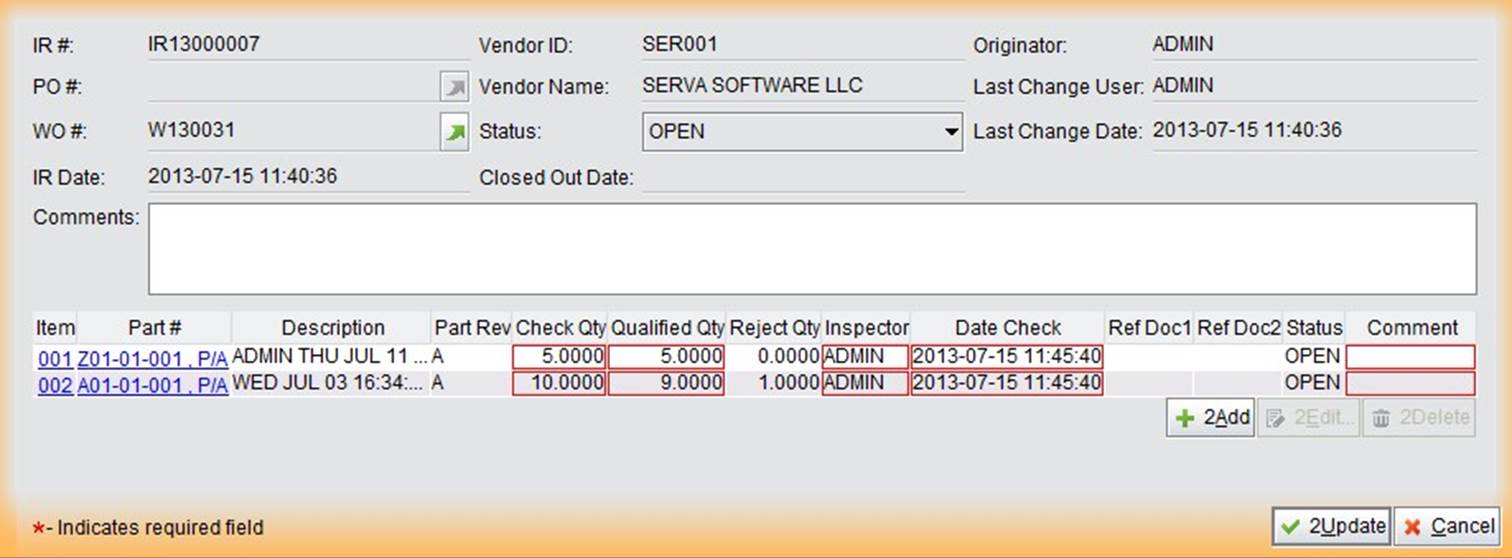
In this scenario, an IR is created for Work Order W130031 with two items. After inspection, it is found that all 5
Items 001 of “Z01-01-001” are qualified, while 1 out of 10 Items 002 of “A01-01-001” has been rejected. Fill in
“5” qualified for Z01-01-001 and “9” qualified for A01-01-001, then click “2Add:”
 |
By clicking “2Add,” the “Update IR” interface is opened with 2 items in it. You can revise the item details if they change, but you cannot add more items to the IR, because Items in an Inspection Report are in accordance with the related PO/WO.
 |
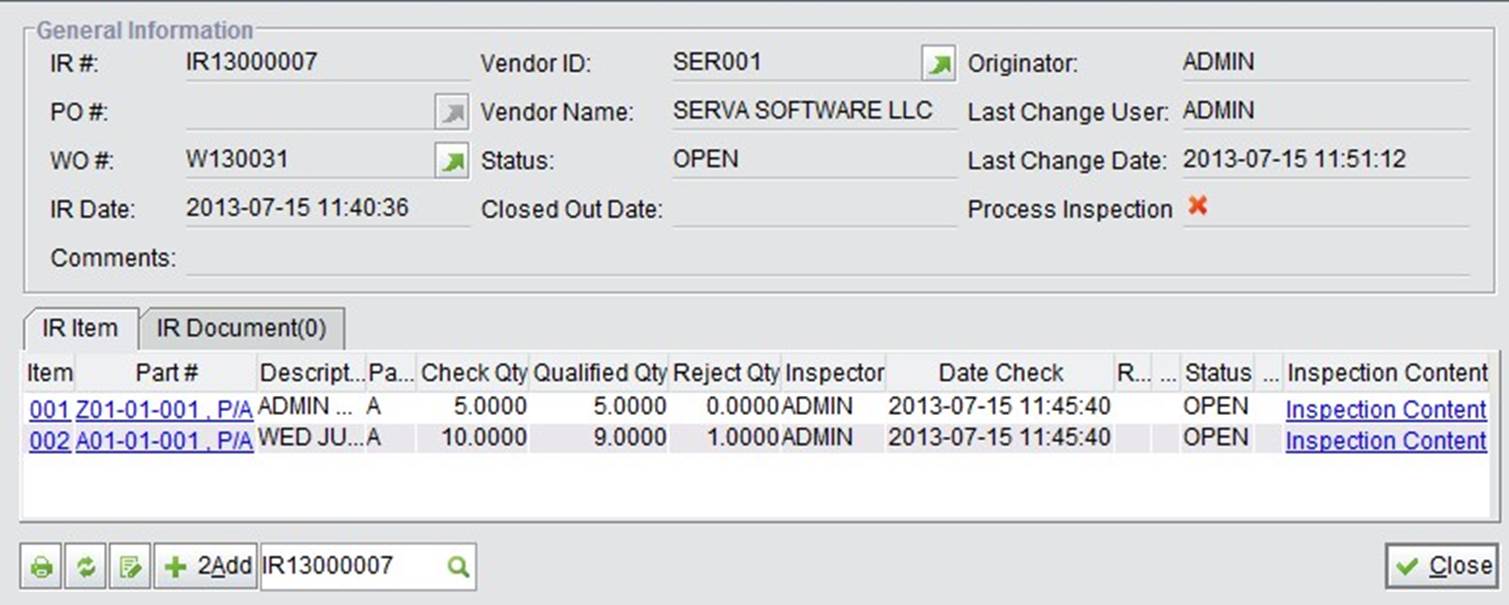
Click “2Update” at the bottom right corner to submit the IR and open the interface of IR Properties, shown below. Here come two very important steps: add inspection content for each item and properly handle the defected part “A01-01-001” as quality control standards require.
 |
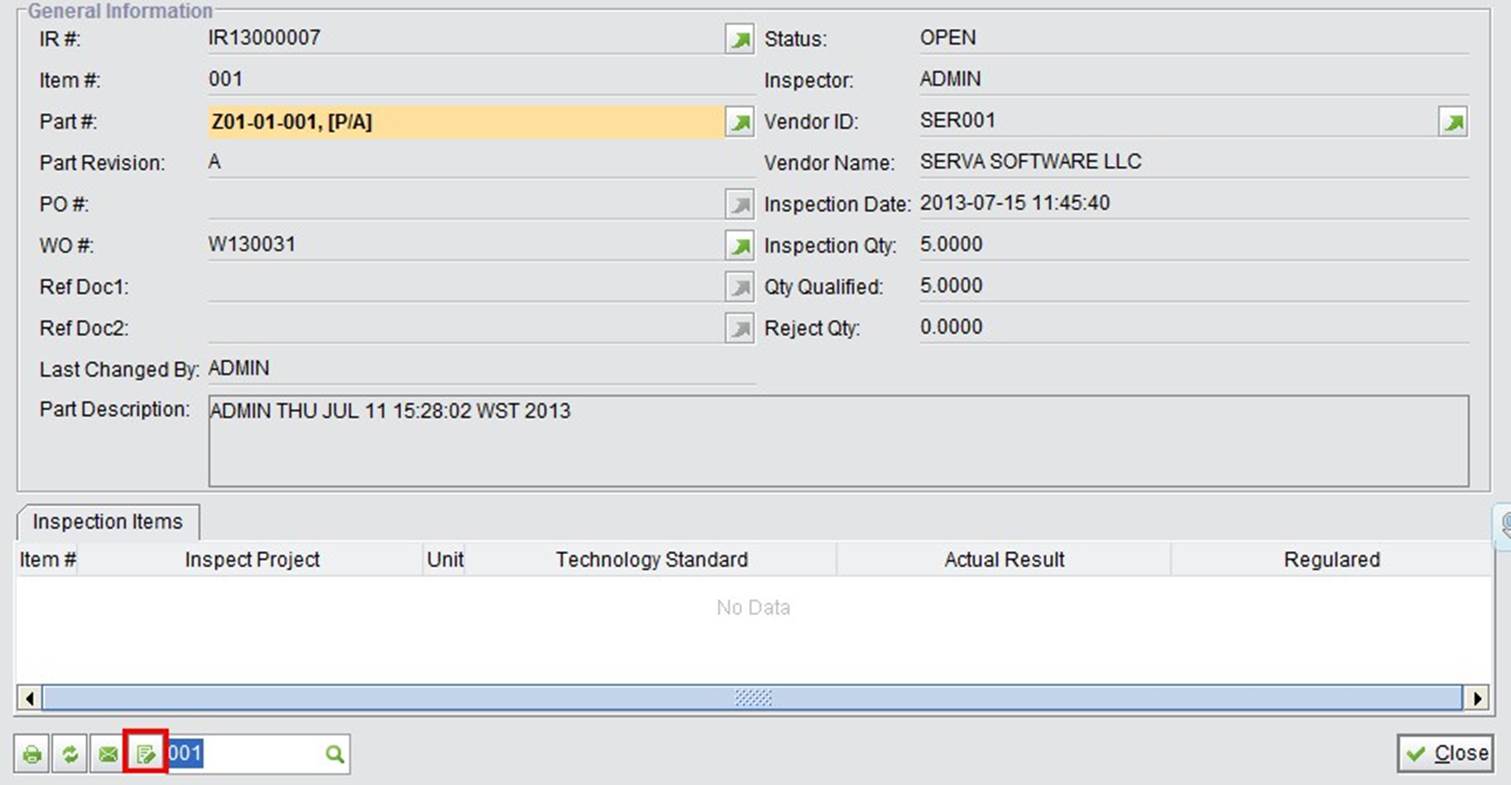
Click “Inspection Content” to open the Properties of each item. Here, you can add inspection content by clicking the “Update” button at the bottom left corner.
 |
In the “Update IR Item” interface, click “2Add” to open the adding interface:
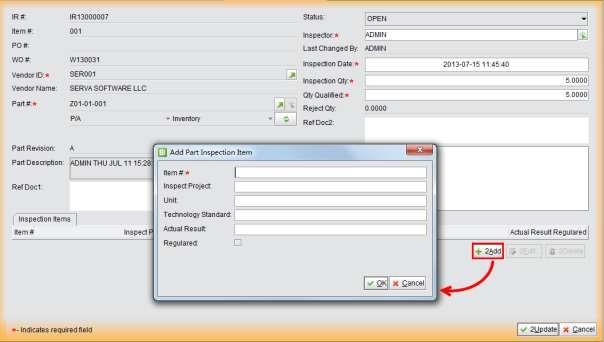 |
Inspection Items are essential to inform users of the inspection results of qualified parts. Fill in the “Inspect Project,” “Unit,” “Technology Standard,” and “Actual Result” according to the inspection standards of the specific product. You can add as many items as necessary here. When you are finished, click “2Update” to submit.
As for “A01-01-001,” add Inspection Content as in the previous steps. Now we come to the other important issue: how to handle the defected part A01-01-001? If you looked closely, you might have noticed a slight different between two Inspection Content Pages: On the page with “Reject Qty,” a button to “Create NCR” appears at the bottom left corner:
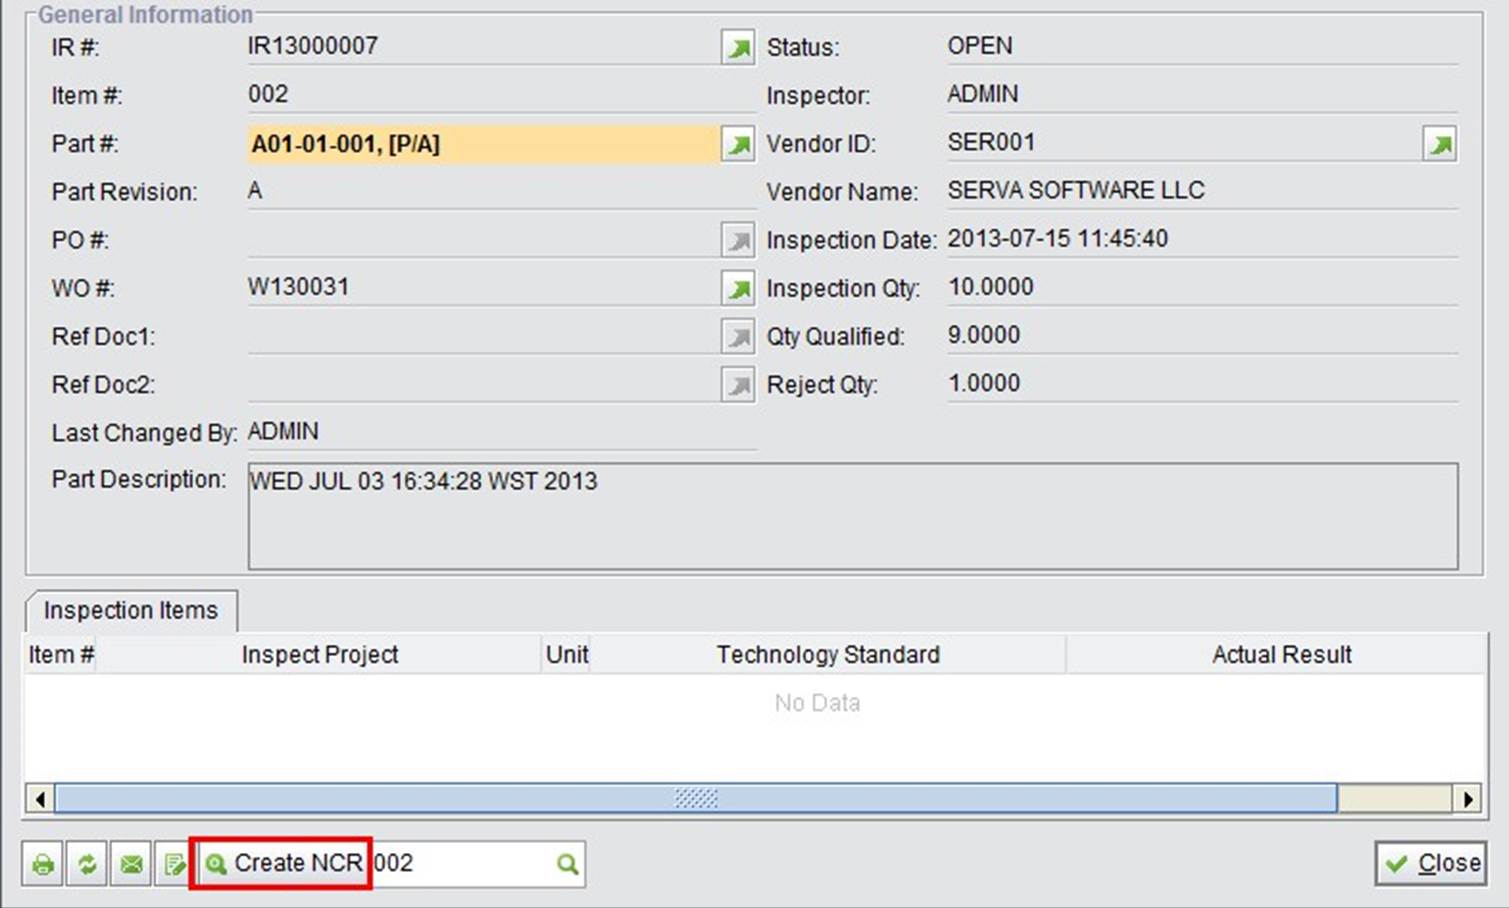 |
Click “Create NCR” to create an NCR to process the rejected quantity in the Inspection Report. This operation can also be completed in “Quality Box – NCR.” The detailed steps to create an NCR will be introduced later in the “NCR” Chapter.
In the previous chapter, we learned that after an Inspection Report is created, Inspection Content is required to notify which inspections have been completed for this part. For enterprises that have established a series of inspection content for their products, inspection type can be pre-defined by inspection content to lessen the labor when creating Inspection Reports. Below is the flowchart to add and apply for creating an Inspection Type.
Click “All Inspection Type” to view all Inspection Types in the system. At the search results, click “2Add” to add an Inspection Type:
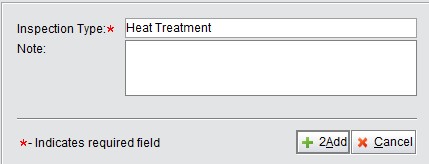 |
Fill in the name of the Inspection Type and click “2Add” to enter the “Update Inspection Type” interface:
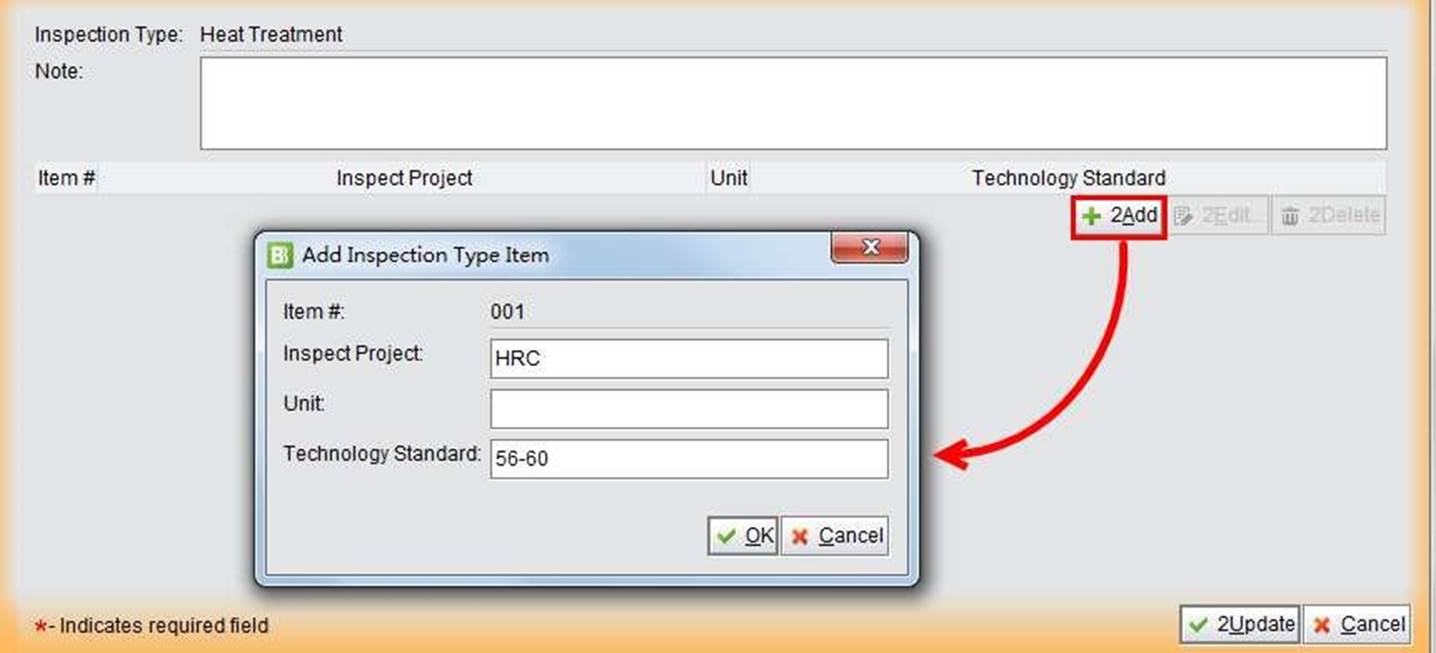 |
Here, you can add Inspection Content by Items. Click “2Add” at the right to add an Inspection Type Item.
Click “OK” to add an item and click “2Update” to finish this Inspection Type.
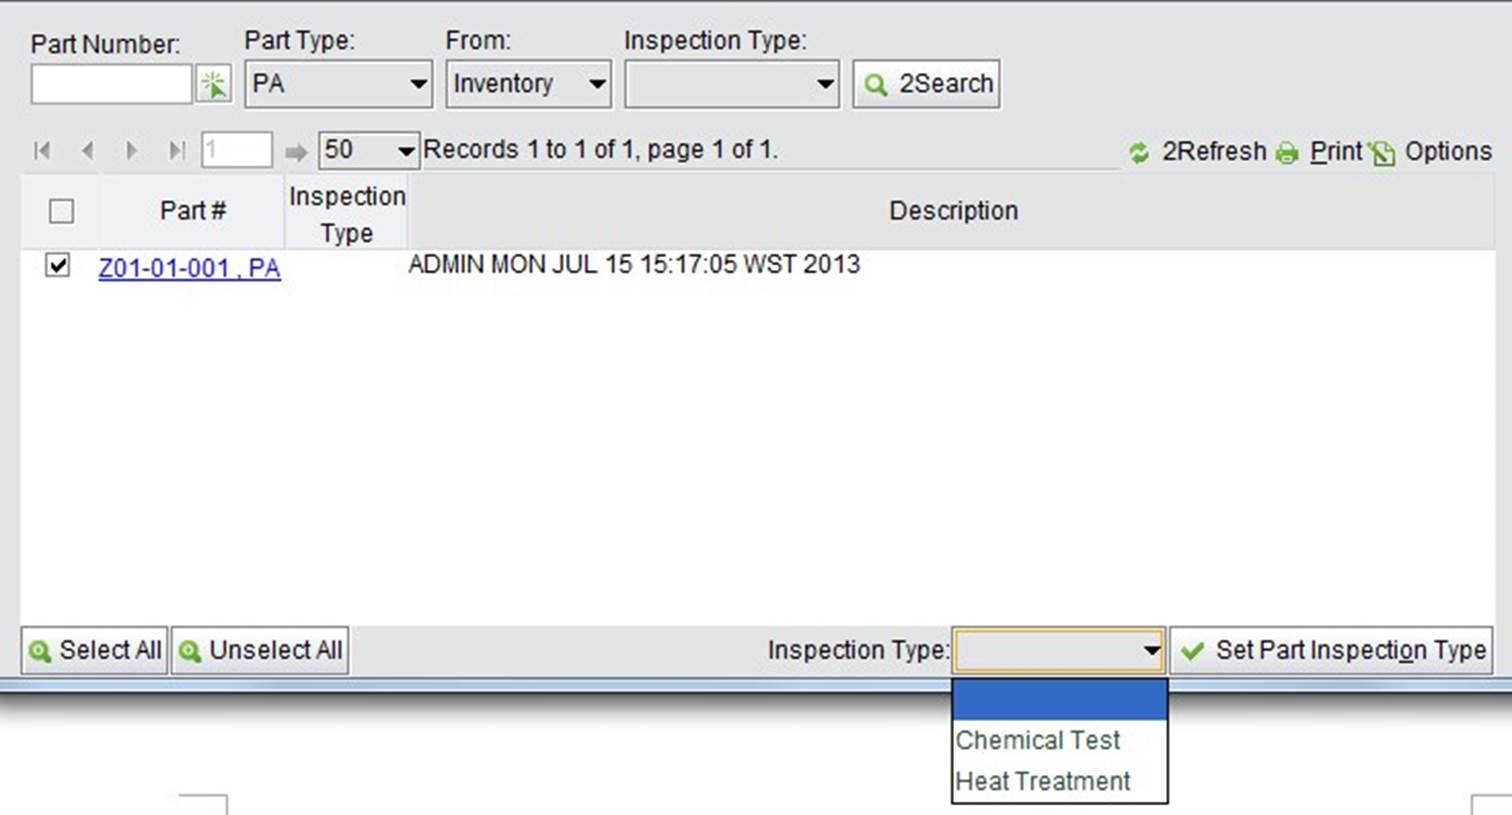
When an Inspection Type is added, you can use “2Search Part With Inspection Type” to set Inspection Types for Parts. If you have not set any types for parts, leave “Part Number” and “Inspection Type” blank, then click
“2Search Part with Inspection Type:”
Check the desired part, select an Inspection
Type at the bottom of the screen from the dropdown menu, and click “Set Part Inspection Type.” In this way, you have set a Part Inspection Type for part “Z01-01-001.”
 |
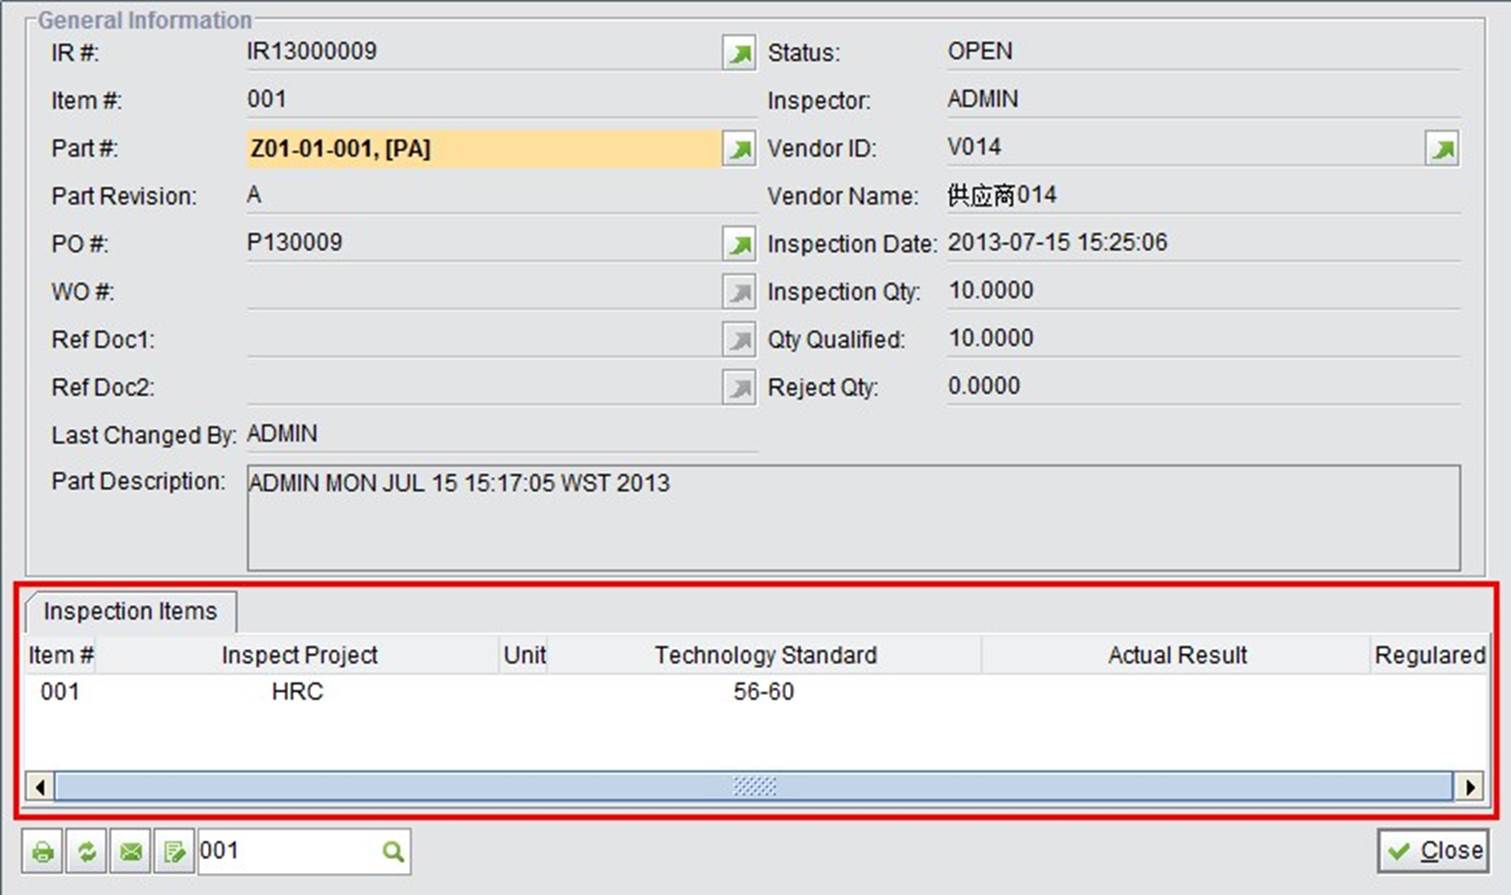
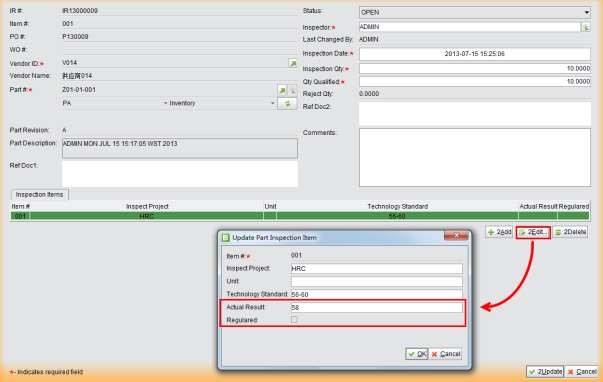
Suppose we have set the Inspection Type as “Heat Treatment” for “Z01-01-001,” and then make an Inspection Report for it. Upon opening the “Inspection Content,” you will see the Inspection Type Item that was just set for part “Z01-01-001” in the item list.
 |
Since Inspection Items have been added, inspectors can go directly to the update interface to fill in the actual inspection results for each item.
 |
In 2BizBox, the Inspection Content added into an Inspection Type is labeled “Public Inspection Content,” which means that any part that is set with this Inspection Type will follow the specified Inspection Content. However, some specific products will have specific Inspection Content, which belongs to the same Inspection Type, but is not applicable to other products. This Inspection Content is called “Private Inspection Content,” and it can be added through “2Search Part Inspection by Part#.”
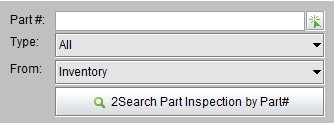 |
Click “2Search Part Inspection by Part#.” At the search results click “2Add” and fill in the Part # for which you want to set the Private Inspection Content:
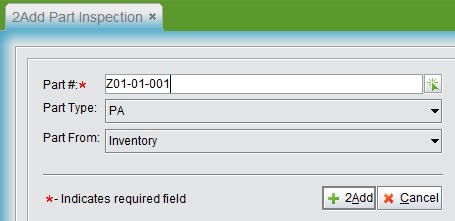 |
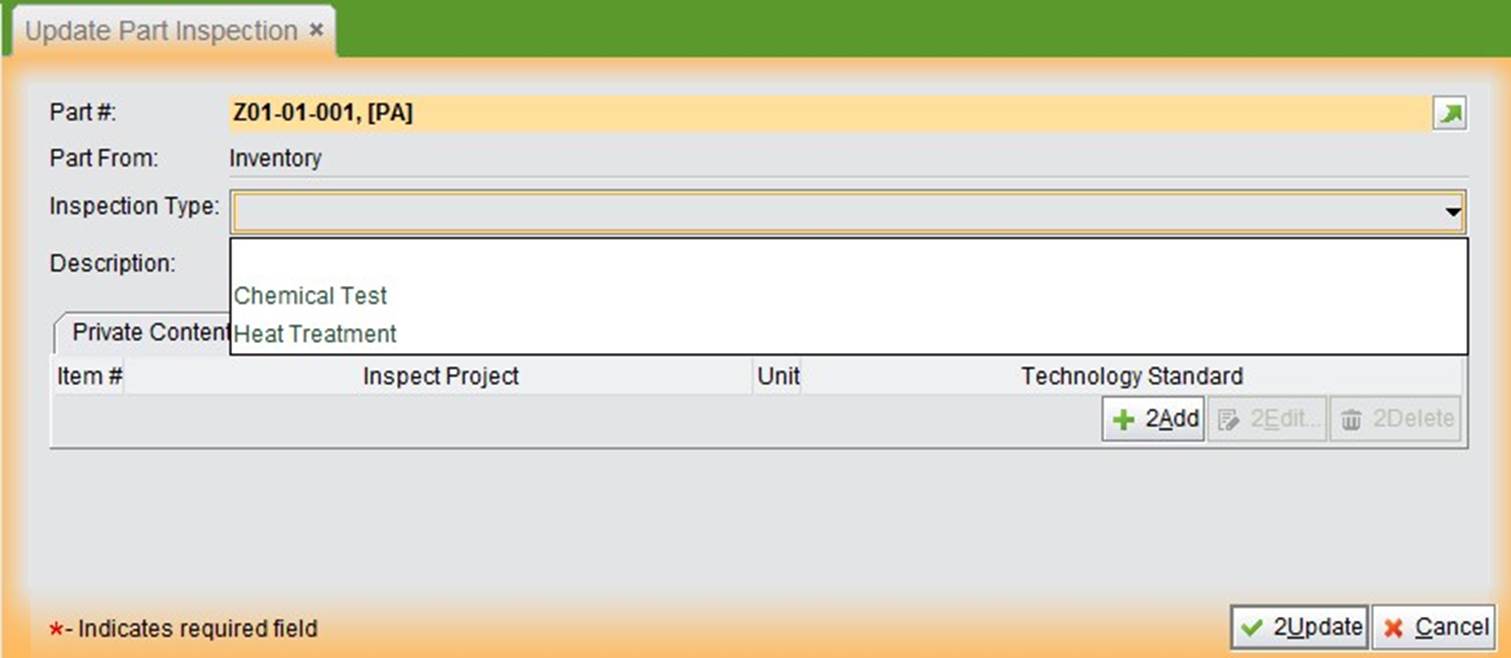
Click “2Add” to open the updating interface as shown below and select Part Inspection Type “Heat Treatment” from the dropdown menu, like we set for “Z01-01-001” before. In the “Private Content” box, click “2Add” to add private inspection content.
 |
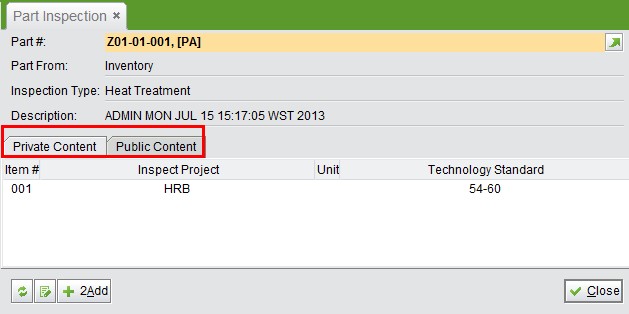
Finally, click “2Update” and return to the Part Inspection Interface, where you will see both the Private and Public Content of the part.
 |
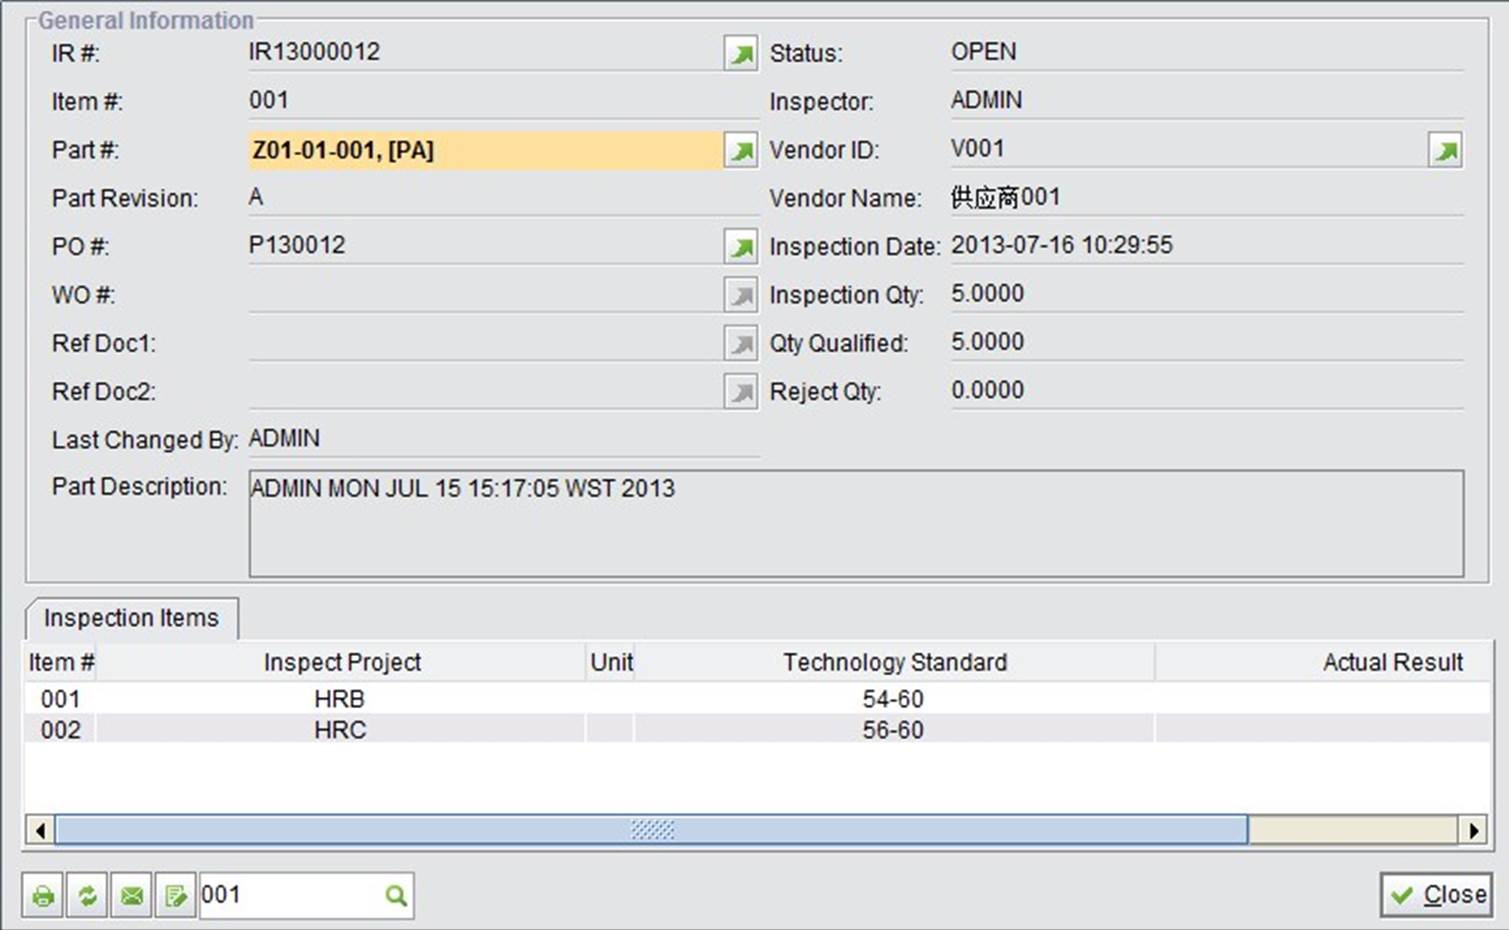
After creating an Inspection Report for “Z01-01-001” and viewing its Inspection Content, we can see both the Private and Public Items:
 |
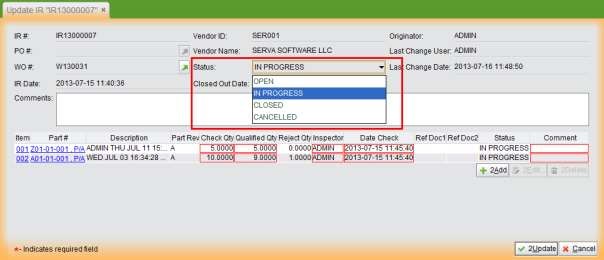
The status of an Inspection Report can be “OPEN,” “IN PROGRESS,” “CLOSED” or “CANCELLED.” The status of IR Items are the same. IR Item status should be updated as the inspection work proceeds. IR status changes with the item status, e.g., when Item 001 is OPEN and Item 002 is IN PROGRESS, IR status is OPEN; when both items are IN PROGRESS, IR status will become IN PROGRESS too. When both of the items are CLOSED, IR status will become CLOSED and the system will record the “Closed Out Date.”
 |
In the IR sub module, we provide various ways to look up and search IRs.
This is the basic look up function. Fill in the complete IR# and click the button to view an IR.
This is the basic search function. Fill in the keywords of an IR# and click the button to search for related IRs.
This is the search function to search for IRs by IR vendor ID. The Vendor of an IR refers to the Vendor of its PO/WO.
This is a comprehensive search function.
This is a function to search for Part Inspection Type by Part#. It can also be used to define Part Private Inspection Content.
Click this button to view all Inspection Types in the system. At the search results, you can add Inspection Types.
This is a function to search for Part Inspection Types by Part# and Inspection Type. At the search results, you can set Inspection Types for the part.