2BizBox® Manual |
Go back to 11.0 Main |
Work Instruction, also called Job Router, describes how to perform a task. It is the procedure to process raw materials and semi-finished products to finished products. In 2BizBox, a Work Instruction can be added to Parts and Tools. Each Work Instruction contains several sequences to finish the Part/Tool. In each sequence, a Work Center must be assigned to indicate the required equipment.
Work Instruction is an advanced implementation stage of 2BizBox. It requires Serva Software LLC to do careful research and collect more manufacturing data before successful implementation.
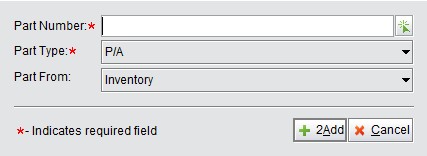
Click “2Add WI” on the “General” tab under “Manufacturing Box – Work Instruction” to open the “Add WI” interface:
|
You are required to fill in the Part Number and Part Type of this Work Instruction. If you want to add the WI of a Tool, choose “Part from Tool Room.”
 |
Click “2Add” to create a Work Instruction for this part and the “Update Work Instruction” interface will open:
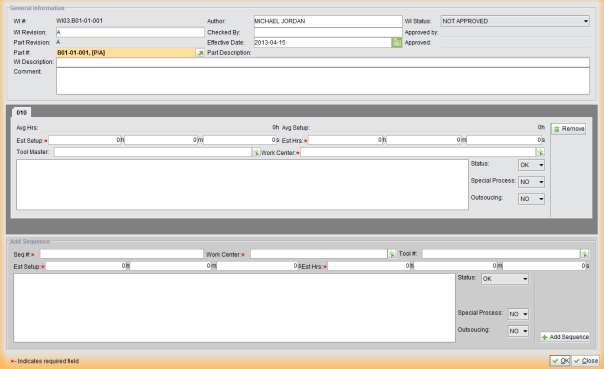 |
The upper part of the “Update Work Instruction” interface contains the general information of this WI. The parameters to be filled in are listed below:
 |
WI#: The format of a Work Instruction Number is “WIXX.Part#,” in which XX represents the sequence number of the part’s WI, counting from 01. When you add the second WI for a part, the WI# will be “WI02.Part#.”
WI Revision: If this is the first WI of a part, the default Revision is A. If the WI Revision differs from Part Revision, the WI Revision will turn red to alert you.
Part Revision: Show the part’s revision.
WI Description: Add the WI’s description here.
Author: Fill in the WI’s author. By default, the author is the current user.
Checked By: The WI needs to be checked when it is created. The system will record the checker here. You can also fill in or revise the WI Checker here.
Effective Date: Set the WI Effective date in the calendar.
WI Status: Manually set the WI status here.
Approved by: Indicate who approved the WI.
Approved: Enter the WI’s approval time. ![]() Comment: Add WI comments here.
Comment: Add WI comments here.
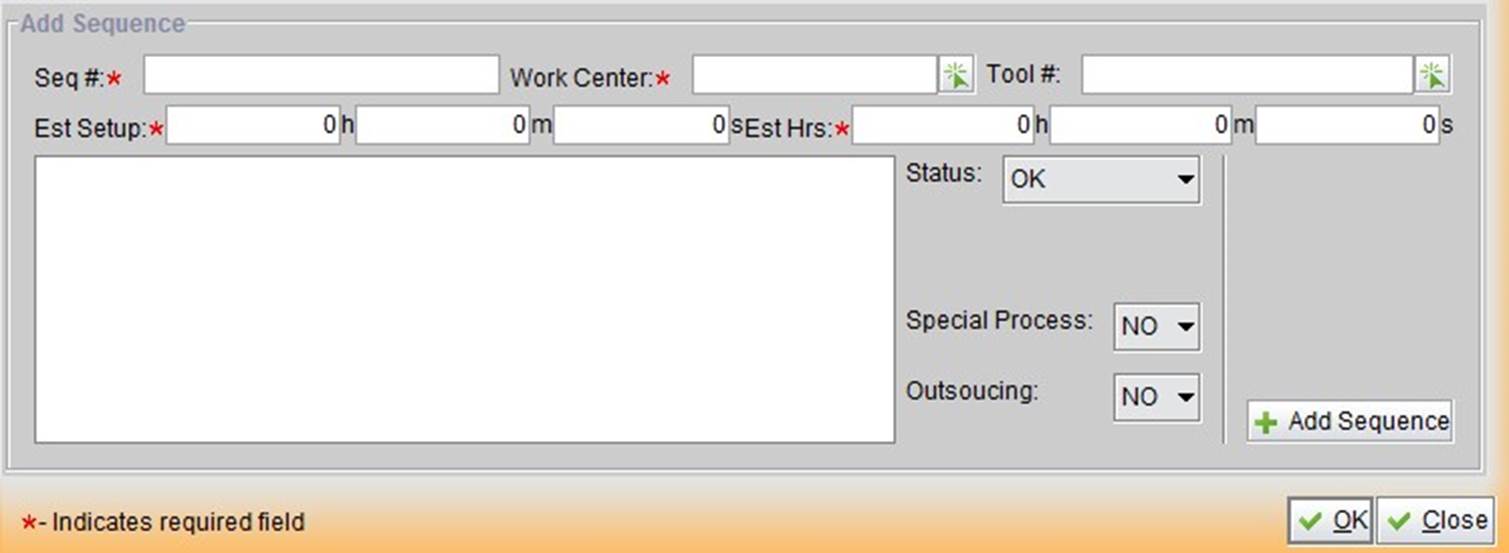
Next, you need to list all steps to be taken to complete this work instruction. We call these steps a “Sequence.” A Work Instruction can include as many sequences as needed. The default first sequence number is “010,” and we suggest that you set the second sequence number as “020.” This way, if you need to insert extra sequences in the future, you can number them “011,” “012” to keep the sequences in order.
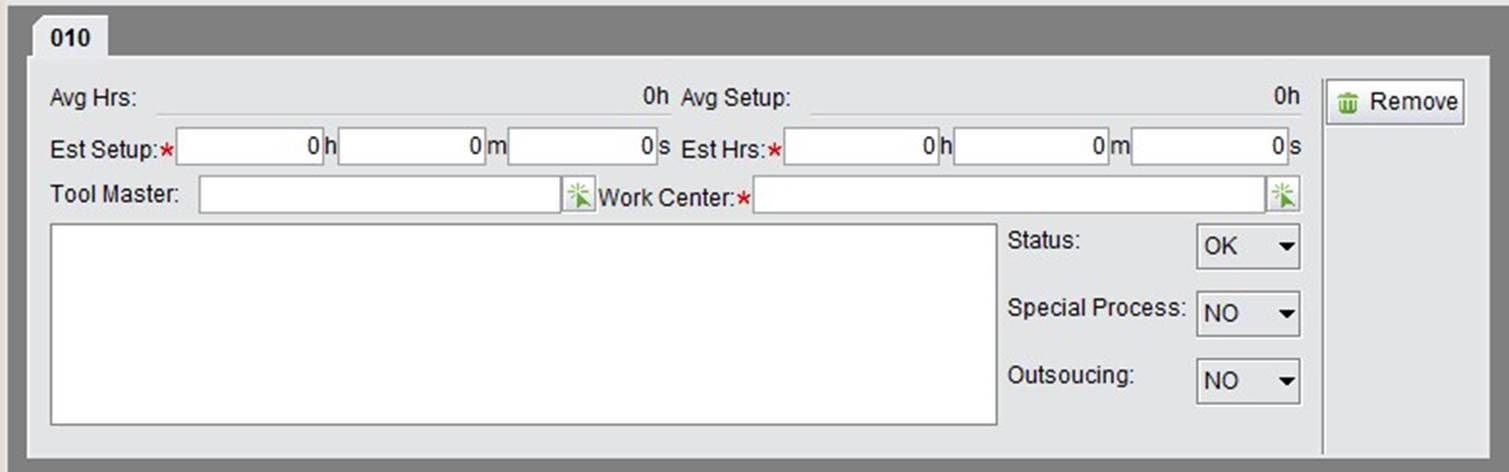 |
In the blank area, you can fill in the detailed instructions of this sequence. The other parameters for this sequence are explained as follows:
When the first sequence is filled out, click “OK” at the bottom right corner to save it. To add other sequences, continue to enter information in the following frame. Then click “Add Sequence” to add a new sequence.
 |
When all the Sequences are added, click “OK” to submit this Work Instruction. A new WI’s status is “NOT APPROVED.”
When the Work Instruction is submitted, you can add files to each sequence and the WI document.
To add files to a sequence, click “2Add File” on the relevant sequence in the WI Property interface. For instance, you can add an assembly diagram for an assembling sequence and print it with the Work Instruction for workers to use on the shop floor.
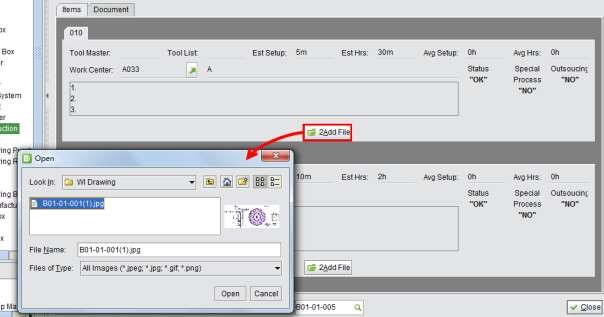 |
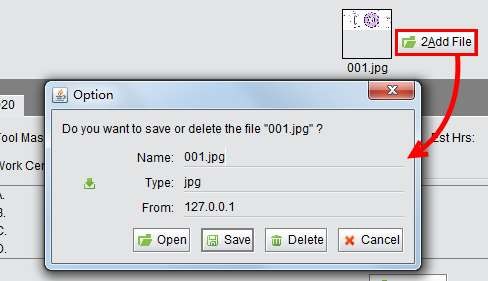
The added files will be shown in the sequence. You can click to open, save or delete them:
 |
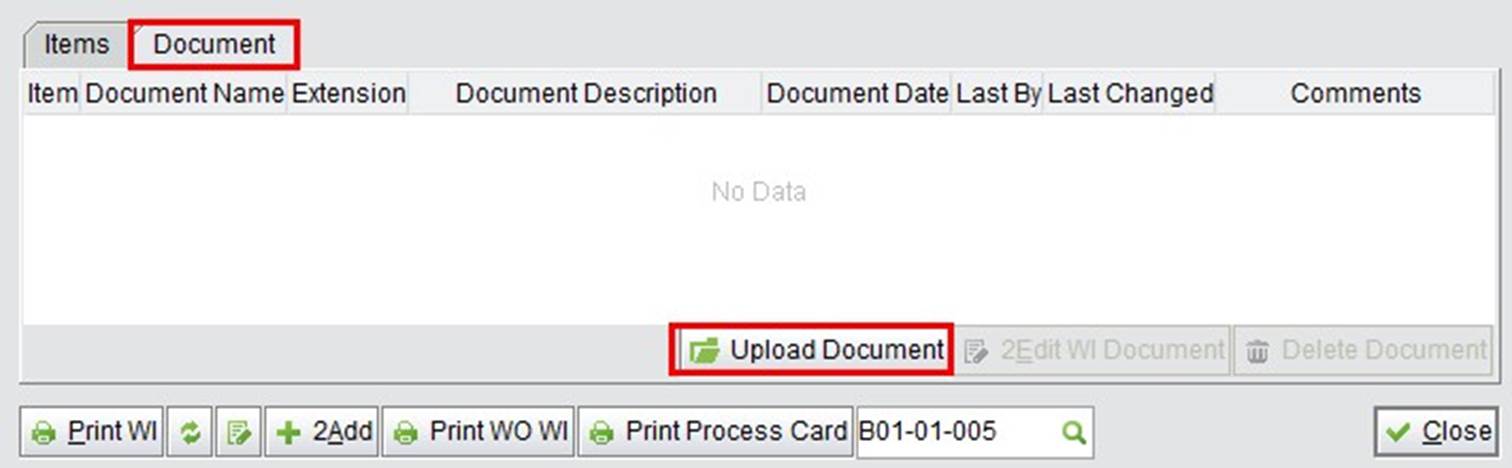
WI Documents are a guide to the whole Work Instruction. Open the “Document” tab and click “Upload Document” to add a WI Document:
 |
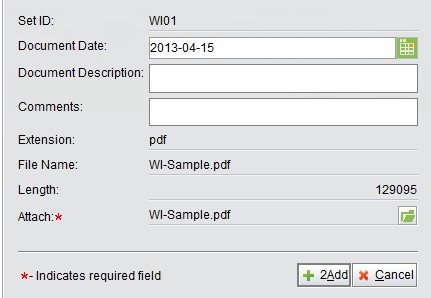
The uploading interface is shown below. You need to fill in the document date, description, and comments.
Click the “![]() ” button to select a document. Before uploading documents, set up the uploading path in the “Document Box.” Please refer to the relevant chapters for a guide on how to set up steps.
” button to select a document. Before uploading documents, set up the uploading path in the “Document Box.” Please refer to the relevant chapters for a guide on how to set up steps.
 |
Click this button to print this Work Instruction as a PDF or XLS document.
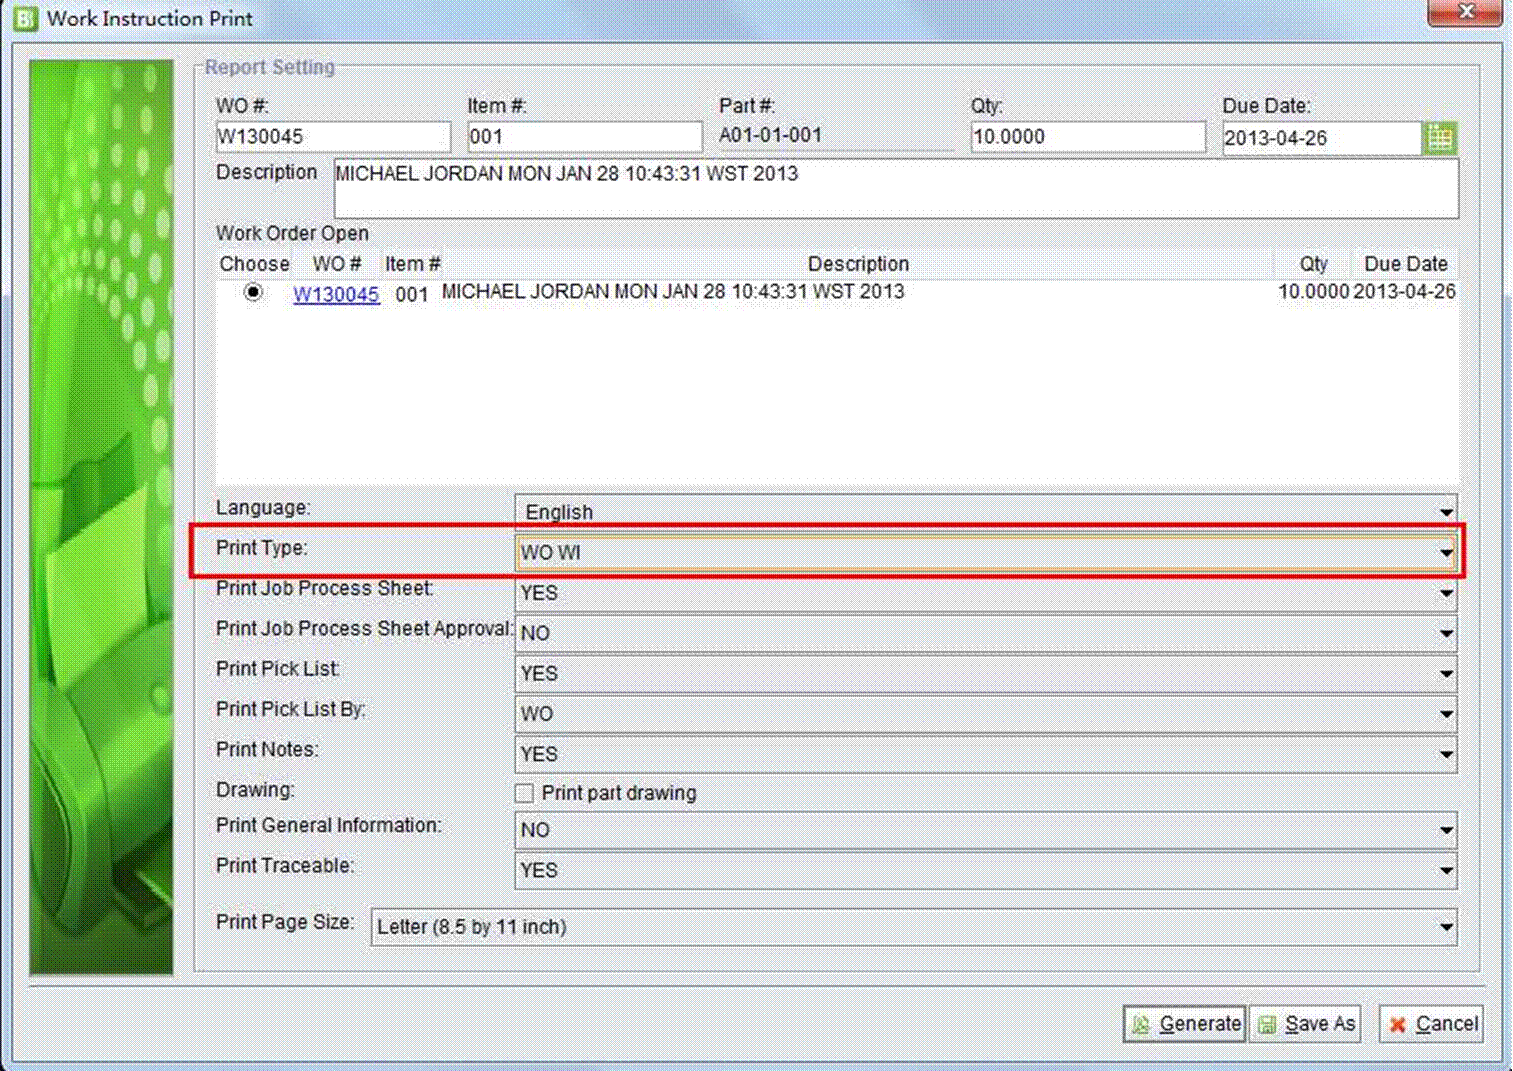
WOWI (abbreviation for Work Order Work Instruction) is the specified WI for a Work Order. Printing a WOWI will show information about the WO and WI together. Click “Print WO WI” to open the settings interface, where all the WOs that used this WI are listed. To print a WOWI, select the Work Order you want to print and choose “WO WI” in Print Type. If you select “WI,” the printing result will show WI information only. Other printing options can be set here, e.g., to print a “Job Process Card” or a “Pick List.”
 |
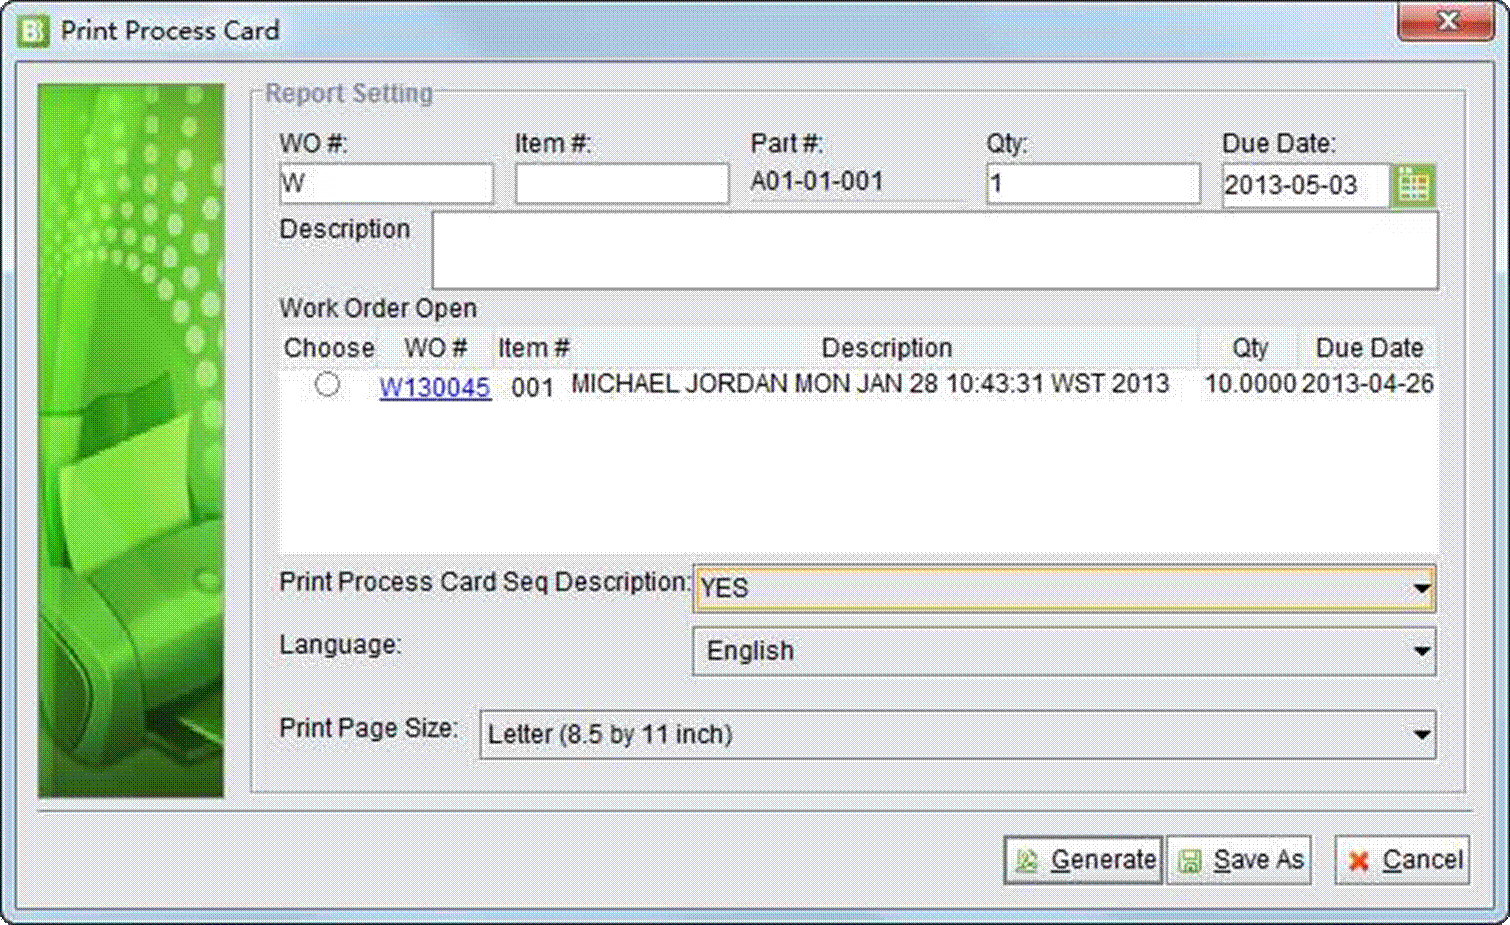
Click “Print Process Card” to print the Process Card of a WI for workers to use on the shop floor.
 |
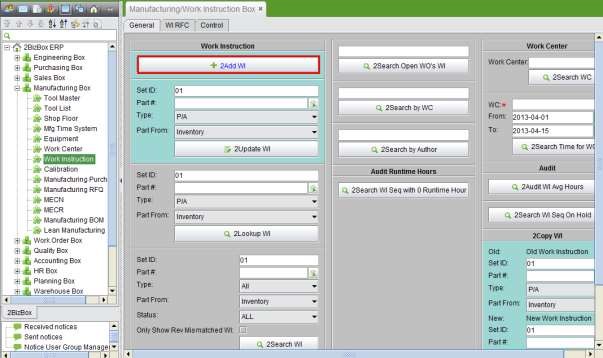
Click the “Edit” button at the bottom of a Work Instruction to update it. Under the “General” tab, you can quickly update a Work Instruction by clicking the “2Update WI” button. The “Set ID” is the ID of the Work Instruction.
 |
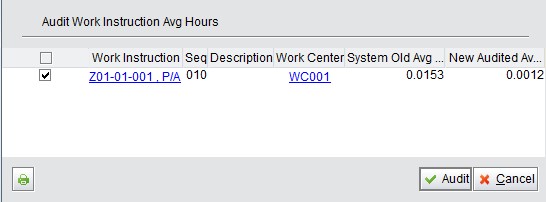
Click this button to list all sequences in which the Estimated Setup Time and Estimated Hours add up to Zero.
Average Hours of a sequence are calculated by the time details collected in a time card. Mistakes happen during long-term operation and data transfer. Clicking this button will cause the system to re-calculate the Average hours of Work Instructions by the Time Details.
In the auditing results, check the item that you want to audit and click “Audit” at the bottom right corner. This will adjust the old number of average hours to the new one.
 |
When updating a Work Instruction, the status of each Sequence can be either “OK” or “ Hold.” Click this button to search for WI Sequences on hold. In search results interface, click “√” to view WI details.
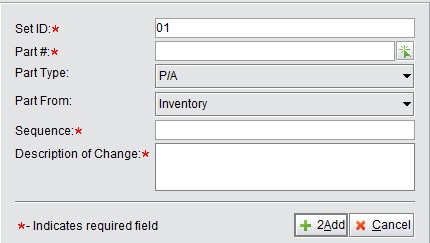
If you are going to create a Work Instruction that is similar to an existing one, this function allows you to copy the existing WI to the new part.
In the picture to the right, “Old Work Instruction” is your copy source. Fill in the Set ID and Part #, then click “2Copy WI” to start copying.
If the new part has no Work Instruction, you’ll be guided to the
“Update Work Instruction” interface. If the new part has a Work Instruction already, you will be warned to cover the old one. Click “Yes” to confirm cover, and open the “Update WI” interface.
Under the “General” tab of the “Work Instruction” sub module, you can look up and search for Work Instructions in various conditions.
This is the basic function to look up a Work Instruction. Fill in the Set ID and Part Number (Tool Number), select Part Type (Tool Type) and Part from (Inventory/Tool Room). Click this button to view the described Work Instruction.
This is the basic search function to search for Work Instructions by Set ID, Part Number. Part Type, Part from, and WI Status. If you check “Only show Rev Mismatched WI,” search results will list Work Instructions for which the WI Rev is inconsistent with the Part Rev.
This is a function to search for Open WO’s WIs by the WO’s Due Date. Set up the time range for the WO’s due date and click this button to get the matched Work Orders. You can click the “√” button in the “WI” column to view this WI. Click “Print” at the end of the line to open the WOWI printing interface.
This is the function to search for open WO’s WIs by keywords of Work Order #. At the search results, click the “√” button in the “WI” column to view this WI. Click “Print” at the end of the line to open the WOWI printing interface.
This is the function to search for Work Instructions by related Work Center. Fill in the keywords of a Work Center# to search. Search results will list all matching Work Centers. Click the“√” button in the “WI” column to view this Work Instruction.
Fill in the Author and click this button to search for all Work Instructions of this author. At the search results, click “Summary” to view the WI summary, or “Detail” to view the WI details.
This is the basic function to search for a Work Center by its ID.
This is a function to check the Work Center Load for a period of time. Select the appropriate Work Center ID and time range to view the results. It will tell you the amount of time until the due date of the Work Order, the incomplete quantity of the Work Order, the summary time that hasn’t been set up, etc.
The revision of a part is controlled by ECN and ECR. The revision of a Work Instruction, though not controlled as strictly as a part, should be the same as the Part. If you want to revise the Revision of a WI, you need to submit a WI Request for Change.
In the “Manufacturing Box – Work Instruction – WI RFC” interface, click “2Add WI RFC” to add a request. You need to fill in the WI#, Part#, Part Type, Sequence#, and Description of Change Request:
 |
Click “2Add” to open the updating interface as follows:
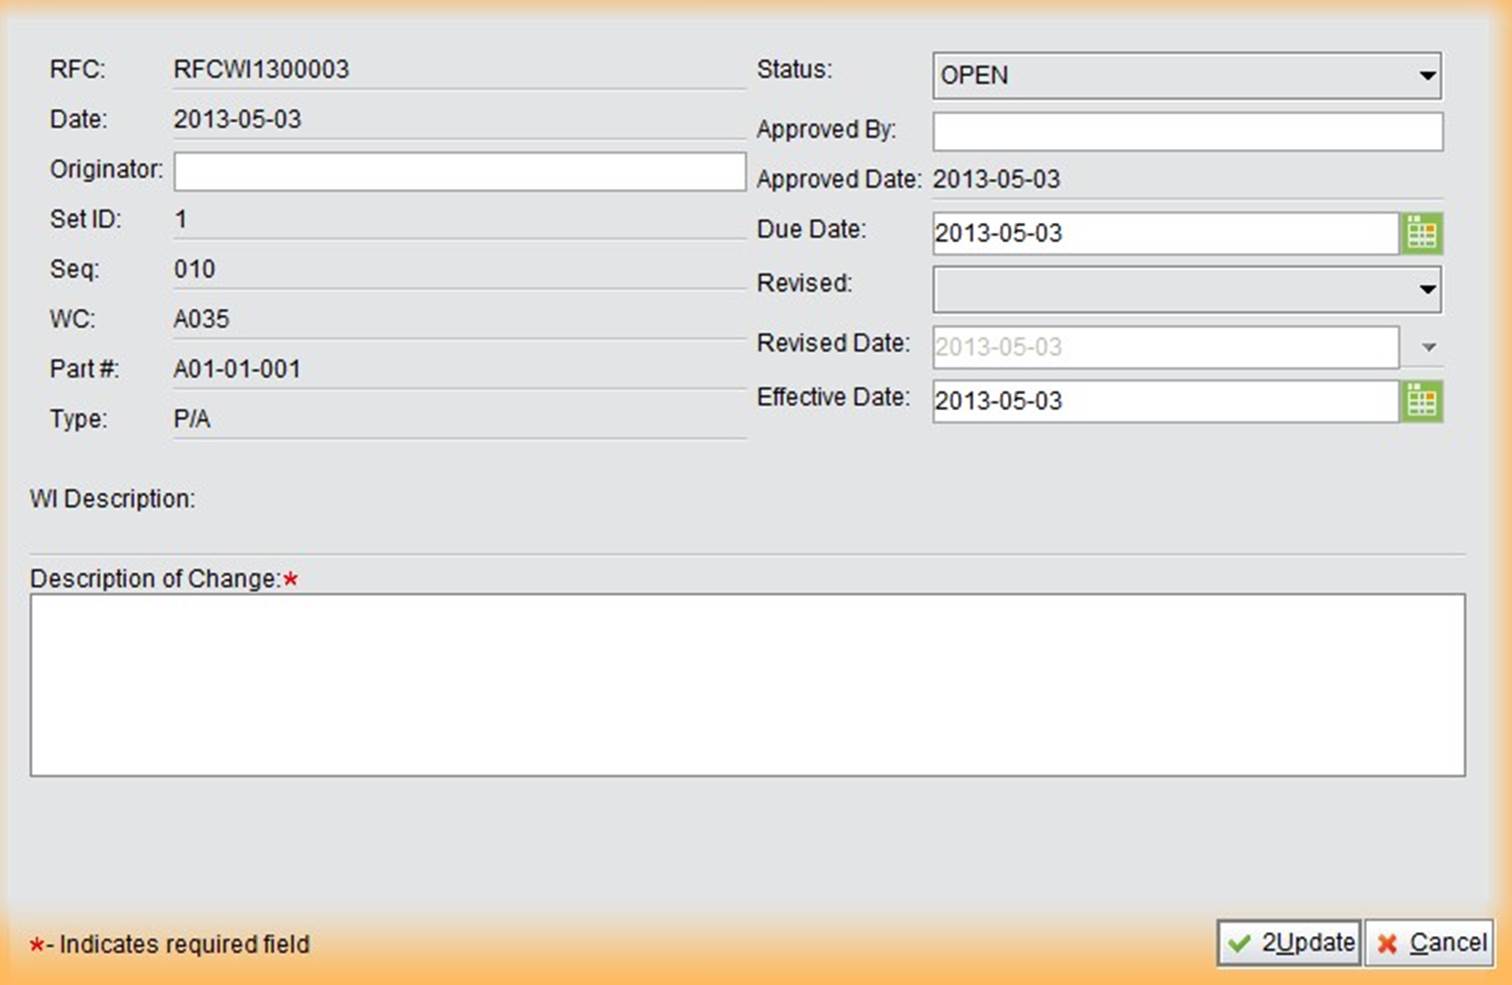 |
Fill in the required information and click ‘2Update” to submit this request. Currently the WI RFC doesn’t require approval.
You can look up and search for a WI RFC in various ways in the “Manufacturing Box – Work Instruction – WI RFC” Interface.
This is the basic function to look up a WI RFC. Fill in the accurate WI RFC# and click this button to open it.
This is the basic function to search for a WI RFC by its number. Fill in the keywords of the WI RFC# and click this button to search for all related WI RFCs.
Click this button to view WI RFCs that have passed their due date.
Click this button to view all “OPEN” status WI RFCs.
In the “Work Instruction – Control” interface, you can assign Approval permissions for WIs. Currently, it is not compulsory to approve a WI before it is put to use.
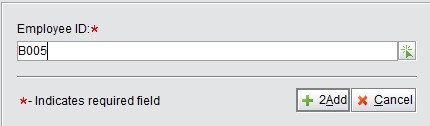
Click the “2Add WI Approval” button to add a WI Approval. Select the Approval Employee ID:
 |
Click “2Add” to update this Approval:
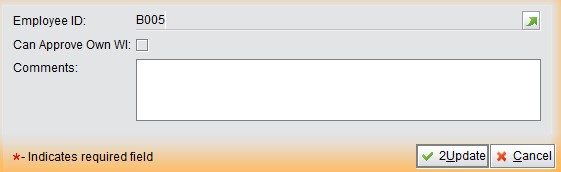 |
Can Approve Own WI: Indicate whether employees are allowed to improve their own WIs.
Comments: Add comments here.
Click “2Update” to finish.
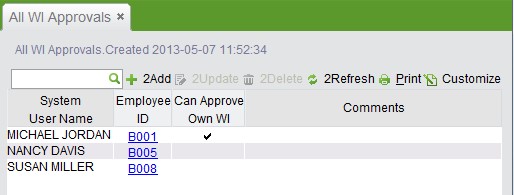
Open the “All WI Approvals” tab to view all WI Approvals in 2BizBox.
 |