2BizBox® Manual |
Go back to 10.0 Main |
A material backflush refers to a special type of material issue in a Work Order. Normally, materials are issued to a Work Order at a time based on actual usage. However, single-issue transactions can be time-consuming and may not be necessary for low-cost, high-volume items where the variance is negligible. In these situations, a backflush transaction can save time, but still capture the usage of materials on a Work Order.
2BizBox provides two versions of material backflush: pre-flush and back-flush.
A pre-flush transaction issues materials to a Work Order automatically when a Work Order is set up. In other words, materials are “picked up” from inventory in advance of the actual production in the system. In this way, MRP will reflect material shortages in advance, so as to push purchasing activity.
A back-flush transaction issues materials to a Work Order automatically when the Work Order is received. In other words, the materials will be deducted from the system after they are consumed in actual production. It is an optimistic management method to assume that there are enough materials. Usually, a minimum inventory should be set to avoid shortages of backflush materials.
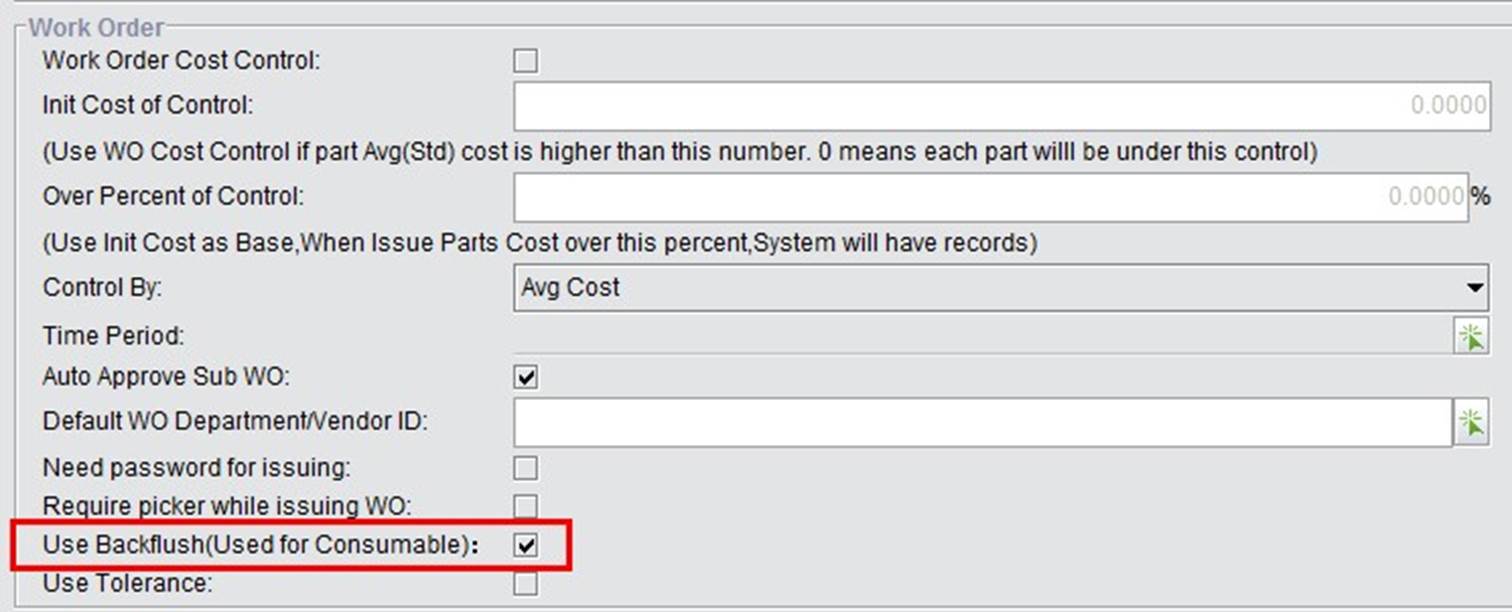
The Backflush function is closed by default. Go to “Control Panel – Company Settings – Work Order” and check “Use Backflush” to enable this function.
|
After you enable Backflush, a “Backflush Part” option will appear when your parts are updated.
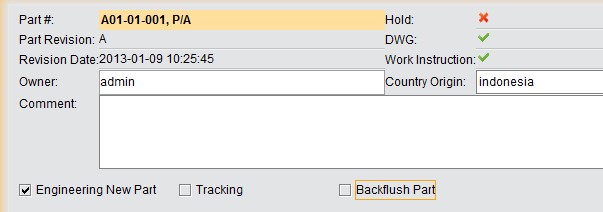 |
If you check “Backflush,” you may select the backflush type for this part:
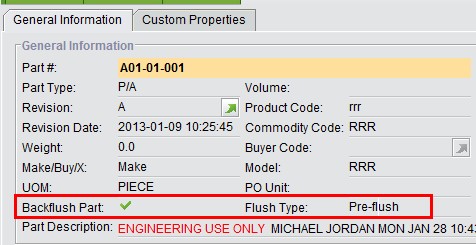
Click “2Update” to submit changes, and the flush information will appear in the part properties:
 |
Due to the special issuing methods of backflush materials, a special location in the warehouse is required to store backflush materials. In real production, a “Floor Store” is used to store backflush materials. For this reason, in 2BizBox, we continue to use the concept of a “Floor Store.”
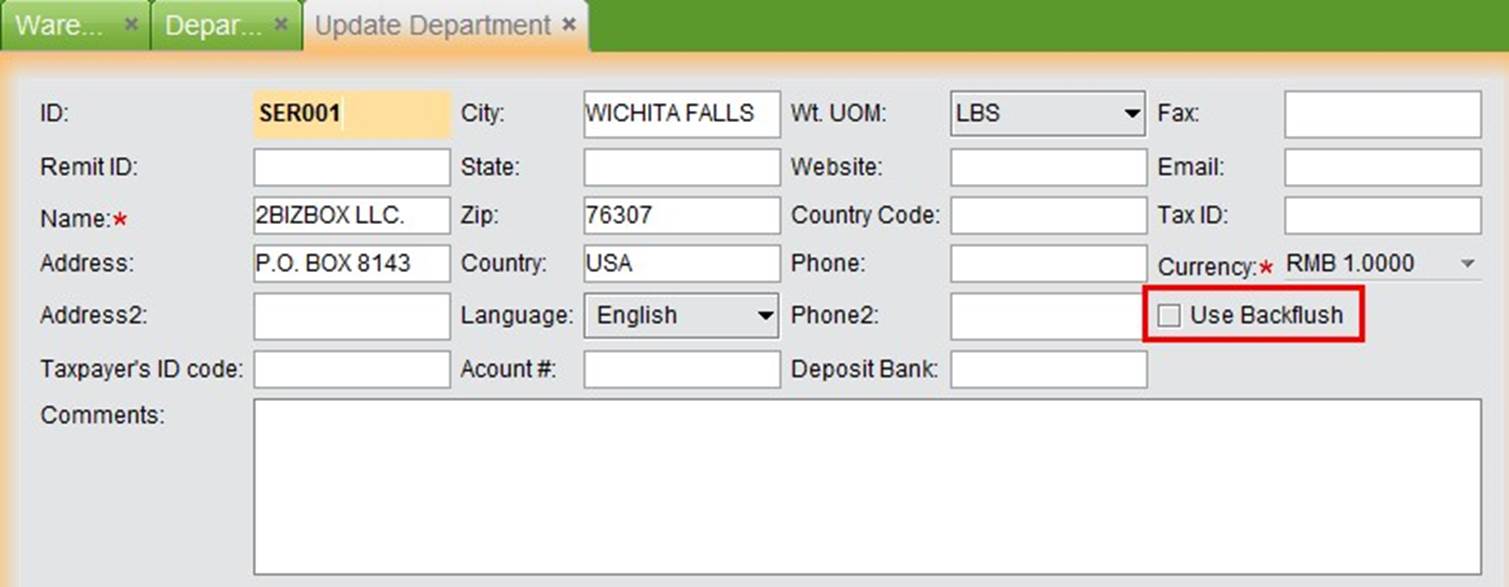
Because the Work Order is executed by the Manufacturing Department in 2BizBox, the “Floor Store” is also set up by this Department. Therefore, before a Floor Store is set up, the Manufacturing Department should enable the “Backflush” function. To do this, go to the “Update” interface of a Department, check “Use Backflush” and update the department.
 |
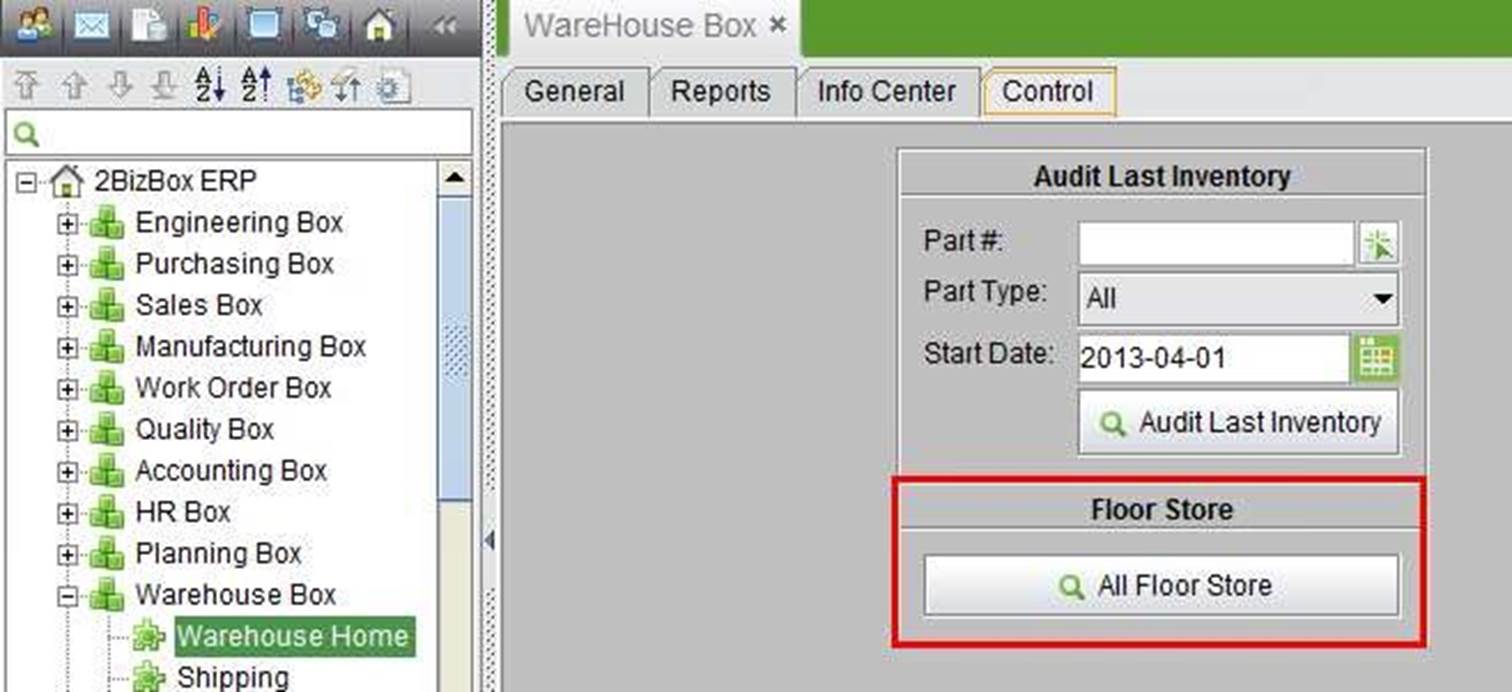
Click the “All Floor Store” button under the “Control” tag in “Warehouse Box – Warehouse Home” to start setting up the Floor Store.
 |
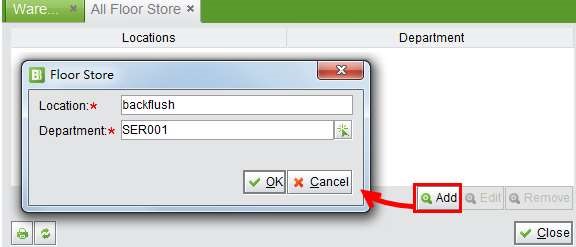
Here, you need to add backflush locations for each department that uses the backflush function. Click “Add” and fill in Location Name and Department ID in the pop up window, then click “OK” to complete the adding.
 |
Now we can create a Work Order to see how the “Pre-flush” and “Backflush” functions work.
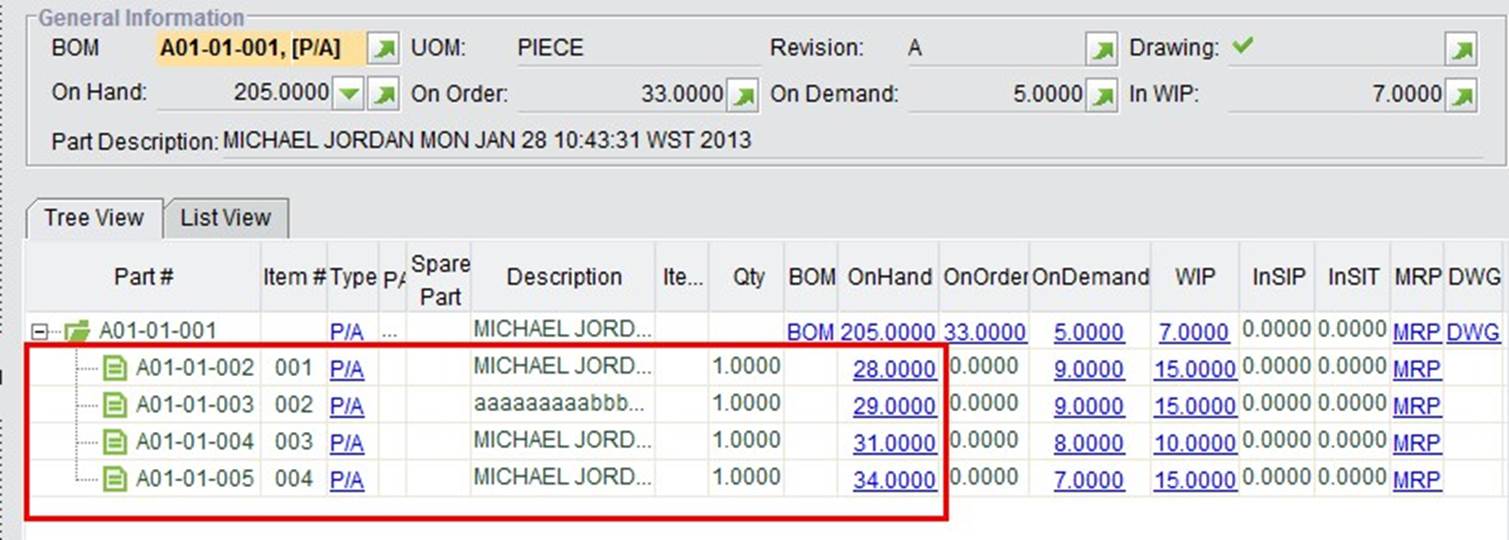
Let’s look at Part A01-01-001. The BOM Level is as follows, in which A01-01-002 is a Pre-flush Part, and A01-01-004 is a Backflush Part.
 |
Now, we will create a Work Order for A01-01-001 and set it up.
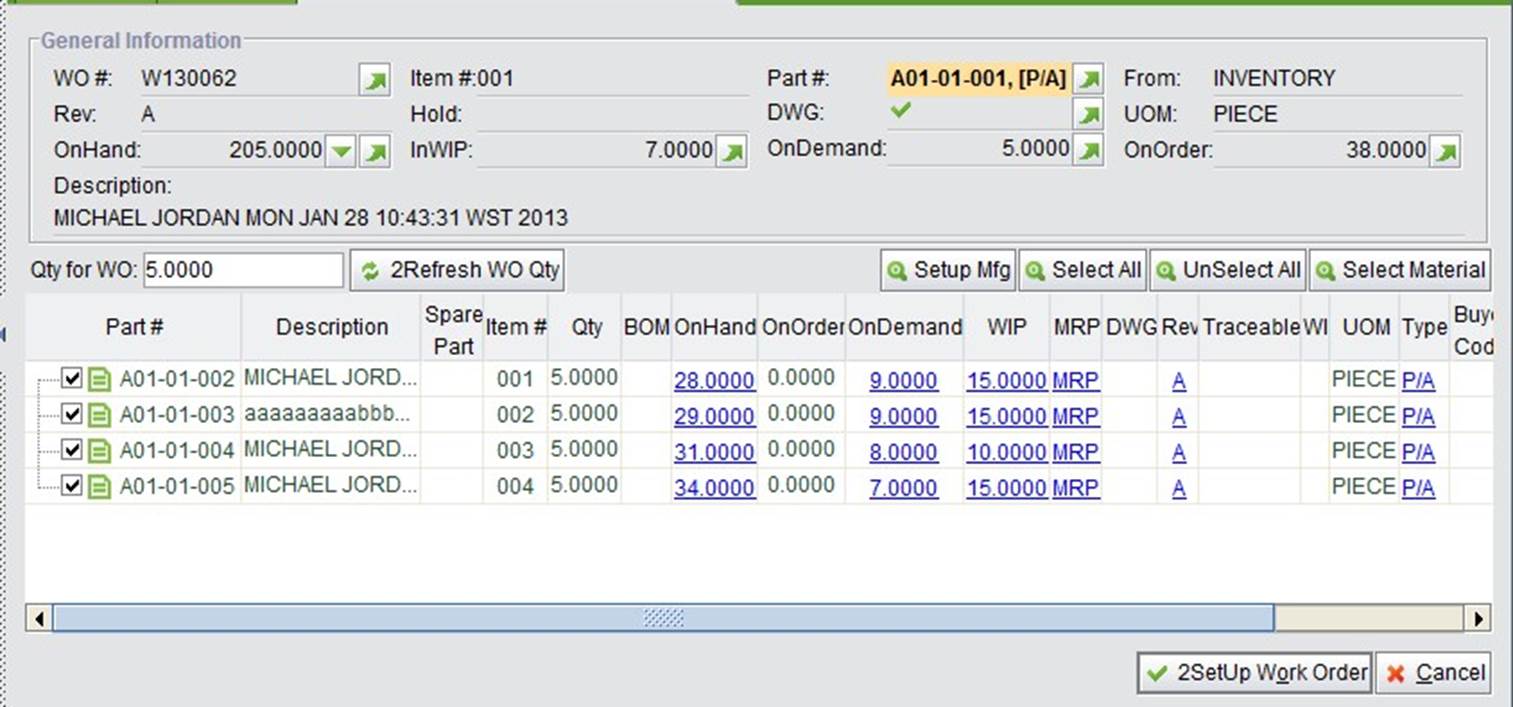 |
By clicking the “2SetUp Work Order” button, the Part Detail Interface will open. Taking special note of Issued Parts, you will find that Pre-flush Part A01-01-002 has been issued in advance.
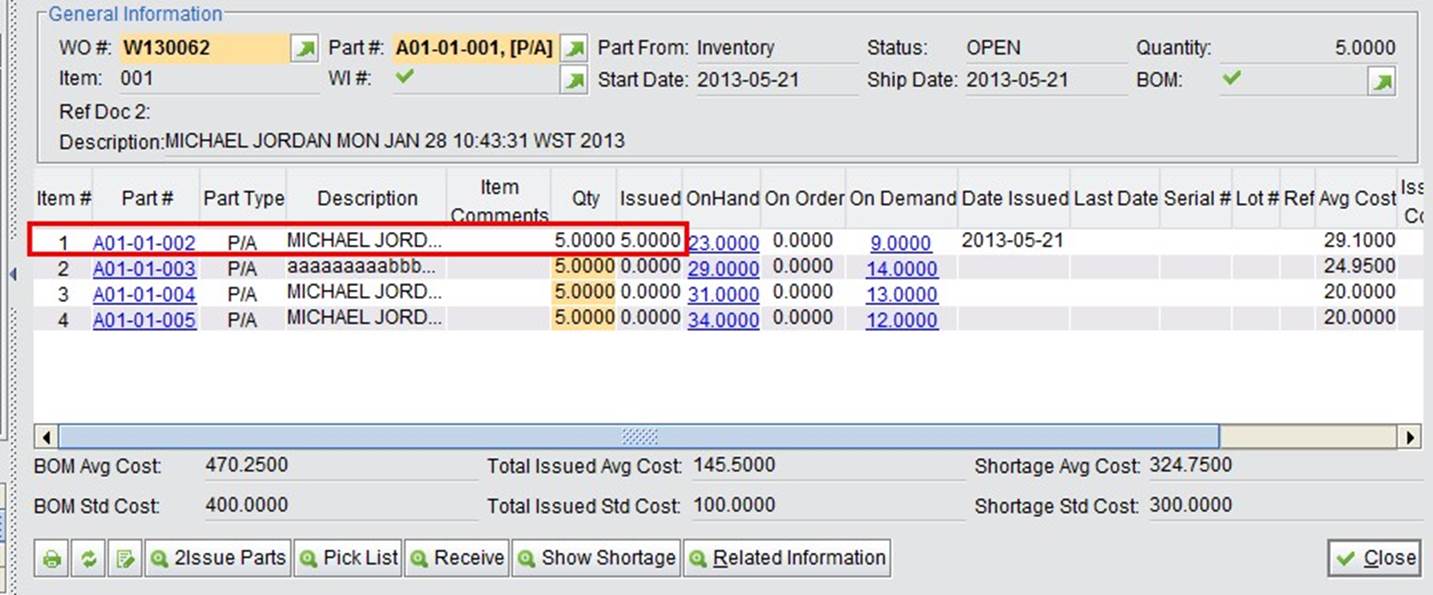 |
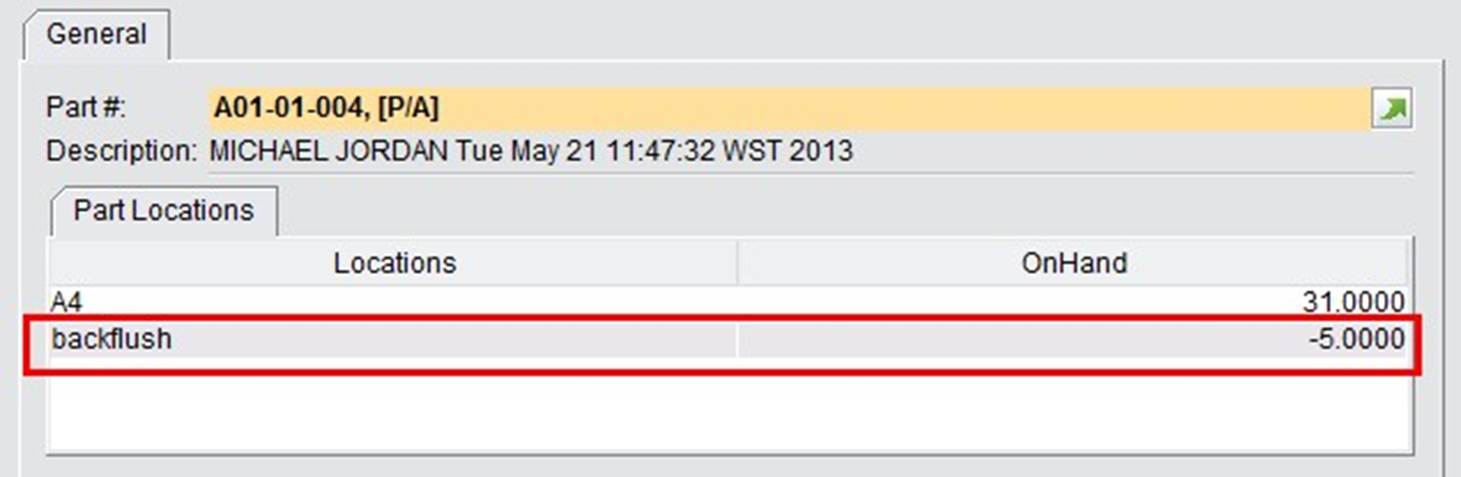
Now, click A01-01-002’s inventory. You will find that a “Backflush” Location is automatically created and the Location quantity is “-5.”
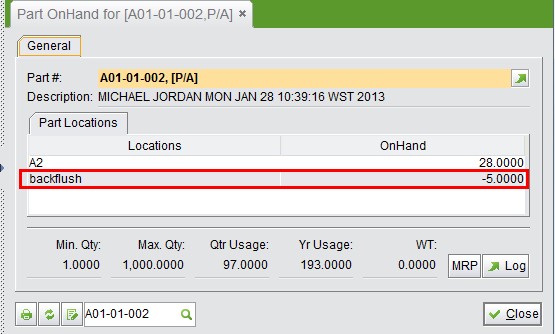 |
Next, issue the remaining parts for this Work Order as usual. In the issuing interface, both “pre-flush” and “backflush” parts will not appear:
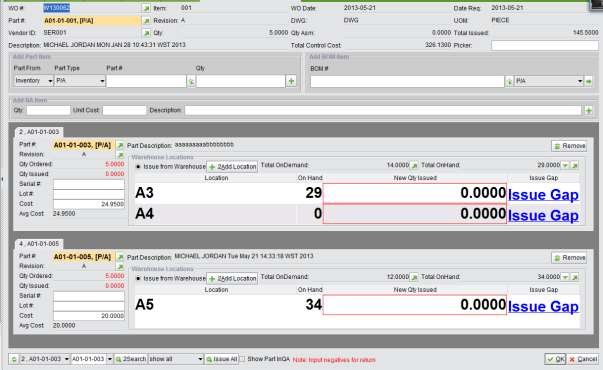 |
Return to Part Detail and click “Receive” to receive this Work Order, leaving A01-01-004 not issued.
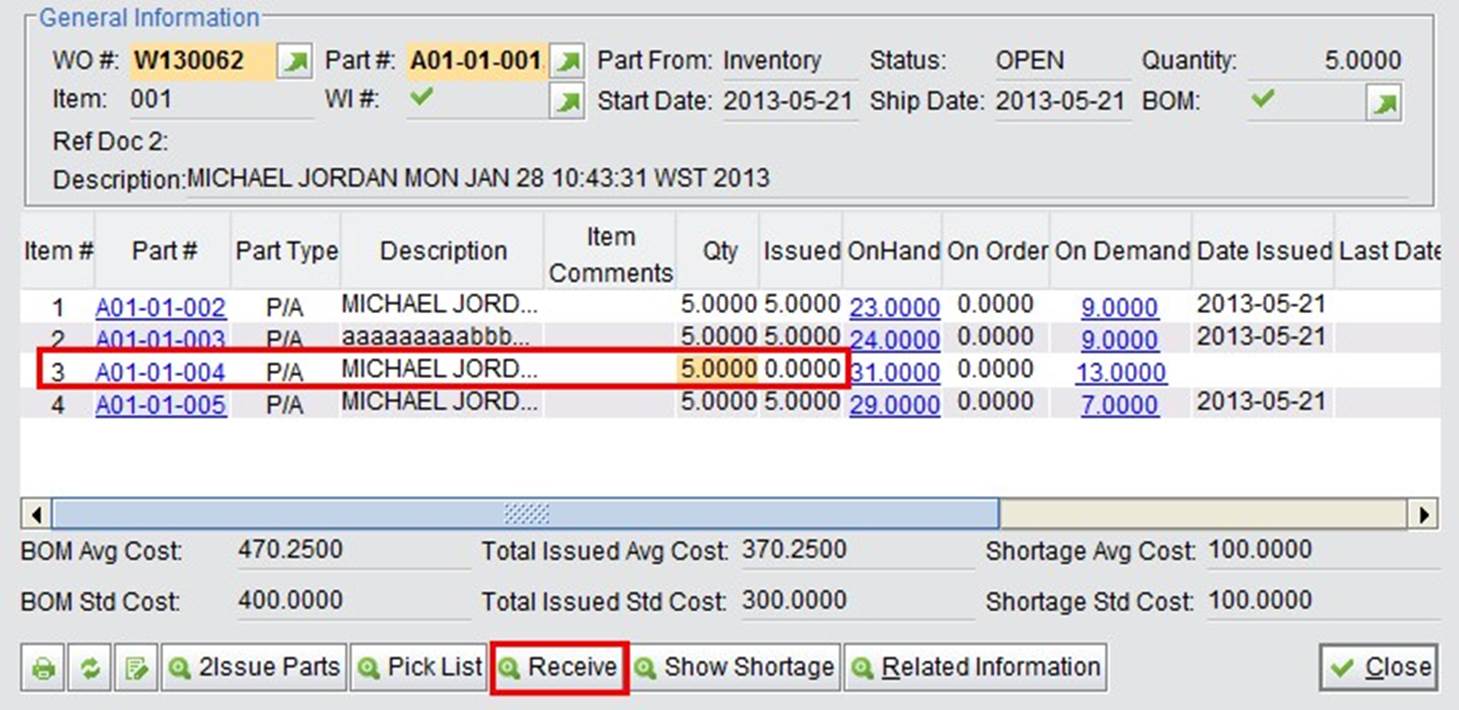 |
The Backflush Part A01-01-004 will be automatically issued when the Work Order is received. At the same time, a “Backflush” Location is created.
 |
Above we demonstrated the workflow of backflush materials in a Work Order. Part inventory can be moved to the “backflush” location by transfering orders.
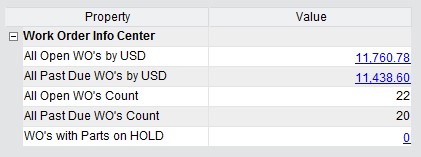
The Info Center of the Work Order sub module provides statistics of the WO quantity and amounts of different statuses. Under the “Info Center” tab in “Work Order Box – Work Order,” you can view these statistics in reports and charts.
Click “Work Order Info Box” to open the info centre. Properties and Values are explained below:
 |
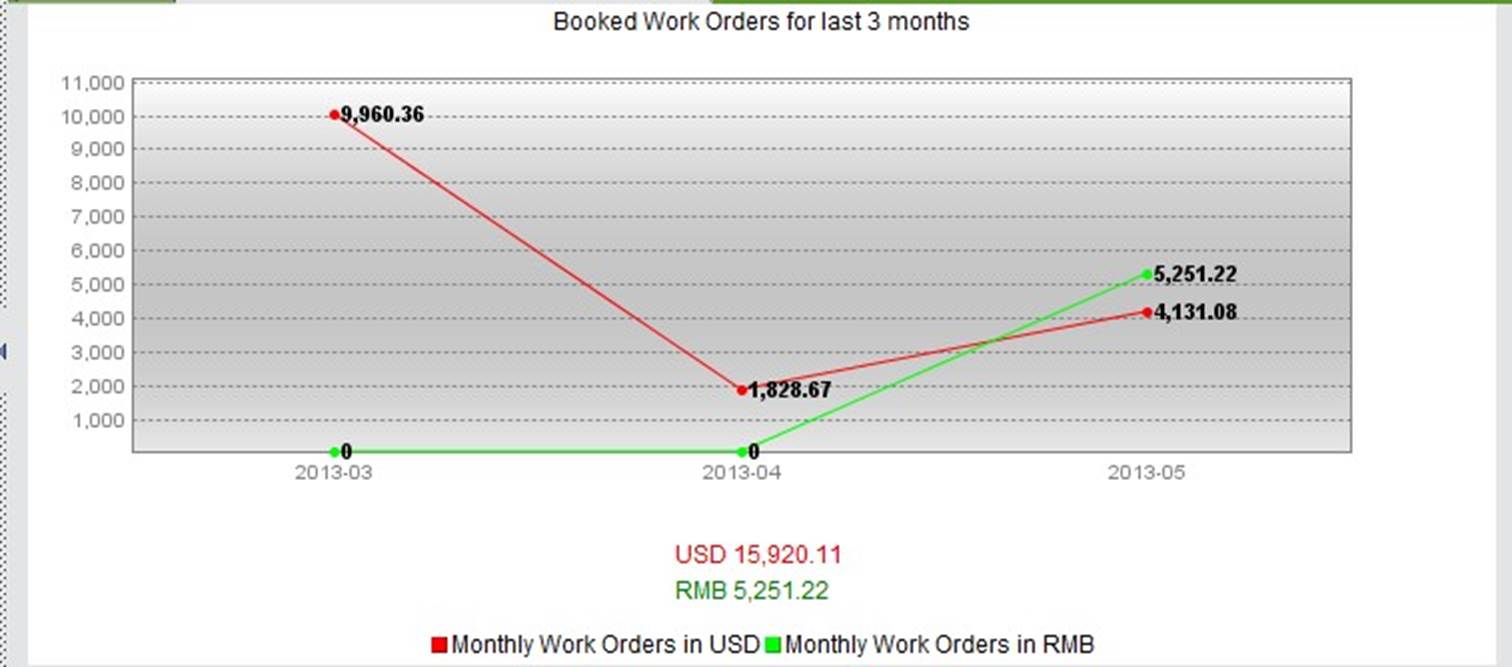
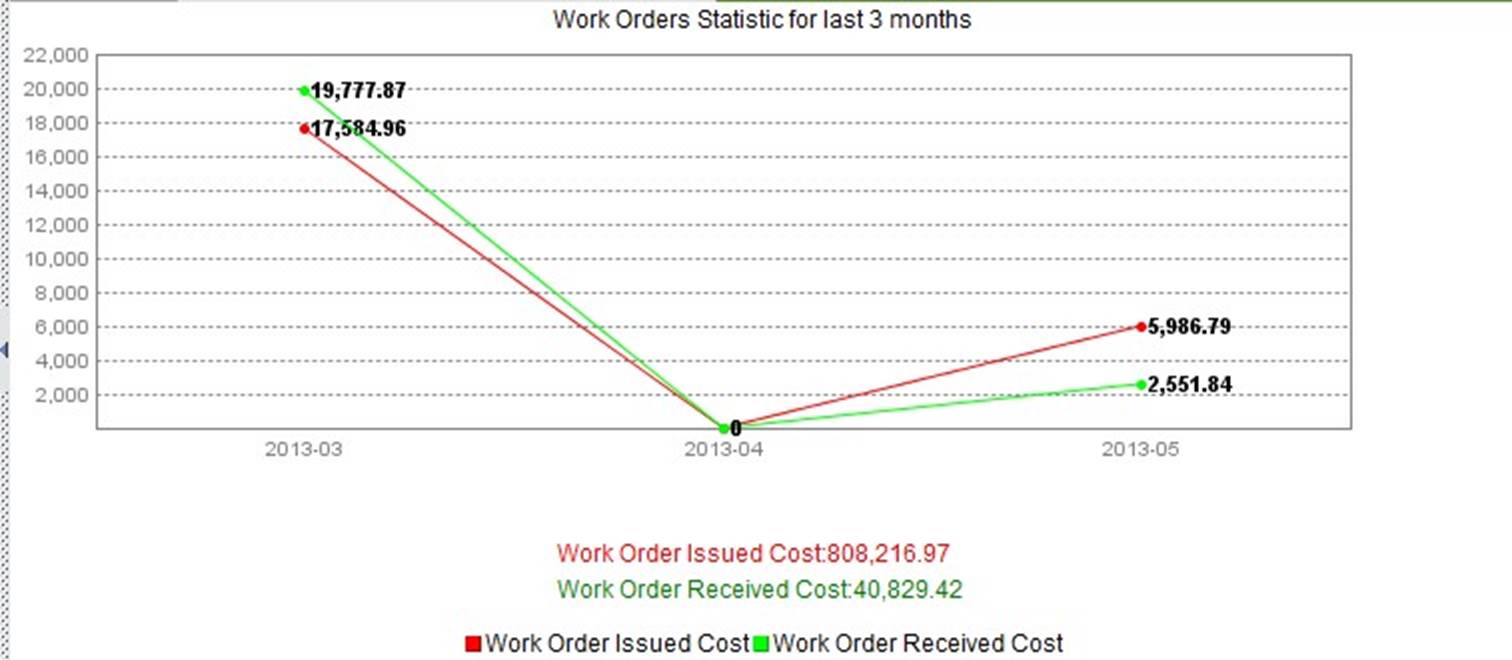
This chart shows Work Order amount by month. You can define a monthly quantity to check. For example, if Serva Software LLC wants to see the WO Amount in the past 3 months, enter the number 3 in the textbox and click “Number of the Month.” The X axis represents Month and the Y axis represents the WO amount for that month.
 |
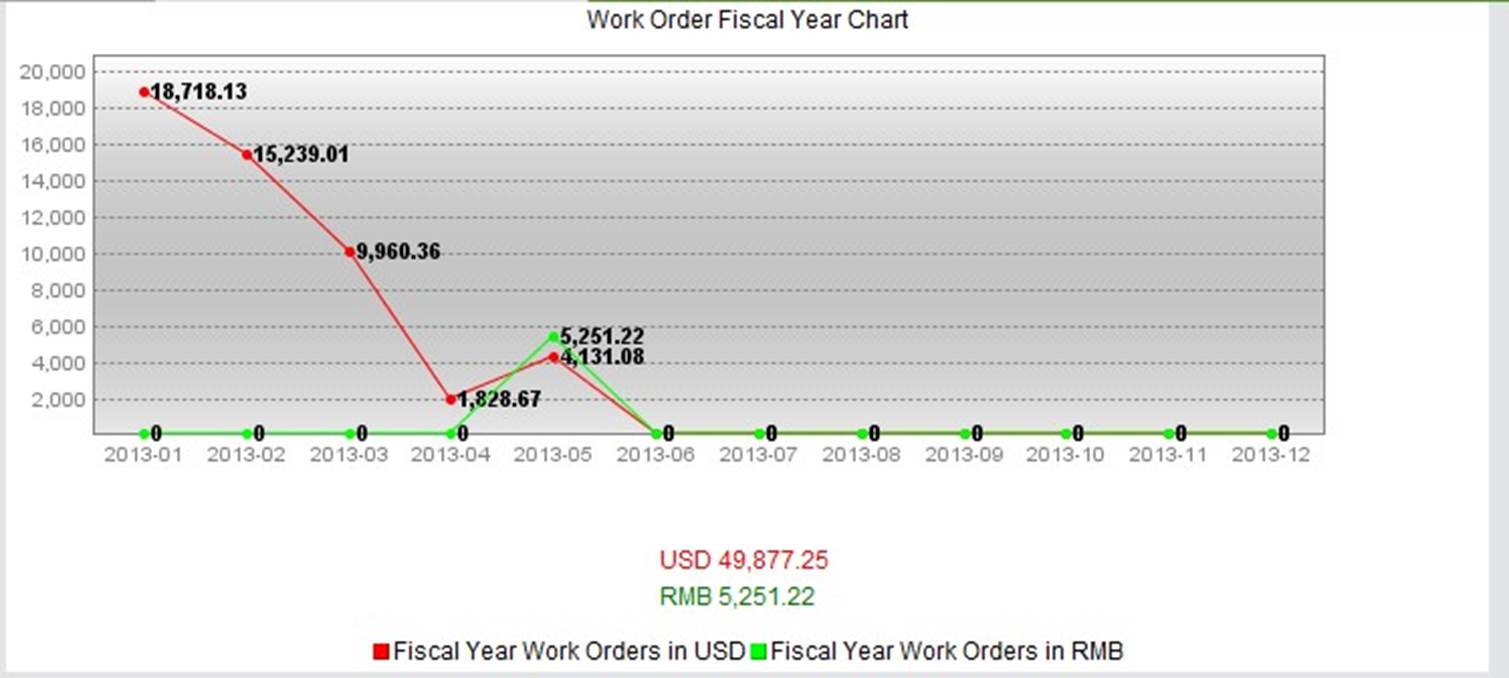
Click this button to view the last 12 months’ WO amount for the current fiscal year.
 |
Fill in the month quantity to view the recent months’ Work Order Issued Costs and Received Costs.
 |
Under the ”Control” tab, you can add WO Approval and WO Boilerplate.
Users with Work Order Approval have the permission to approve Work Orders and Work Order change requests. To add a Work Order Approval for an employee, click “2Add WO Approval” and select an employee ID:
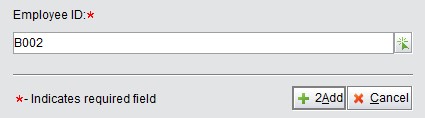 |
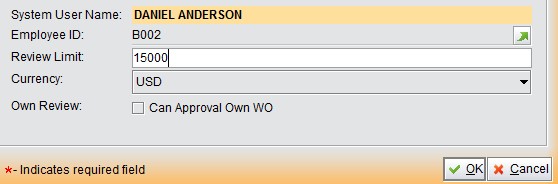
Then click the “2Add” button to open the update page in which you can set the Review Limit, currency, and whether to give permission to review the user’s own Work Order. Click “OK” to submit your decisions.
 |
By clicking “All WO Approvals,” you can view all WO Approvals in the system. In the search results, you can edit and delete selected WO Approvals.
 |
This function allows users to quickly add BP Items when updating Work Orders.
Click “2Add WO BP” to open the adding interface. Here, fill in the ID, description and content to finish the boilerplate.
This is a lookup function. Fill in a complete WO BP ID to look up this boilerplate.
This is a search function. Fill in the keywords of a WO BP ID to search for boilerplates that meet the criteria.