2BizBox® Manual |
Go back to 10.0 Main |
The Work Order sub-module is the first and most important module in the Work Order Box. Before startup, several questions need to be answered about the Work Order.
What is a Work Order?
A Work Order, also called a Production Order, is the paper or electric form that defines production tasks. It commonly covers three aspects:
Why need Work Order?
Products vary from company to company, or even between different departments in the same company. There are products made from simple materials but very complicated routings, products with massive BOM levels that make problems for material issuing, or products with both independent production and outsourcing. Solutions to these production problems require two prerequisites: a sound and effective production plan and strict but flexible Work Order Management.
What can be done with a 2BizBox Work Order?
This question will be answered throughout this chapter. To make it simple and clear, the basics of what you can do with a 2BizBox Work Order are listed as below:
Plan |
|
Prepare |
|
Production |
•Run MRP •Make Work Order through Work Sheet |
•Work Order •Sub - Work Order •Work Order Setup |
•Material Detail •Issue Material •Receive Product |
Now we will explain how to go through a complete Work Order from making the WO, setting up the WO, issuing materials and finally receiving the products.
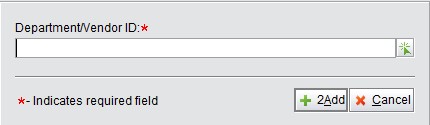
When a manufacturing task is assigned, you can start adding a Work Order under the “General” tab in the “Work Order Box – Work Order” interface. Click “2Add WO” to open the adding interface and select the “Department ID” or “Vendor ID” of this Work Order.
|
The Vendor of a Work Order is usually a Department in the enterprise. If it is an Outsourcing Work Order, an outside vendor should be selected here. Click “2Add” to create a new Work Order and open the “Update Work Order” interface as shown:
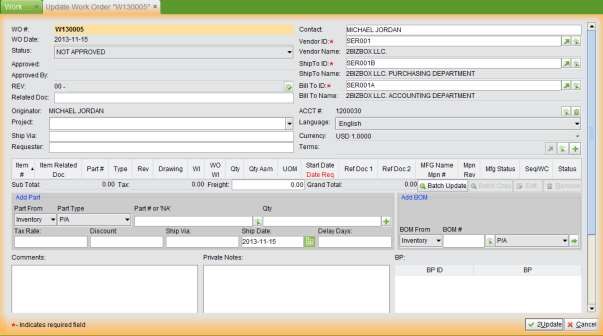 |
Similar to a Sales Order or a Purchase Order, updating a Work Order is used to update its basic information and items. Several blanks are required to fill concerning the basic information of a Work Order.
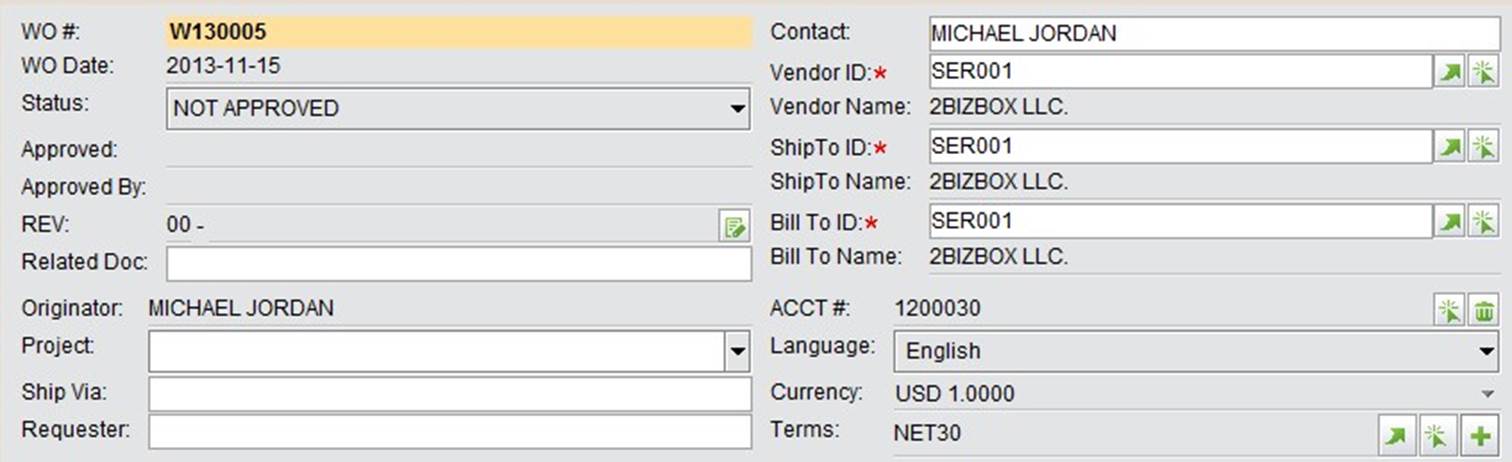 |
REV: the revision of the Work Order. For a new-created Work Order, its revision is “00.” If you are updating an old Work Order, you may need to click “Edit” button aside to input its new revision.
Related Doc: if there is a related document to the Work Order, you can enter the document name here for reference and later you can search this Work Order by the related doc.
Project: if the Work Order belongs to a specific project, fill in the Project name here. Project can be added in “Sales Box – Sales Order – Control.” After being added, you will be able to select the project name from a drop down list here.
Ship via: fill in the shipping method of the Work Order.
Requester: fill in the requester of the Work Order.
Contact: by default, it’s the creater of the Work Order. You may change the contactor if necessary.
Vendor ID: you may change the Vendor ID if necessary.
Ship To ID: by default it is the “Ship To Address” in Company Information in the Control Panel. You can change it if necessary.
Bill To ID: by default it is the “Bill To Address” in Company Information in the Control Panel. You can change it if necessary.
ACCT#: the accounting number of the Work Order. Click “edit” button to change it.
Language: select the language of this Work Order. By default, it follows the language in the Vendor Address Book.
Terms: select the payment terms of the Work Order. If there’s no term, click “+” to add one.
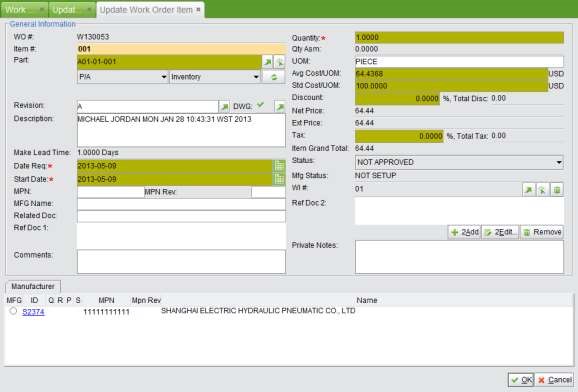
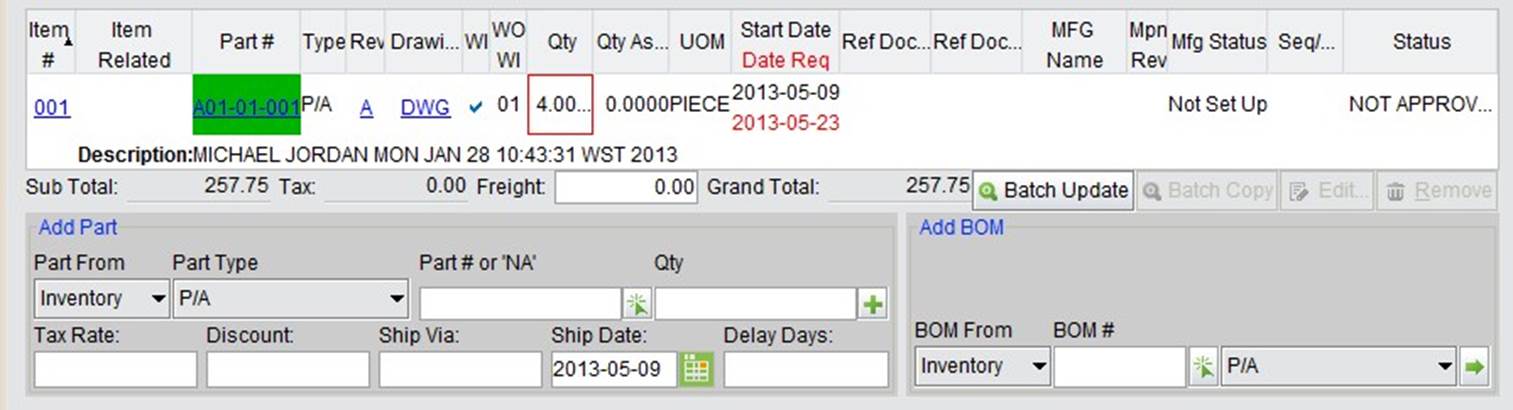
When you finish the basic information, add WO Items under To add WO Items, fill in or select a Part#, then click the “+” button to open the “Update Work Order Item” interface:
In the “Update Work Order Item” interface, several important parameters should be set here.
Date Req: Indicates on which date the Work Order should be finished.
Start Date: Indicates on which date the Work Order should start.
Quantity: The quantity of the WO Items. You can revise this number here.
Qty Asm: Shows the finished quantity of the item(s).
Discount & Tax: Fill in the discount and tax rate, if necessary.
WI #: The Work Instructions of this item. Here, the default WI of the part is shown. You can select another one if the part has more.
Ref Doc 2: This can be a SO or a WO.
 |
When you are finished filling out this page, click “OK” to submit. A WO Item is added and you will return to the “Update Work Order” interface. You can continue to add WO Items in this way.
To update the added item, select it and click the “Edit” button. You can also add items through the BOM.
 |
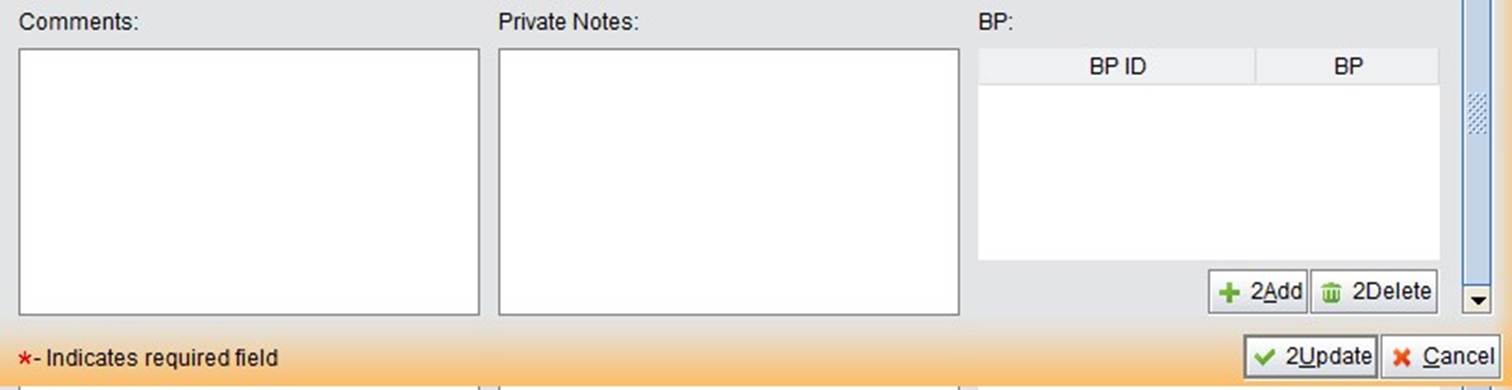
At the bottom of the screen, you can add “Comments,” “Private Comments,” and “Boilerplate.” Afterwards, click “2Update” to finish the Work Order.
 |
The status of a submitted Work Order is primarily “NOT APPROVED.” A user with the correct permissions can click the “√” button at the top right to approve it. Work Order Approval can be added under the “Control” tab in the Work Order Module. The status of an Approved Work Order is “Open.”
The manufacturing status of an open Work Order is “Not Set Up.” Click “Not Set Up” to set it up.
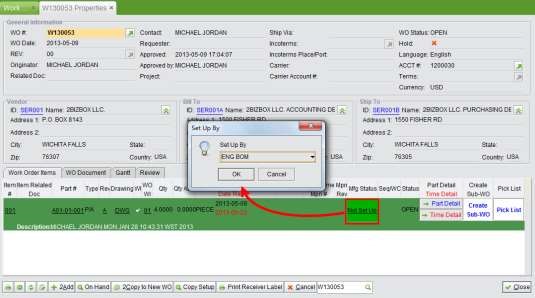 |
Setting up a Work Order implies deciding which materials to issue for the Work Order. The Work Order is set up by the BOM. If you select “Manufacturing BOM” in the Manufacturing Box, the system will allow you to select the set up type. Click “OK” to open the set up interface:
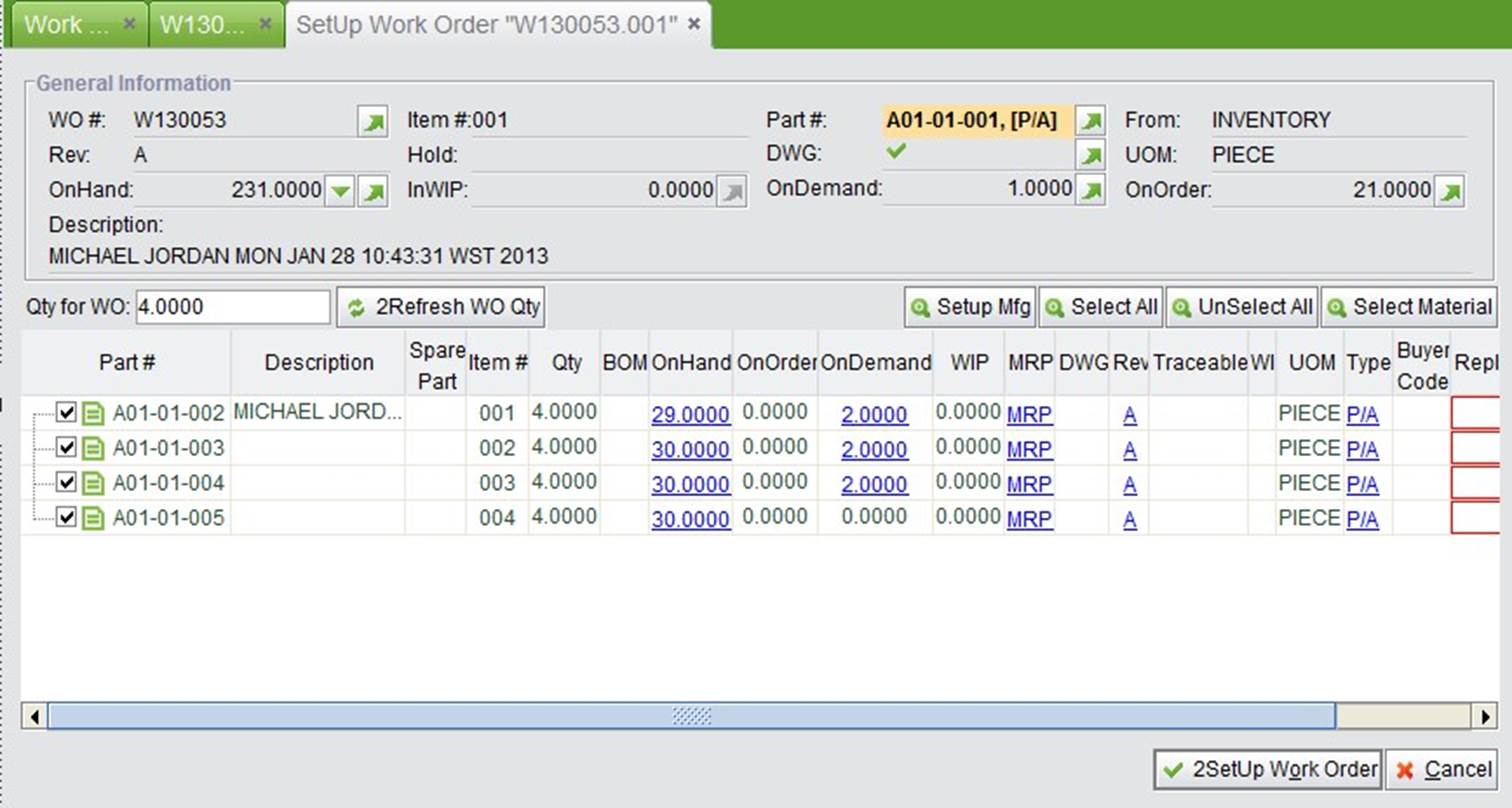 |
All the parts are listed and checked in the “SetUp” interface by “EBOM“ or “MBOM.” Parts with BOMs are folded here, because you will create sub-Work Orders later.
If you are going to change the issuing quantity, you can enter the quantity in “Qty for WO” and then click “2Refresh WO Qty.” This will not change the WO Item quantity, only the issuing quantity.
Finally, click “2SetUp Work Order” to set up the Work Order. When setting up a WO, you will see the WO Part Detail screen as follows:
 |
When the Work Order is set up, there are three locations in 2BizBox that support part issuance.
At the bottom of the “Part Detail” interface, click “2Issue Parts” to issue parts. This will open the Issue Parts interface as shown below:
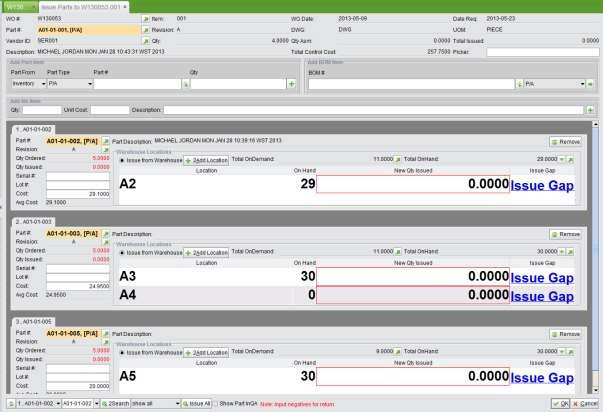 |
All the items are listed here. “Qty Ordered” and “Qty Issued” are outlineed in red for caution. You can fill in the quantity in the red textbox, or you can click “Issue Gap” to issue the remaining quantity.
If there is a shortage of some parts, you can issue them later. When you finish, click “OK” and accordingly, you will be supplied with an Issue Number as an issuing record.
 |
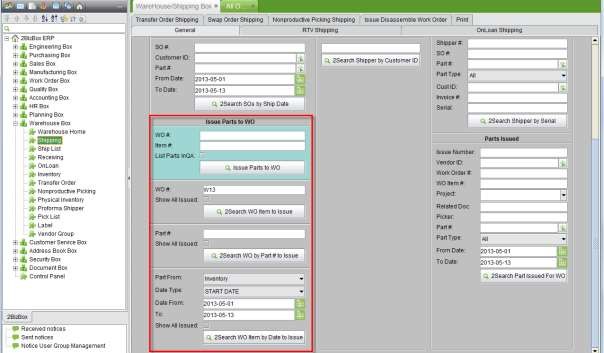
Under the “Issue Parts” tag in “Work Order Box – Work Order,” you can issue parts to a Work Order by their WO # and Part #.
 |
Issue Parts to WO: Fill in the accurate WO # and Item #, then click this button to enter the Issue Parts interface. If you check “List Parts In QA,” Parts in QA will be shown on the location.
2Search WO Item to Issue: fill in the keywords of the WO# to search WOs. At the search results interface, click WO# to open the issue interface. If you don’t check “Show All Issued,” the search results will show only not issued WO Items.
2Search WO by Part # to issue: you can search WO to issue by Part# and Type. At the search results interface, click WO# to open the issue interface. If you don’t check “Show All Issued,” the search results will show only not issued WO Items.
Under the “General” tab in “Warehouse Box – Shipping,” you can also issue parts for Work Orders. The first three buttons: “Issue Parts to WO,” “2Search WO Item to Issue,” and “2Search WO by Part # to Issue” are the same as the buttons uunder the “Issue Parts” tag in “Work Order Box – Work Order.”
2Search WO Item by Date to Issue: this is a comprehensive search function for WO Items by “Part From,” “Date Type,” and “Date Range.” At the search results interface, click WO# to open the issuing interface. If you don’t check “Show All Issued,” the search results will only show not issued WO Items.
 |
When the Work Order task is finished, receive the finished parts in “Part Detail” or “Warehouse Box.”
Click the “Receive” button to open the receiving interface:
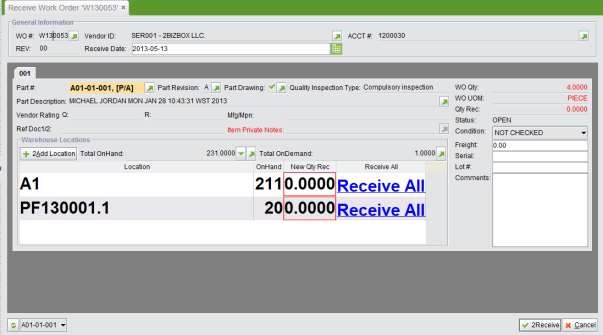 |
You can fill in the quantity to receive in the red textbox, or click “Receive All” to receive all the finished parts. Click “2Add Location” to create a new location. Click “2Receive” to finish.
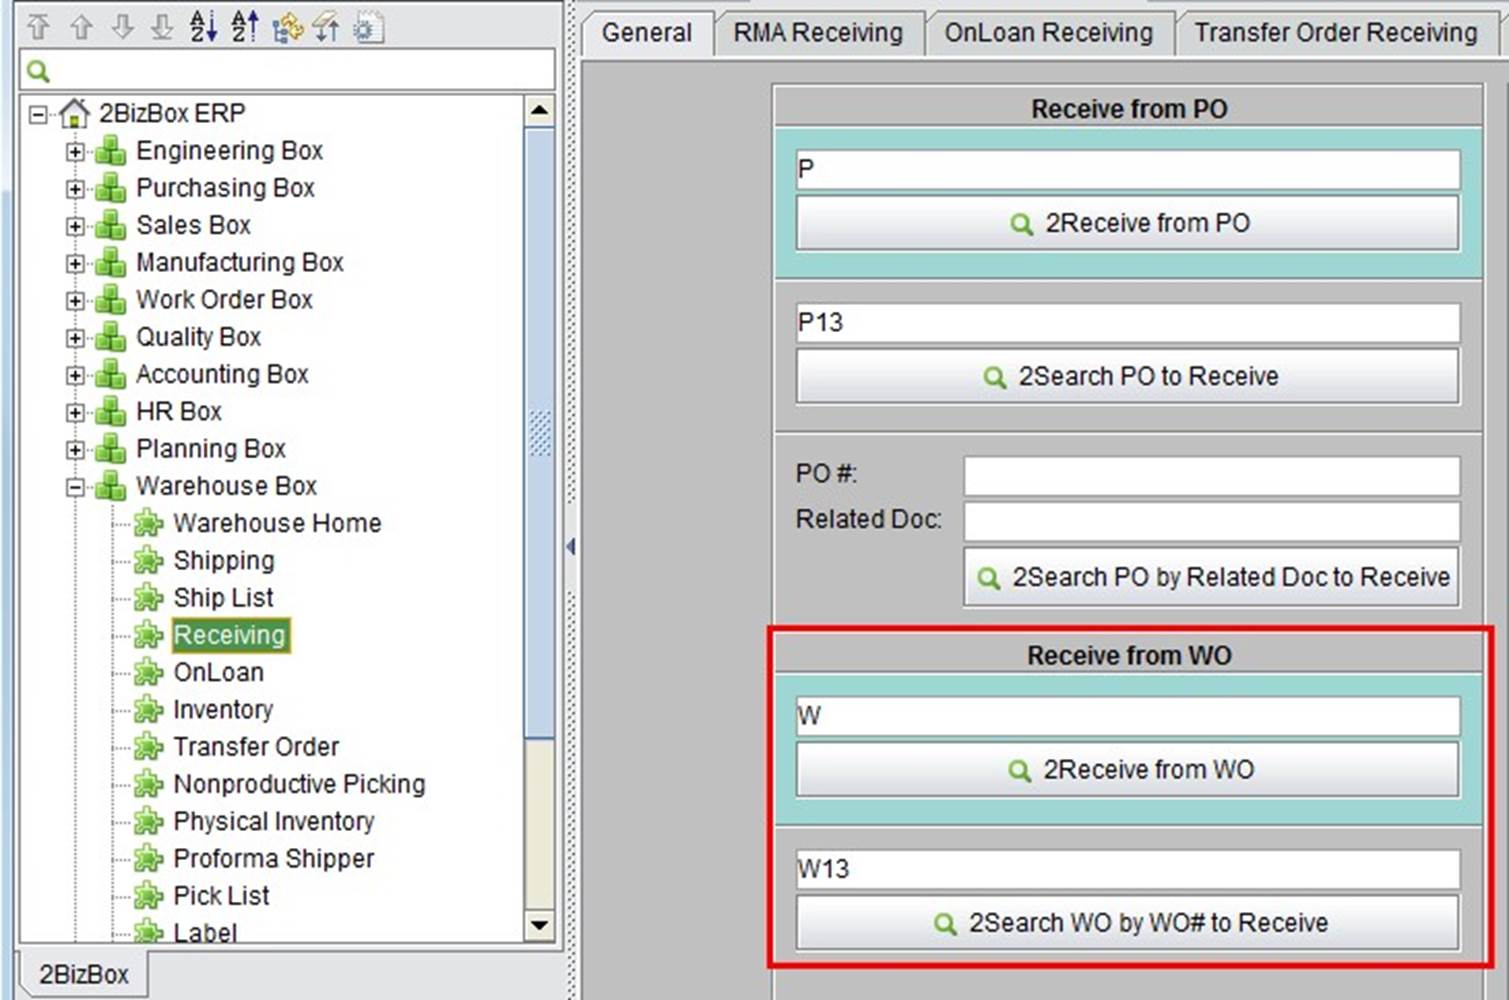
In “Warehouse Box – Receiving,” you can receive WOs.
2Receive from WO: fill in the accurate WO# and click this button to receive a WO.
2Search WO by WO# to Receive: fill in the keywords of a WO# and click this button to search for and receive a WO.
 |
You can receive the WO several times until all the items are complete. When a WO’s Items are received, the item status will be “Closed:” when all the WO Items are received, the WO status will also be “Closed.”
The Work Order can be received in several increments as long as the total received quantity doesn’t exceed the item quantity. If you set “Inspection Report Required When Receiving,” you must create an Inspection Report for this Work Order before you receive it.
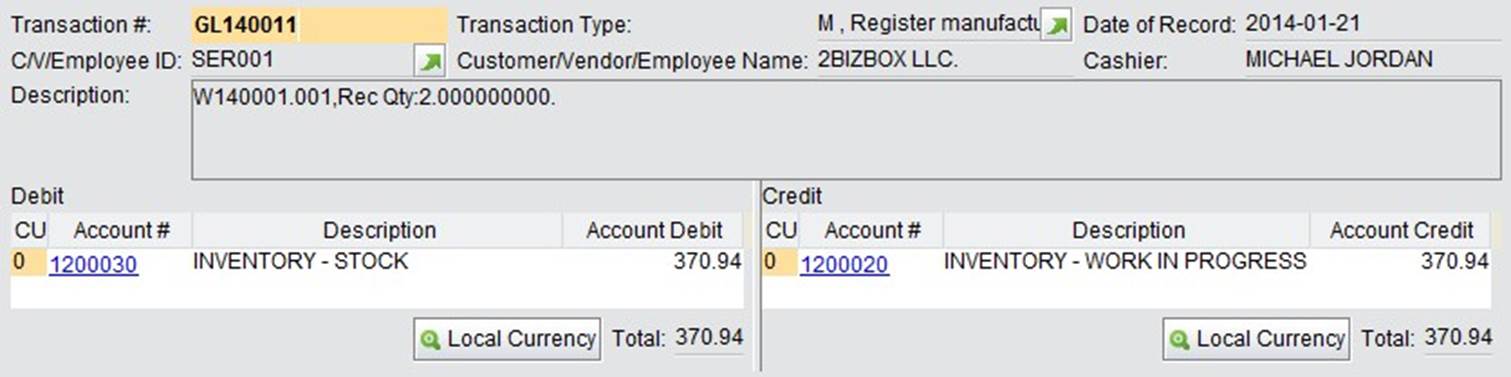
If you want 2BizBox to generate a GL when receiving the Work Order, check “Make GL When Receiving WO” in the control panel.
Once the WO item is received to the warehouse, a GL transaction will be generated as below:
 |
The GL can be found under the “Ship Assy” tab:
 |
We’ve introduced a simple workflow of a Work Order with One BOM Level. When a WO item has multiple BOM Levels, sub-work orders are created for production. 2BizBox ERP never limits your BOM Levels, which means you can create as many sub-work orders as you want. However, obviously there is to come of creating endless sub-work orders. A meticulous Work Order leads to over-complex setting up and disordered field management. Therefore, you need to be considerate about setting up work orders when you are establishing a BOM.
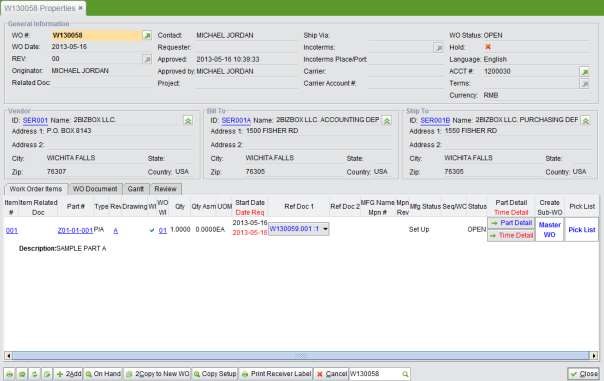
When setting up a Work Order, you should check parts from the second BOM Level instead of unfolding them. Then, when you return to the Work Order Property, you can click “Create Sub-WO” to create sub-WOs:
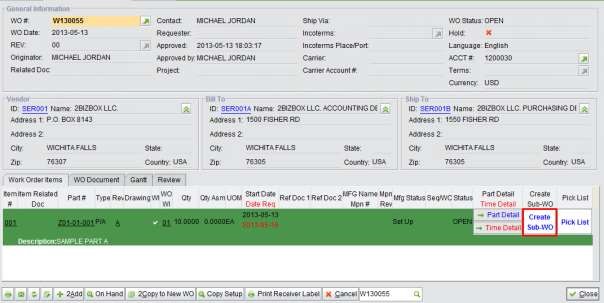 |
Parts with BOMs will have a “+” sign. Check these parts and click “Create Sub-Work Order” to create a Sub-Work Order.
 |
Sub-Work Orders are related to their Main Work Order. You still need to approve and set up Sub-Work Orders.
Note: in “Control Panel – Company Setting,” you can set whether to “Auto Approve Sub WO.” Check this option to automatically approve a Sub-Work Order when it is created.
When a Sub-Work Order is created, you can approve it, set it up, and issue parts to the WO Items with the same procedures as a Main Work Order.
When receiving a Sub WO, you will see in the “Receive WO” interface the option to “Receive to Orders.” That means you can receive this Sub WO to the warehouse, or you can directly receive it to the Main WO. Receiving a Sub WO to the Main WO combines the two steps: receiving a Sub WO Item to the warehouse AND issuing a Sub WO Item to the Main WO.
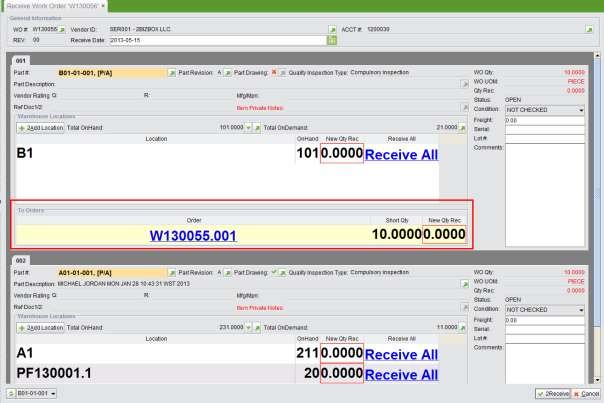 |
In the above operation, the system allows you to receive a Sub WO to the Main WO because a Sub WO is the reference document of the Main WO. This operation greatly reduces operations, and, on the other hand, the manufacturing tasks are clearer with reference to work orders. To Serva Software LLC, this function can help to effectively avoid mistakenly selecting parts used in other Work Orders or Sales Orders.
If you relate Sales Orders and Work Orders, finished Parts can be received to the SO directly. If you relate Purchase Orders and Work Orders, you can receive PO Items to WOs, so that the purchased part can be used in the WO directly. Reference documents also can be applied in Outsourcing Management, which will be introduced in later chapters.
We have now introduced the main workflow of work orders and sub-work orders. The following chapters will focus on the properties of a Work Order.
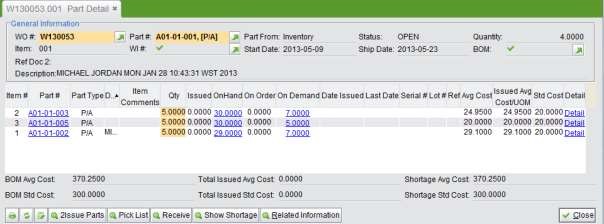
Part Detail describes which parts and how many parts should be issued to a Work Order. It is set up according to the BOM, but you can change it when necessary. There are two statuses of Work Order Items: Mfg Status and Item Status. The Mfg Status is “Set Up” after you set up a WO item. When you start to issue parts, it will change to “RUN.”
“Part Detail” determines which parts will be issued to this Work Order Item. Click “Part Detail” to view the details.
 |
Below is the “Part Detail” interface, where you can see the part list for this particular Work Order:
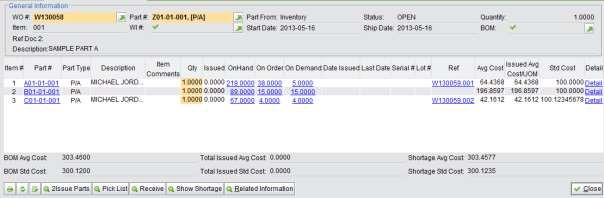 |
In this interface, you can complete a variety of tasks. Clicking the buttons “2Issue Parts” and “Receive” will guide to you issue parts and receive WO Items. Clicking “Pick List” will open the Pick List. Click “Show Shortage” to view the parts in shortage. Click “Related Information” to unfold more options.
The Pick List is the document that lists the materials to be picked for manufacturing. Clicking the “Pick List” button in either Part Detail or WO Item will open the Pick List.
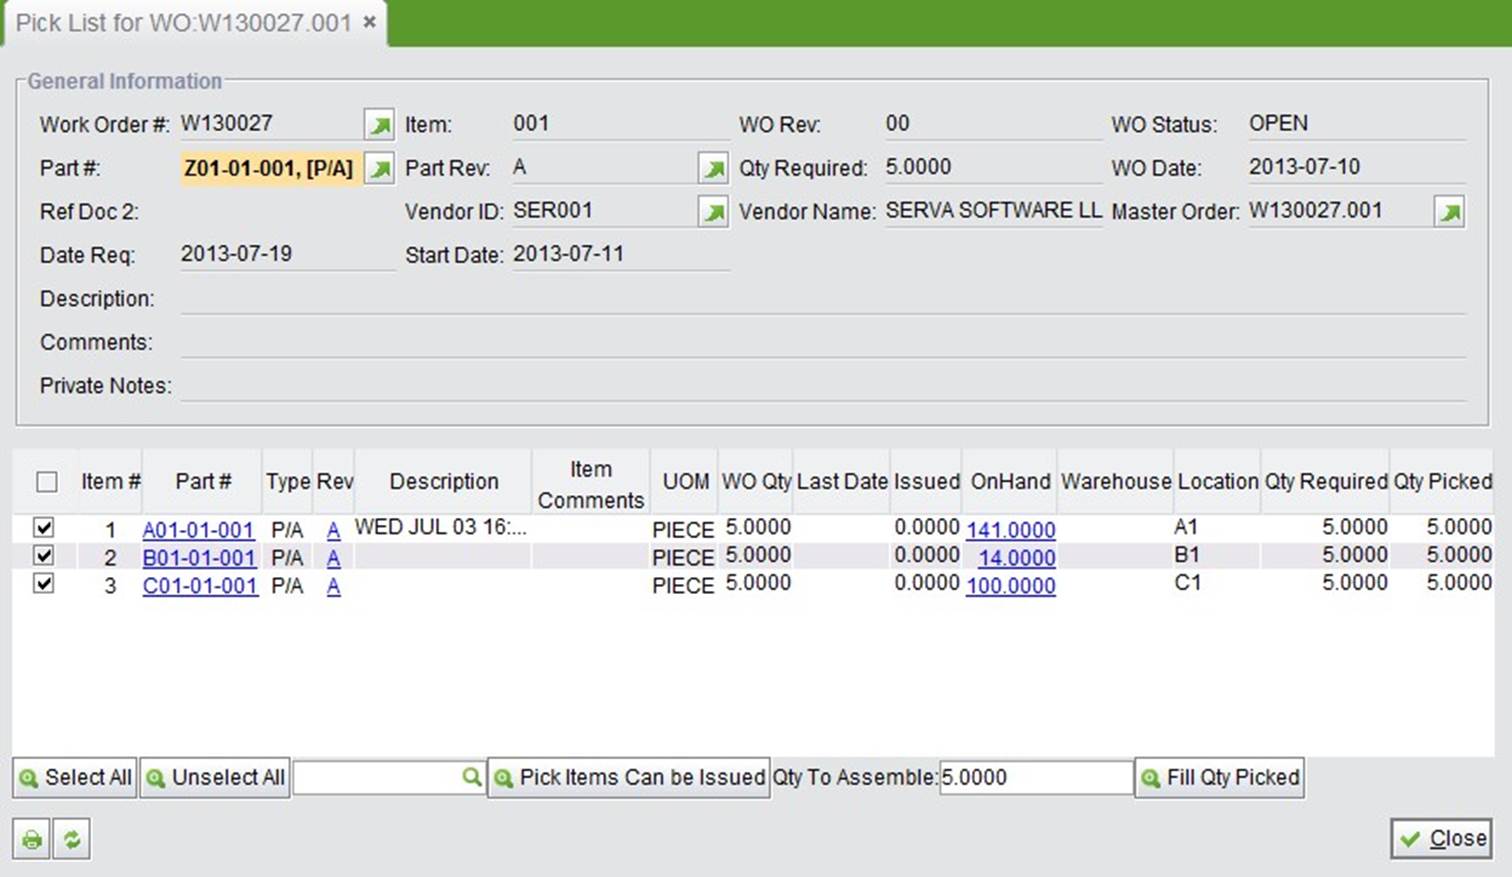 |
Parts on the Pick List are determined by the Part Detail. You can check the Parts to issue and print them out here. There are several buttons on the interface that will help you to select parts:
Select All: Click to select all parts in the list.
Unselect All: Click to unselect all parts in the list.
Search: Fill in the keywords of a Part# and click the search button to select parts that contain the keyword.
Pick Items Can be Issued: Click this button to select parts that have sufficient OnHand quantity.
Fill Qty Picked: Fill in the “Qty To Assemble” and click this button; the required item quantity will be entered in the “Qty Picked” column.
In the Work Order Item interface, there are several important concepts that are closely related to manufacturing management. You can read their detailed descriptions in the Manufacturing Box Chapter. Until then, a quick description of these concepts will be provided here.
 |
WOWI indicates the exact routing of a Work Order. With different WIs, the time, cost and equipment used will differ. You can select a Work Instruction when updating a WO Item; then the selected Work Instruction will become the WOWI for this WO. Click the Set ID to view the WOWI. You can update the sequence, record time information, and finished percent on the WOWI.
In a Work Instruction, you need to define the Work Center, Setup & Run Time for each sequence. This WI information will be applied to the Work Order Item after it is set up. Click the “Seq/WC” to view the details.
Time Detail communicates which worker has worked in the Work Centre, how much time he spent there, the progress he has made, etc. Time detail is added in the Manufacturing Time System. Refer to the Manufacturing Box Chapter for further details.
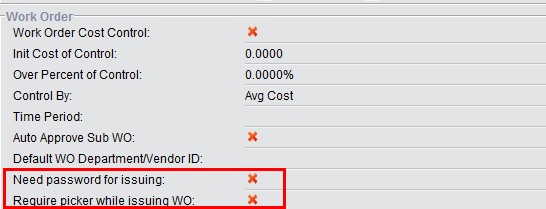
The warehouse staff should strictly follow the issuing principle to issue materials. The issuing number must be in accordance with the manufacturing plan and pick list, all the while maintaining paper or electric records. In 2BizBox, there are two settings in the control panel to secure the issuing process: “Need password for issuing” and “Require picker while issuing WO.”
 |
This is a Vendor/Department level password. After enabling this option, go to the “Updating Vendor/Department” interface to set the password.
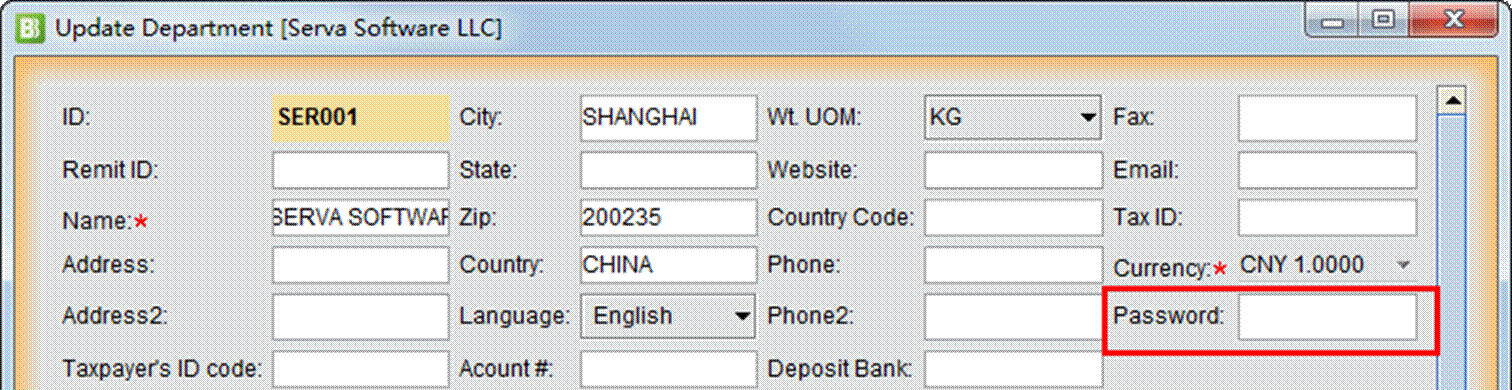 |
After the password is set, entering the password is compulsory to issue materials to every Work Order.
If this option is enabled, users must fill in a picker’s name when issuing the material.
Although the Work Order is set up by the BOM, in actual manufacturing activities extra materials that are not included in the BOM, such as oils and rags, also need to be issued. You can issue NA items in the issuing interface. Fill in the quantity and cost and then click “+.” The issued NA item will be recorded in the Part Detail and the cost will be accumulated in the Work Order Cost.
If some parts are scrap and need to be reissued, you can directly add the part in the issuing interface and issue it.
 |
Parts that are reissued will also be recorded in Part Detail and WO issue cost.
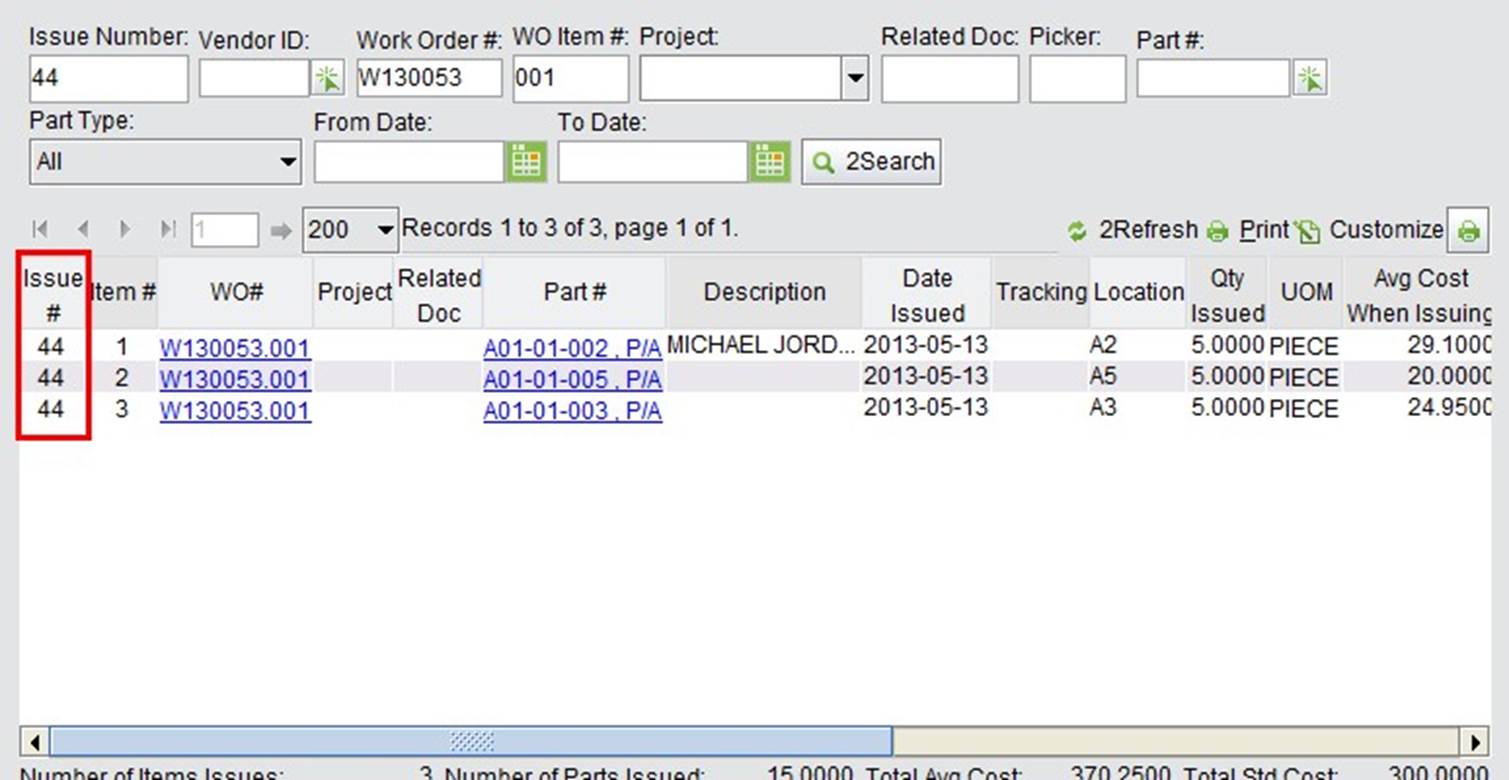
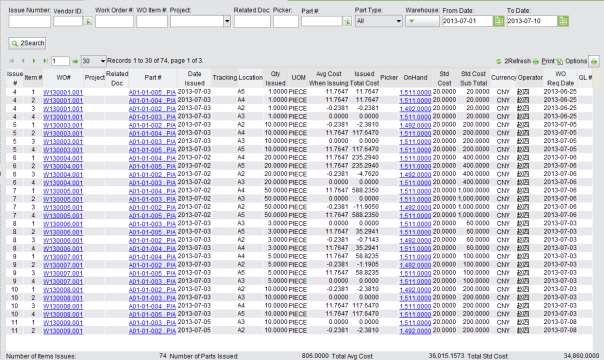
Under the “Issue Parts” tab of the Work Order sub module, you can search for the records of parts issued to previous Work Orders.
This function is used to search for unissued parts in the WO items by WO#, Vendor ID and time range. In the search results, you will see the WO#, Item#, Assembly Part of the unissued part, and the unissued part’s total quantity and issued quantity. Searching for unissued parts enables businesses to better monitor the manufacturing process.
This function provides many conditions to search for issued parts. Search conditions include Issue Number, Vendor ID, WO#, WO Item#, Project, Related Doc, Picker, Part#, Part Type, Warehouse and time range. Search results will also show the items’ total number, parts’ number, total average cost and total standard cost. You can use the search results interface as a WO Issued Report.
 |
This report shows issuing cost by Part Number. You can use date range, project name and Part# as search conditions. In the search results interface, you will see the total issued cost of each part and subtotal.
Under the “General” tab of the Work Order sub module, you can look up and search for Work Orders in various ways.
This is the basic function to look up a Work Order. You can fill in the accurate WO # and click this button to open the Work Order.
Fill in the keywords of a WO# and click this button to search for related open WOs.
This is the function to search for WOs by Part # and type. Fill in the keywords of the Part #, select a part type and click this button to search for Work Orders that contain these Parts.
Fill in the keywords of the Vendor ID and click this button to search for WOs from related vendors. WO Vendors can be a department or an outside Vendor.
This is the function to search for Work Orders that have sufficient parts to issue and be assembled. When the Work Order is set up and part detail is confirmed, you can use this function to view Work Orders that are executable and adjust the WO execution sequence. Search conditions include WO #, Part #, Vendor ID and WO Required Date.
At the search results interface, please notice the following columns:
Qty: WO Item quantity required to assemble.
Asm: Assembled quantity of this WO Item.
Qty to Asm: WO Items that are needed to be assembled.
 |
This is the function to search for Open Work Orders with some Parts. You can fill in the keywords of Part # and WO # to search.
This is a comprehensive search for Work Orders. Search conditions include date type, date range, part #, type, vendor ID, project name, WO’s originator, Related Doc, contact, status, hold status and ACCT#.
Click this button to view all cancelled WO Items. You may cancel a WO Item before it is set up.
Under the “Reports” tab of the Work Order sub module, you can view Work Order Reports to improve management of manufacturing.
Click this button to view all Past Due Work Orders; this includes those are past due the “Date Required” but are still open.
Click this button to view all Open Work Orders.
Click this button to view all Work Orders that are not approved. In the search results, you can click the “Approve” link to approve the Work Order.
This is the function to search for Work Orders that are not set up by Work Order Number.
Through this report you will see what and how many part are issued to which Work Order at what time. Search conditions include Date Type (WO’s start date or Due date), date range, WO #, WO Item, issued Part # and Type, Vendor ID, etc.
A Master WO or Main Work Order is a WO that contains Sub-Work Orders. Using this search function, you will be able to view the relationship between Main WOs and Sub WOs.
Search conditions include WO#, Part#, Part Type and Related Doc. At the search results, you can click “Detail” to unfold the Main Work Order and view the Sub-Work Orders.
Search results indicate the percentage of On Time Finished Work Orders among total Work Orders. A Work Order is considered to be on time when its receive date is the same as the request date. If you want to tolerate a few days earlier or later, fill in “Days Delayed” and “Days Advanced” in the search criteria.
Search results are listed by Vendors. Each line shows a Vendor’s total item count, on time items and the on time delivery rate, calculated by “On Time Items/Total Items.”
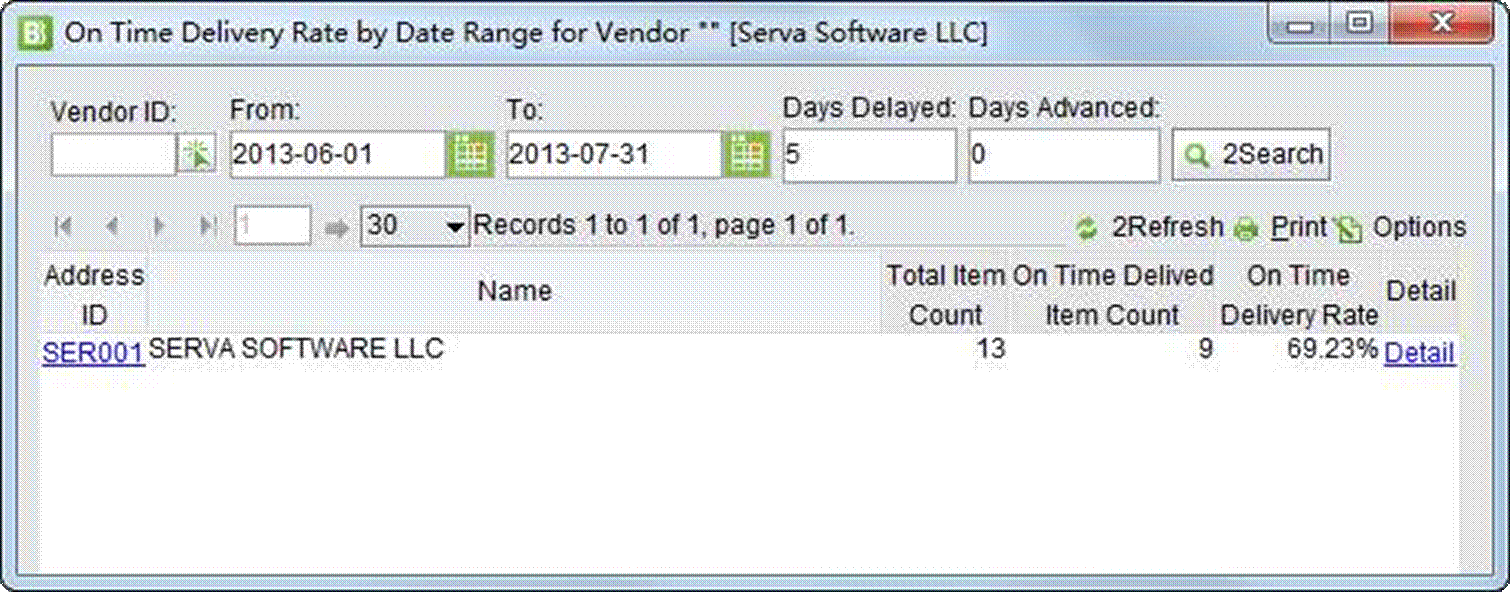 |
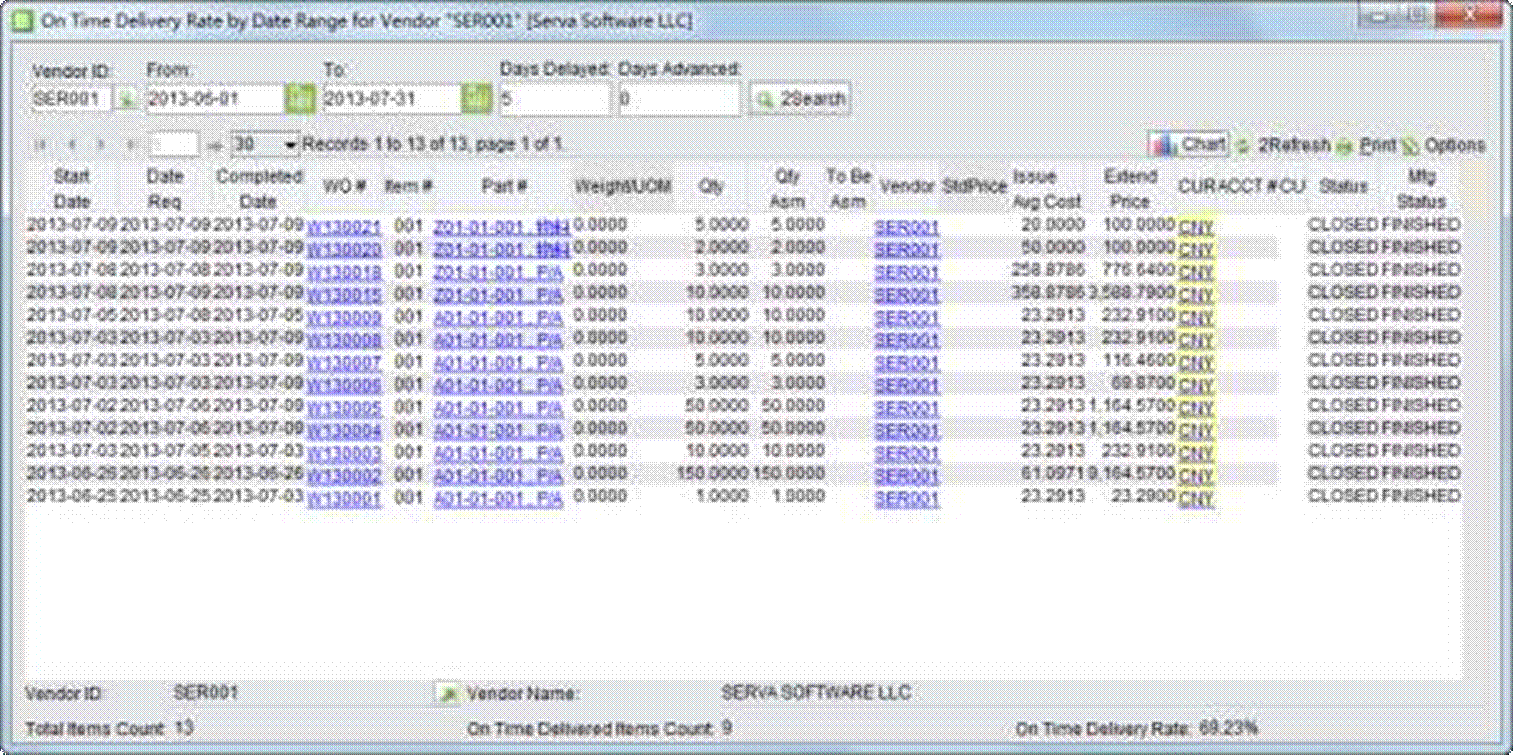
Click “Detail” of a vendor to see detailed information of each Work Order Item:
 |
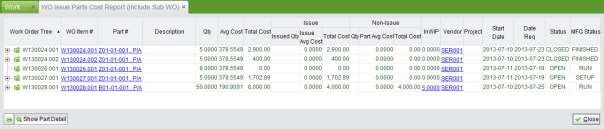
This report shows the cost of the issued and unissued parts in Work Orders
 |
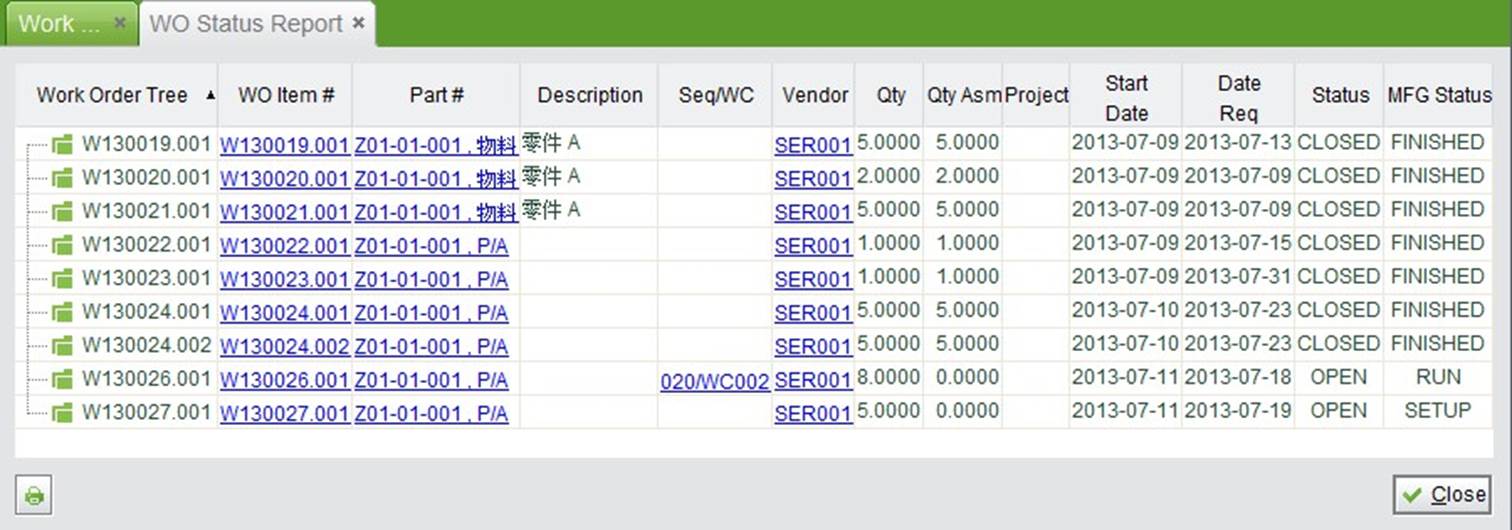
This report shows the Work Order’s status by item. The status includes item quantity, finished quantity, the item’s start and request date, item status and MFG status.
 |
Work Order Cost Control helps to control issuing costs. After setting the control values, the system will notify you when the issuing cost exceeds the specified control value.
Go to “Control Panel – Company Settings – Work Order” to find the Work Order Cost Control Settings.
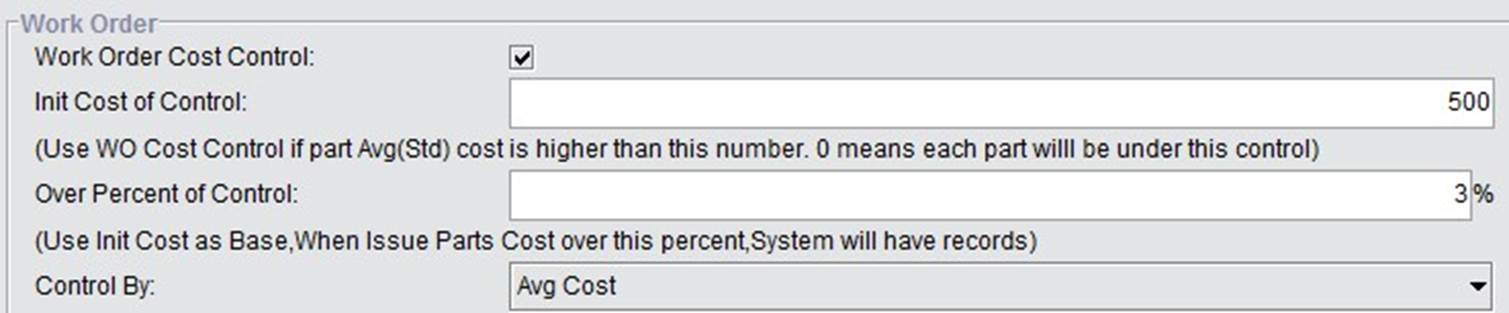 |
After setting the control values, the warning below will appear when issued cost exceeds the specified control percentage.
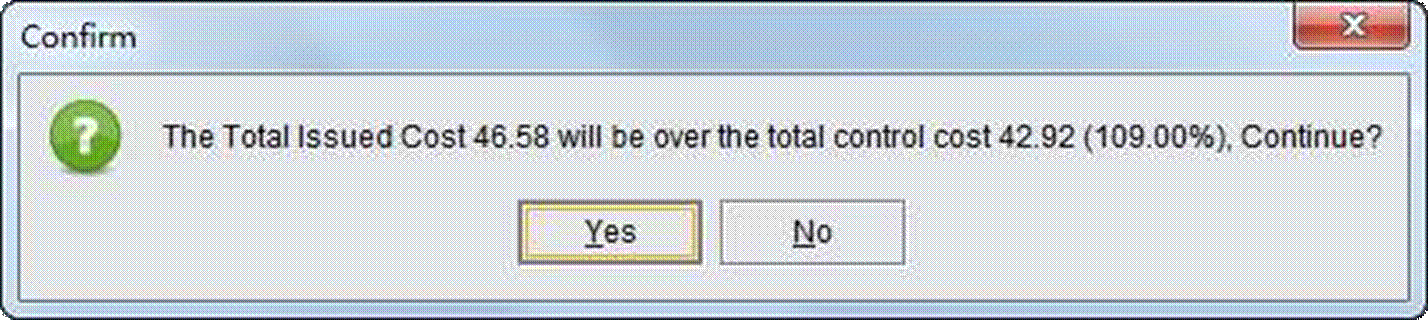 |
If the above warning notification appears, you can click “YES” to continue issuing materials. The over cost Work Item can be found by using this search function:
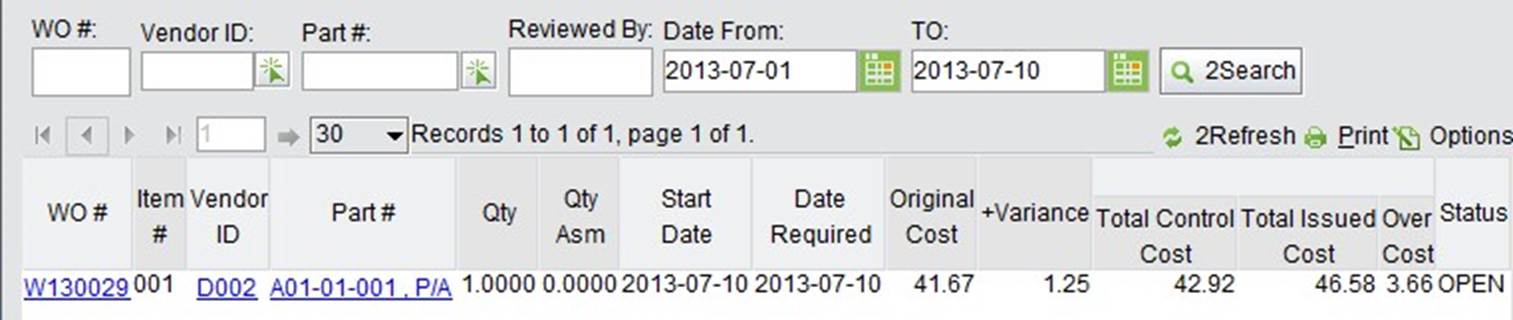 |
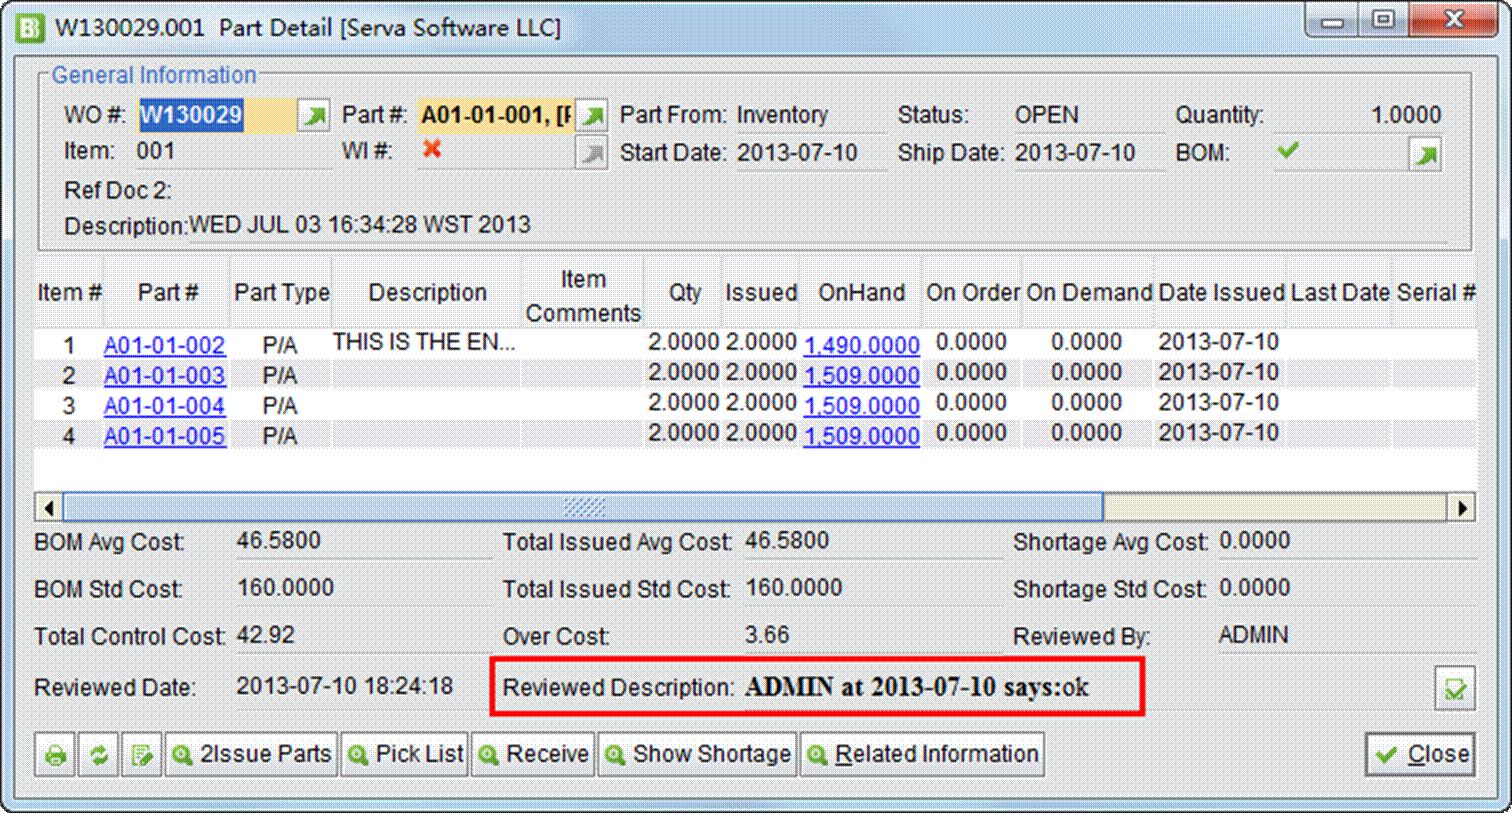
For the Over Cost Work Order Items, use this function to review these items. Click “REVIEW” in the search results and fill in the content.
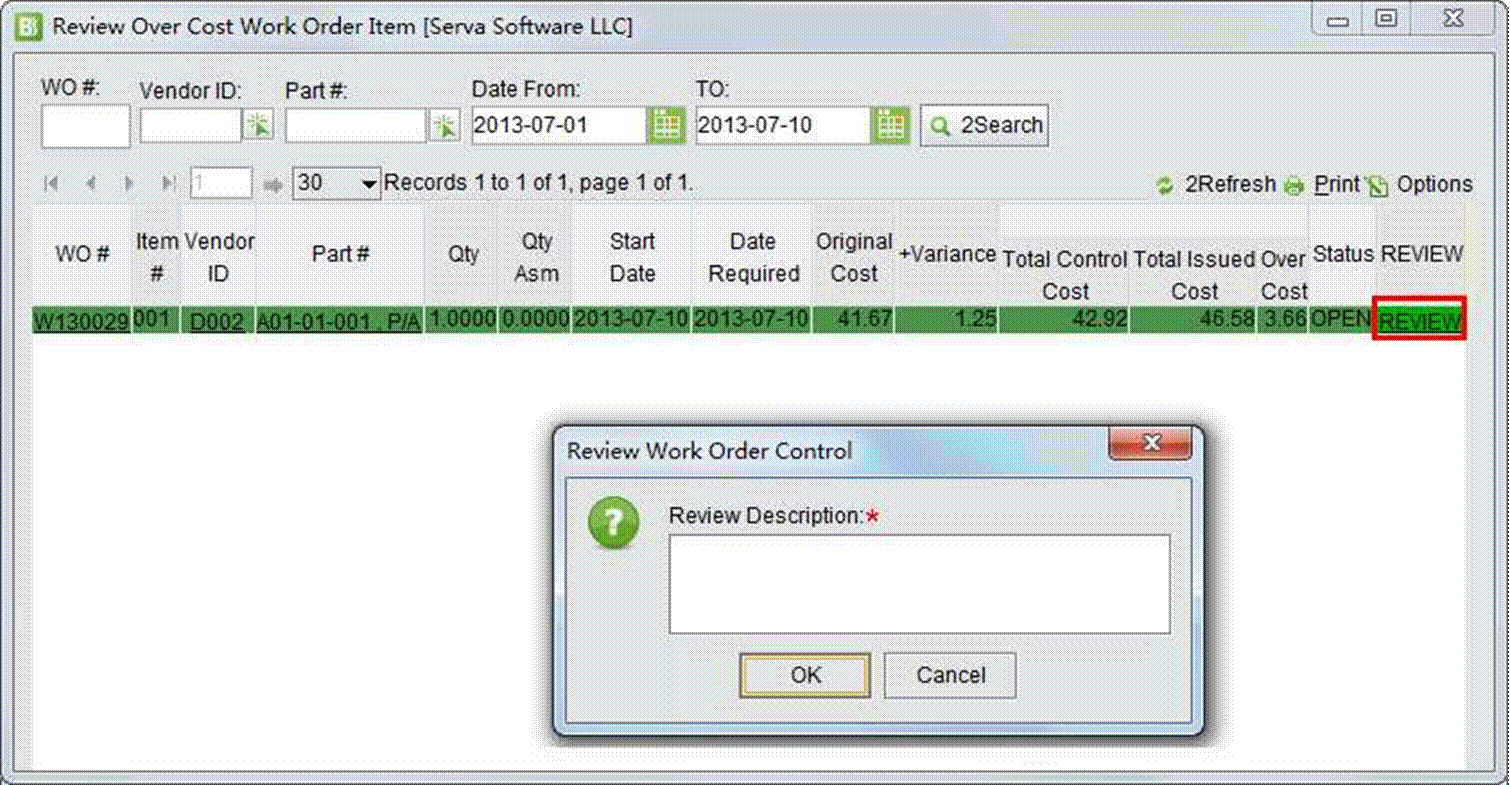 |
The review will appear in the “Part Detail” interface:
 |