2BizBox® Manual |
Go back to 9.0 Main |
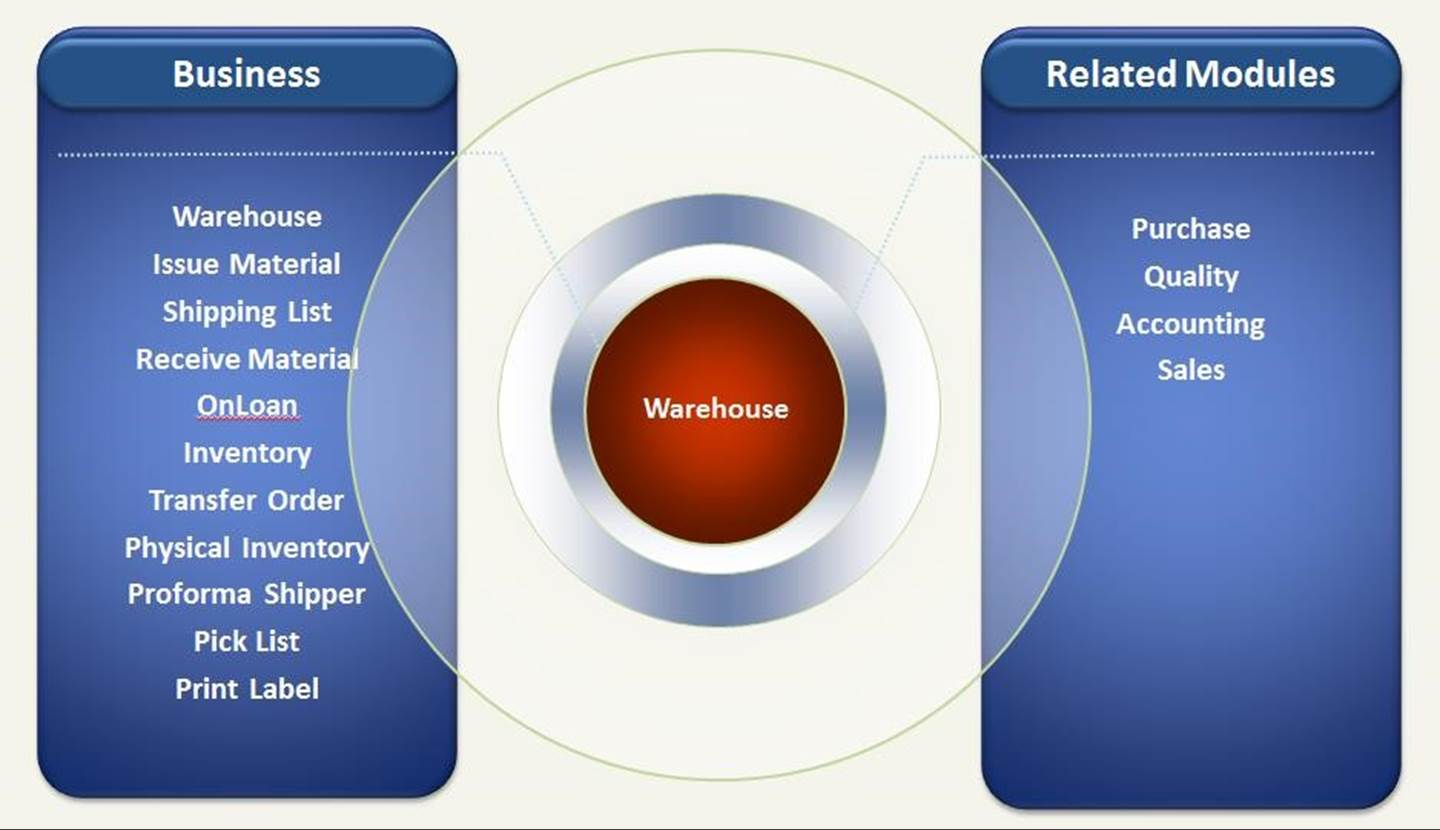
The warehouse module has many features including receiving and shipping, onloan, transfer order management, physical inventory, proforma shipper, pick list, label printing, etc. Efficient management of the warehouse can help to decrease inventory quantity level, increase inventory flow rate, avoid inventory shortage, and optimize inventory capital by product tracking with batch number and label.
|
In the Inventory Management Module, inventory and warehouse location can be inputted and edited. Only users with special permissions can adjust inventory. 2BizBox supports multiple warehouses and multiple locations to manage warehouse efficiently; do online physical inventory to cycle the company warehouse continually and then maintain strict control and records for receiving and shipping.
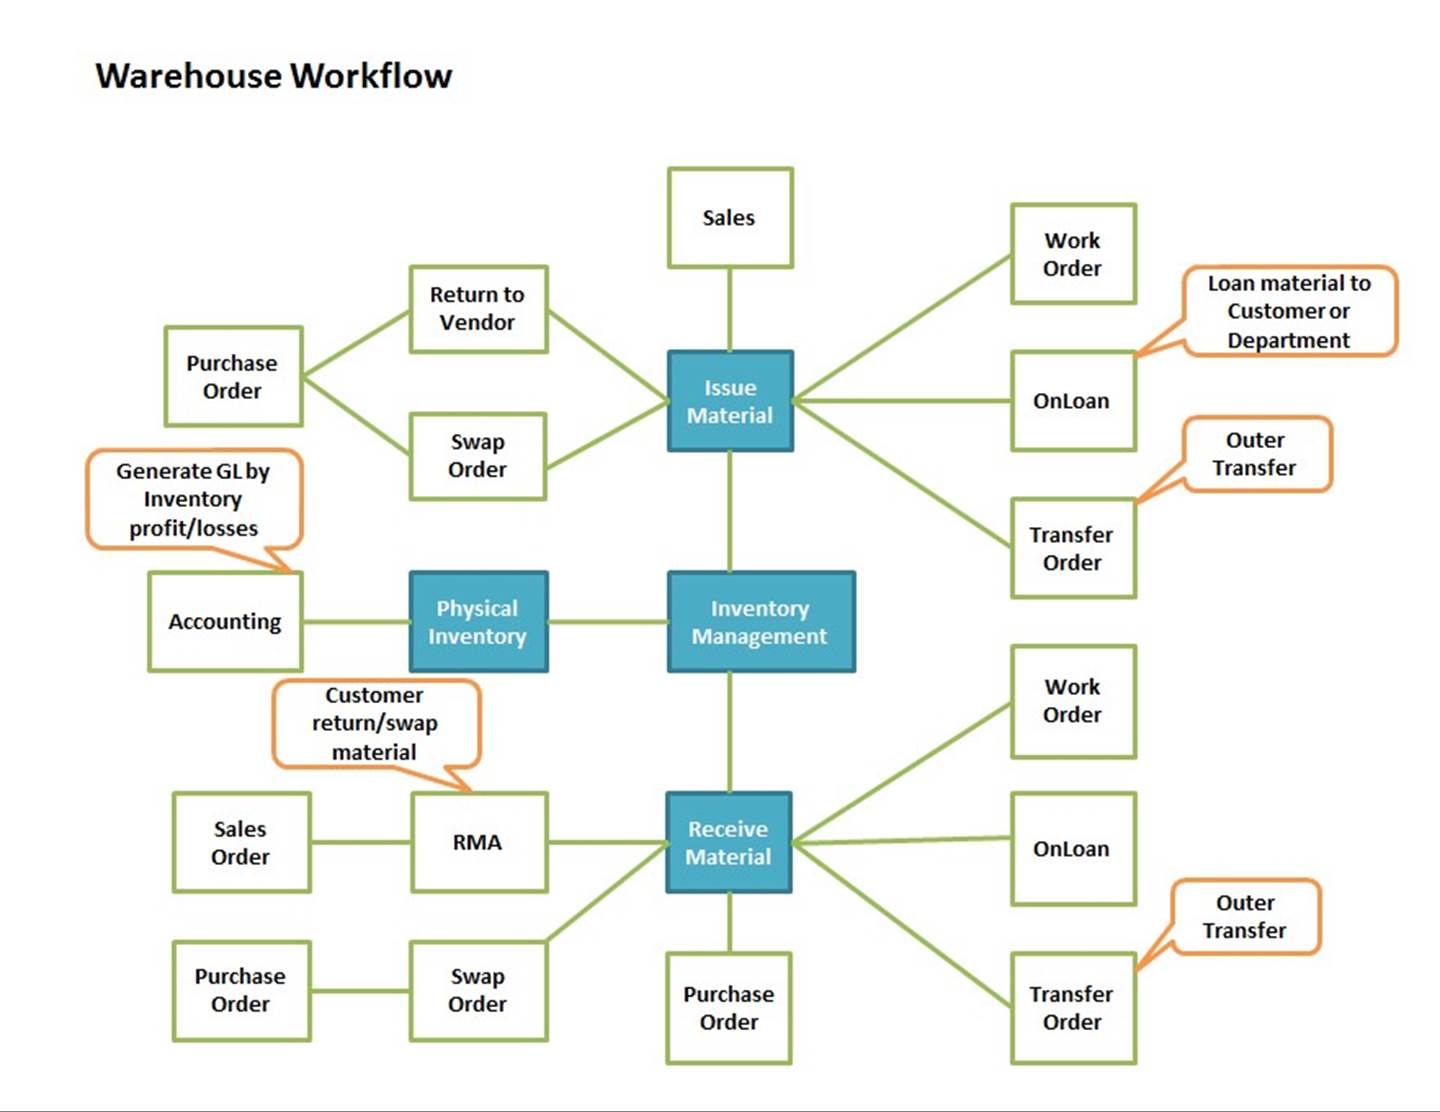
In the Receiving Module, receive produced and semi-produced products in to the warehouse.
Other features include receiving PO to warehouse, receiving for RTV, SWP, Onloan orders and transfer orders, Those received products can be directed to different warehouses or locations. Also receiver can be generated. Related receiving records can be checked.
In the 2BizBox Shipping Module, it supports shipping of produced parts; issuing parts to work order for manufacturing or assembling; shipping for RTV, SWP, onloan orders and transfer orders; shipping SO with proforma shipper; generate shipper and check shipping records.
2BizBox supports various customizable reports and printing in PDF and Excel format. The reports can be downloaded and saved to a local path.
 |
The Warehouse Home is mainly used for checking inventory information, including inventory quantity, MRP, location, stock transactions, and creating inventory reports. 2BizBox supports multi-warehouse and transfer location management for companies with many warehouses.
At “Warehouse home - General,” warehouse staff can look up parts in the warehouse and find out about part’s stock transaction information, among other features.
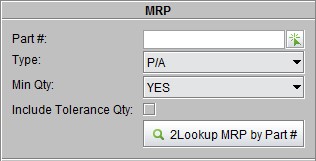
Use this feature to check a part’s MRP, including its required quantity, order quantity, receiving, shipping orders and other related orders.
Fill in the part# and type; choose whether to consider “Min Qty.” If YES is checked, the part’s minimum quantity will also be included in the search. If you select to include tolerance quantity, then the work order requirements will be calculated with a part’s tolerance rate. The function here is the same as “Look up MRP by Part#” under “Purchasing Box - MRP.” Please refer to related document for further information.
 |
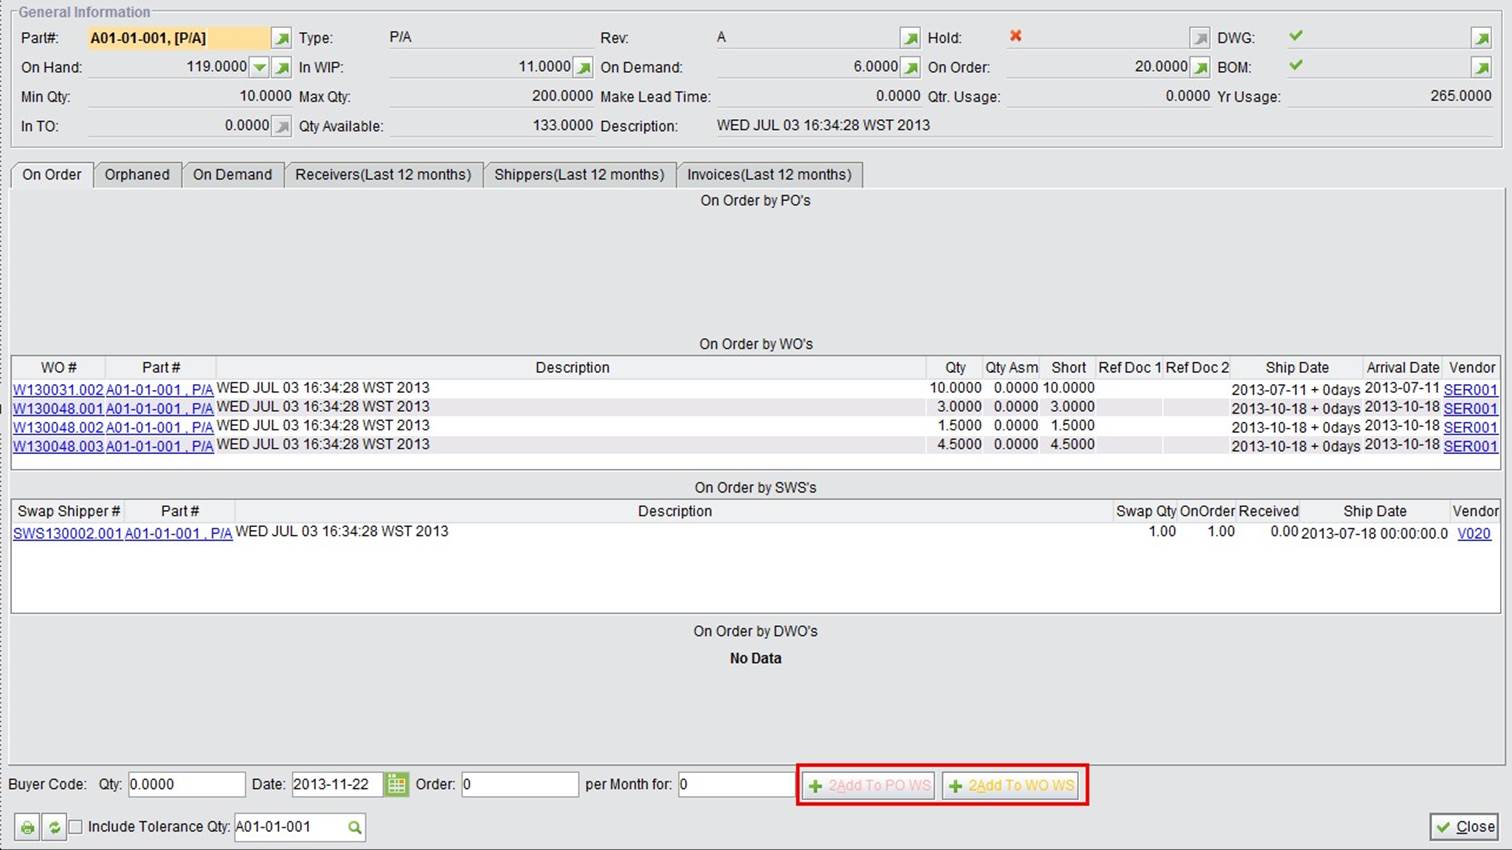
The search results will appear as below. Check a part’s basic information, inventory information and related orders. At the bottom of the interface, you can add the part to PO or WO Work Sheet quickly.
 |
This feature is used for checking a part’s onhand inventory information.
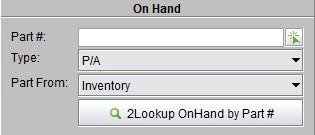 |
Input part#, type, and part from. Click the button to look up OnHand by Part#; the results will be show as below. You’ll see the part quantity on each location, and part’s tracking record if there’s any. Click “MRP” to see the part’s MRP info. Click “Log” to view the part’s inventory log.
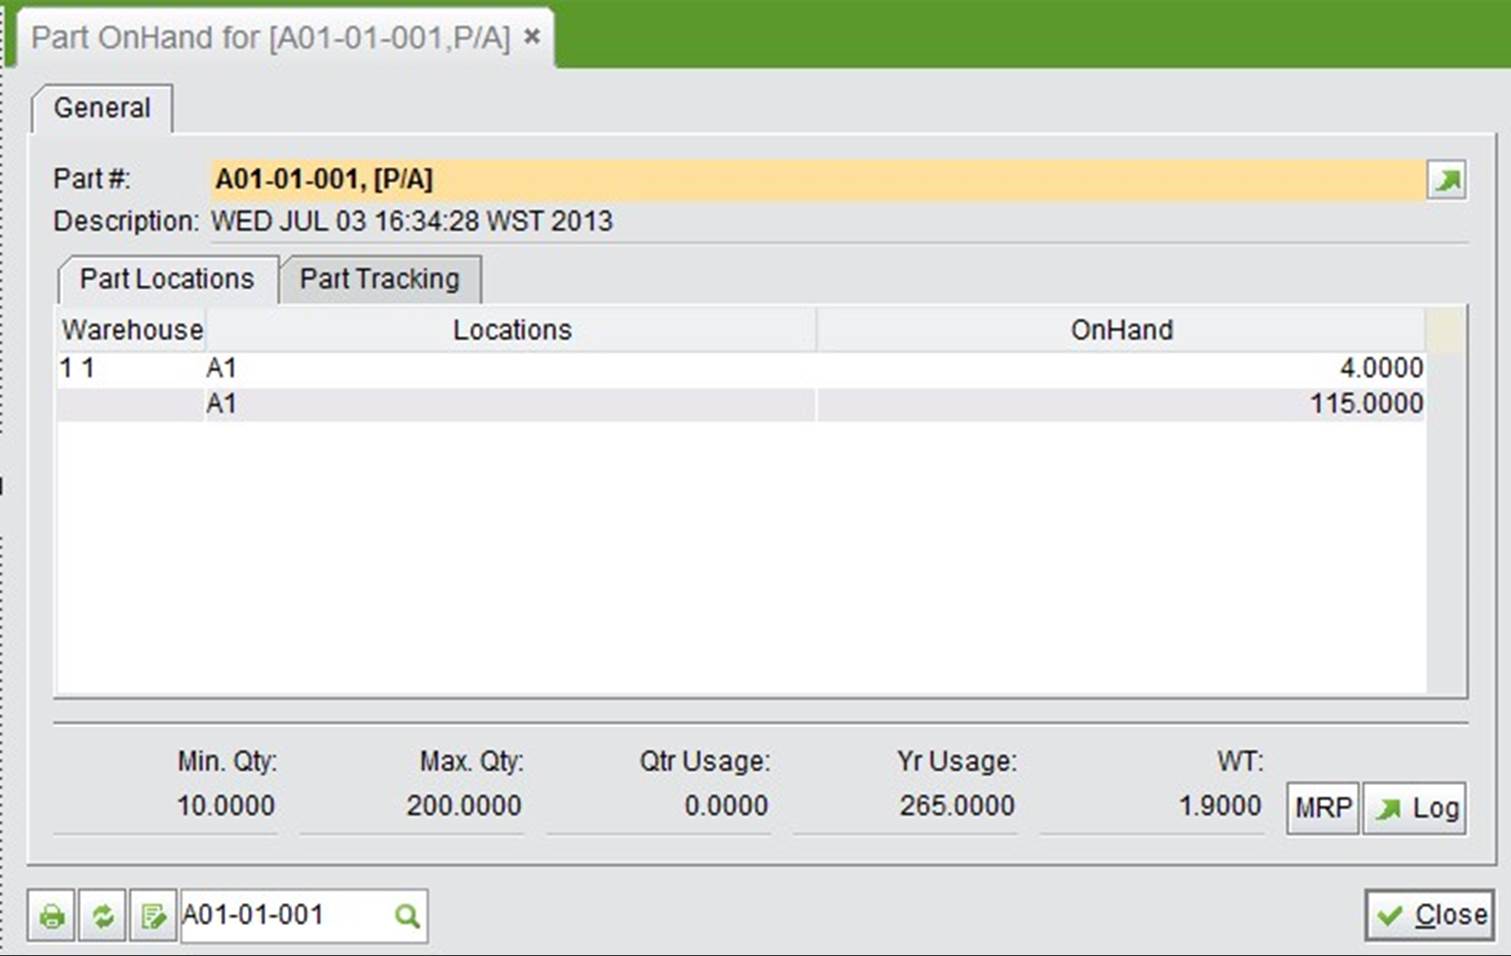 |
On this page, you may also edit the part’s inventory info by clicking “Edit” at bottom left of the interface. You may adjust part’s quality on the location and warehouses, if multi-warehouse is enabled. However, the total onhand quantity cannot be changed.
 |
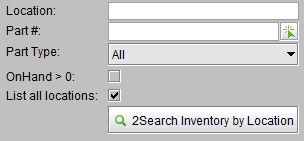
This feature is used for searching part’s inventory info by part # and locations. “Location” and “Part#” are allowed to use fuzzy search conditions. Check “OnHand>0” to show locations with part onhand quantities larger than zero. Check “List all locations” to show a part’s all locations in one line. If not checked, each location will be shown in the separately line.
 |
The search results will appear as below. Part’s main inventory info is shown, and at the bottom, statistics of toal inventory number, Avg Total and Total Std Cost are calculated for parts in the search result.
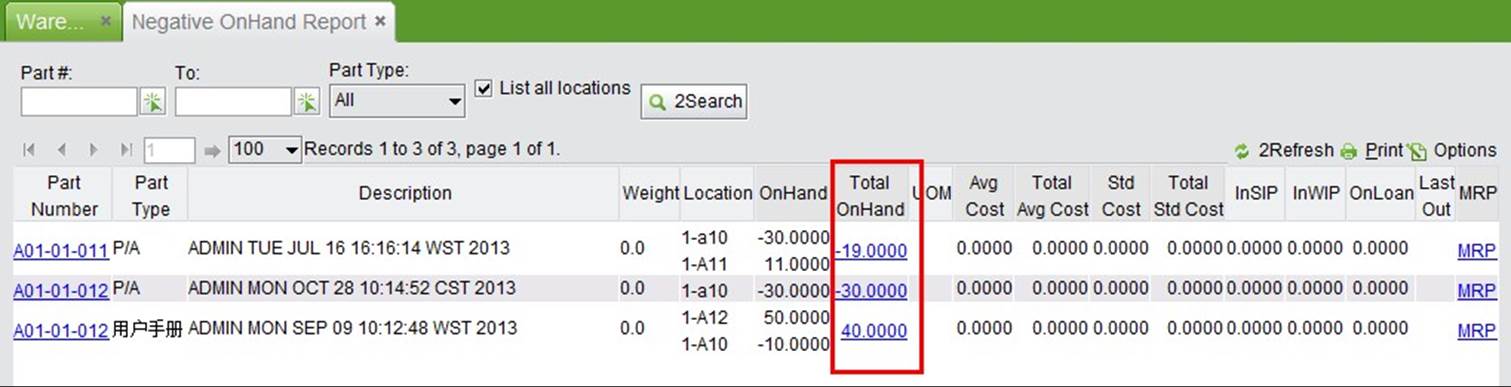
Generally, parts with a negative onhand quantity will not appear, as 2BizBox strictly controls and follows the buying-selling process. Nonetheless, data may contain some errors after running the system for a long period of time. Here you can correct these issues in a timely fashion by looking up negative onhand part reports.
Note: Since 2BizBox v4.0, 2BizBox provides one new function “Back-flush” for some low cost consuming materials. “Pre-flush” and “Back-flush” are allowed, which support shipping negative quantity parts. In this case, negative onhand quantities may appear.
You may run the report by setting the “From Part #” and “To Part #” in the required filed, or leaves them blank to run the report for all parts in the system. Selectting “List all locations” will list all locations of the part with each search result.
In search results, you may click the negative onhand link to check the part’s onhand information.
 |
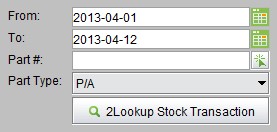
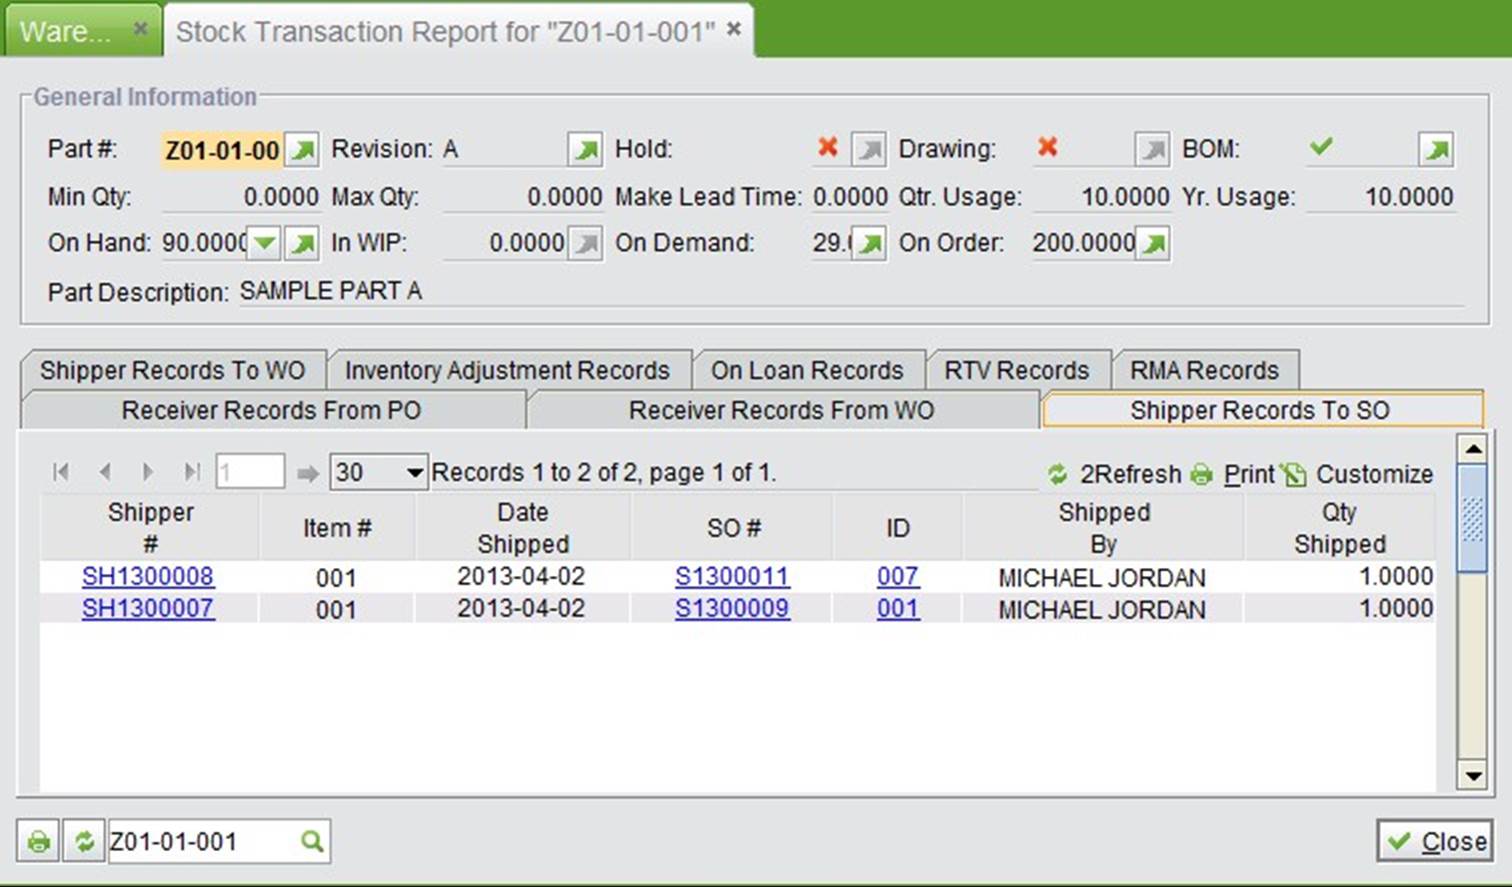
A stock transaction includes records of all parts in the warehouse, whether shipping or receiving. Input “From” and “To” time, a specified part#, part type, and click “Lookup stock transaction” to look up the shipping and receiving records of parts in a specified time range.
The results will appear as below. Click the orders tab to see details:
 |
The results will appear as below. Click on the tabs to switch for details:
 |
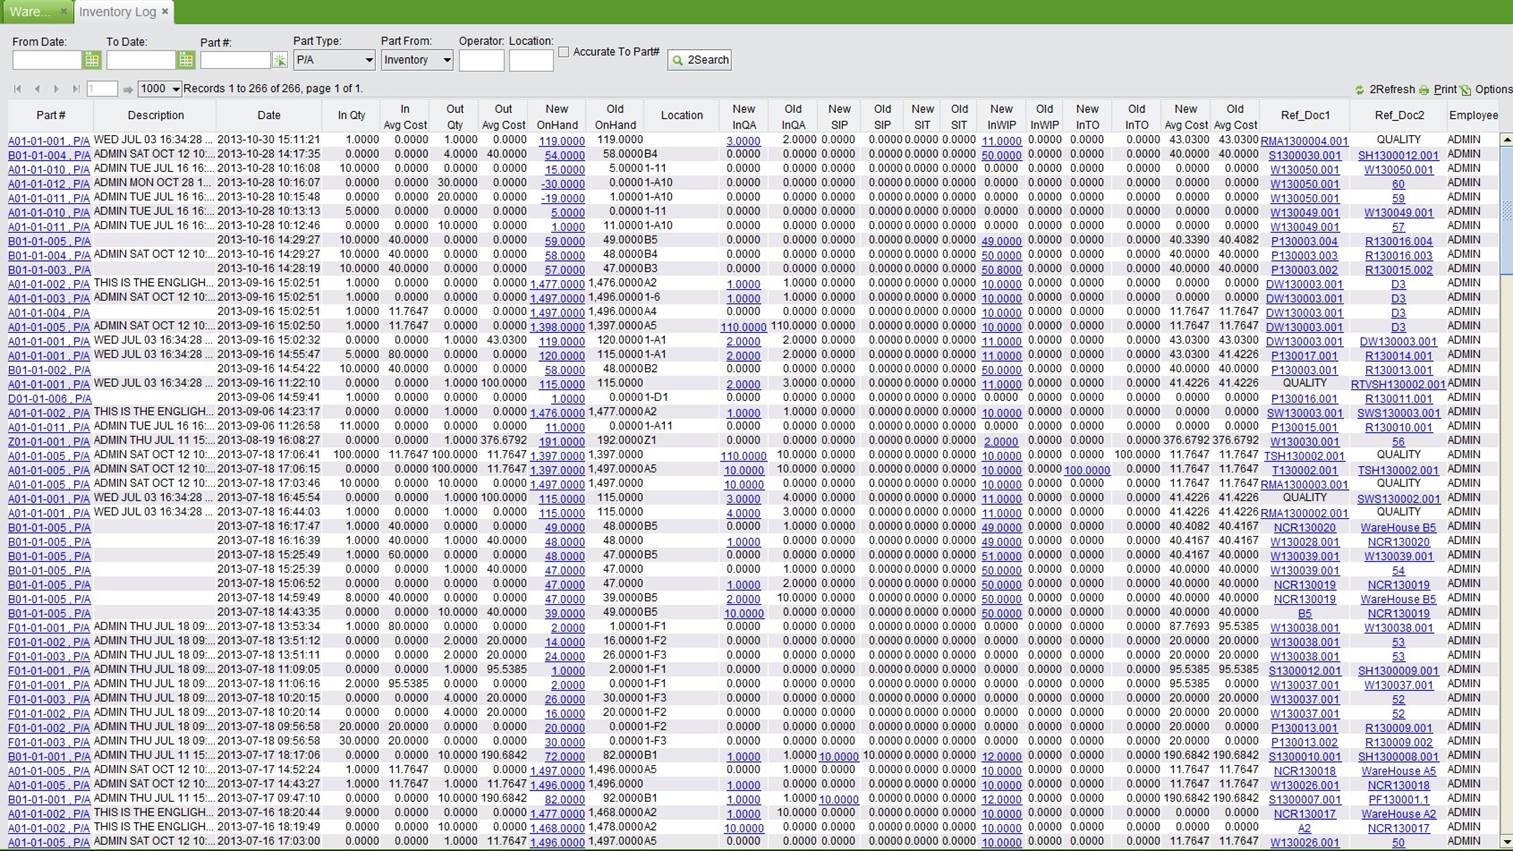
The Inventory Log is a full and complete record of all parts in the system. It contains all parts transaction information, including every specific change of the part’s quantity, cost, location when it goes in and out of the warehouse.
Search criteria you may use are listed as below:
The search results will appear as below. You may click the links to see related inventory information such as onhand, InQA, InWIP, Ref Docs, etc.
 |
Under the “Reports” tab of “Warehouse Home” sub module provides you a function to make an inventory list report for all the parts in the system. Click” 2Make Inventory List” to view the report as bellow. At the top of the report, you can view the total amount of the listed parts calculated by Avg Cost, Std Cost and List Price. Use the search criteria at the top, you can also make report for your desired parts.
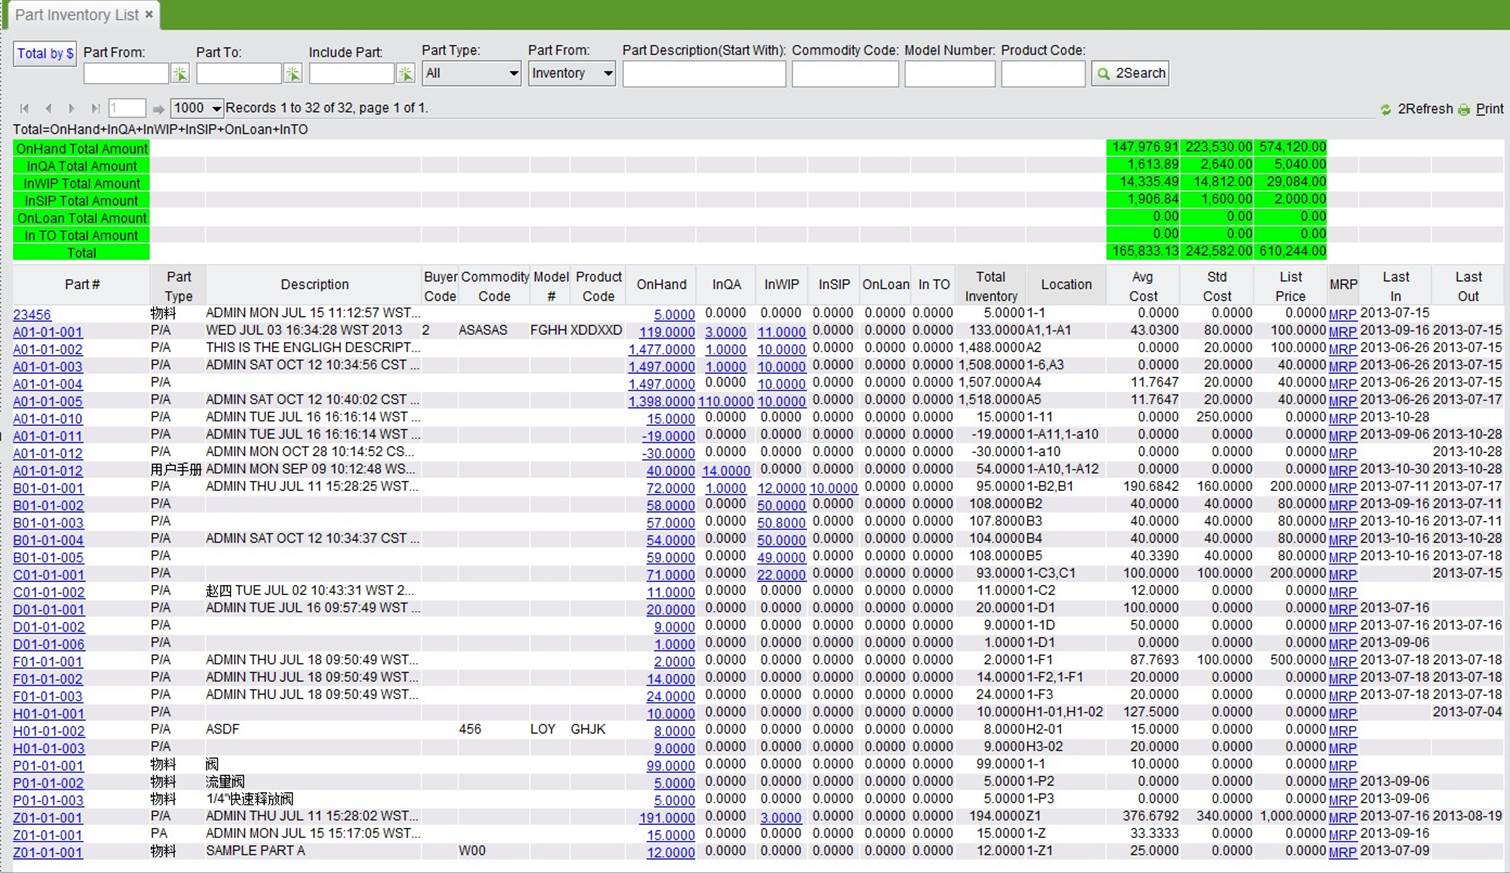 |
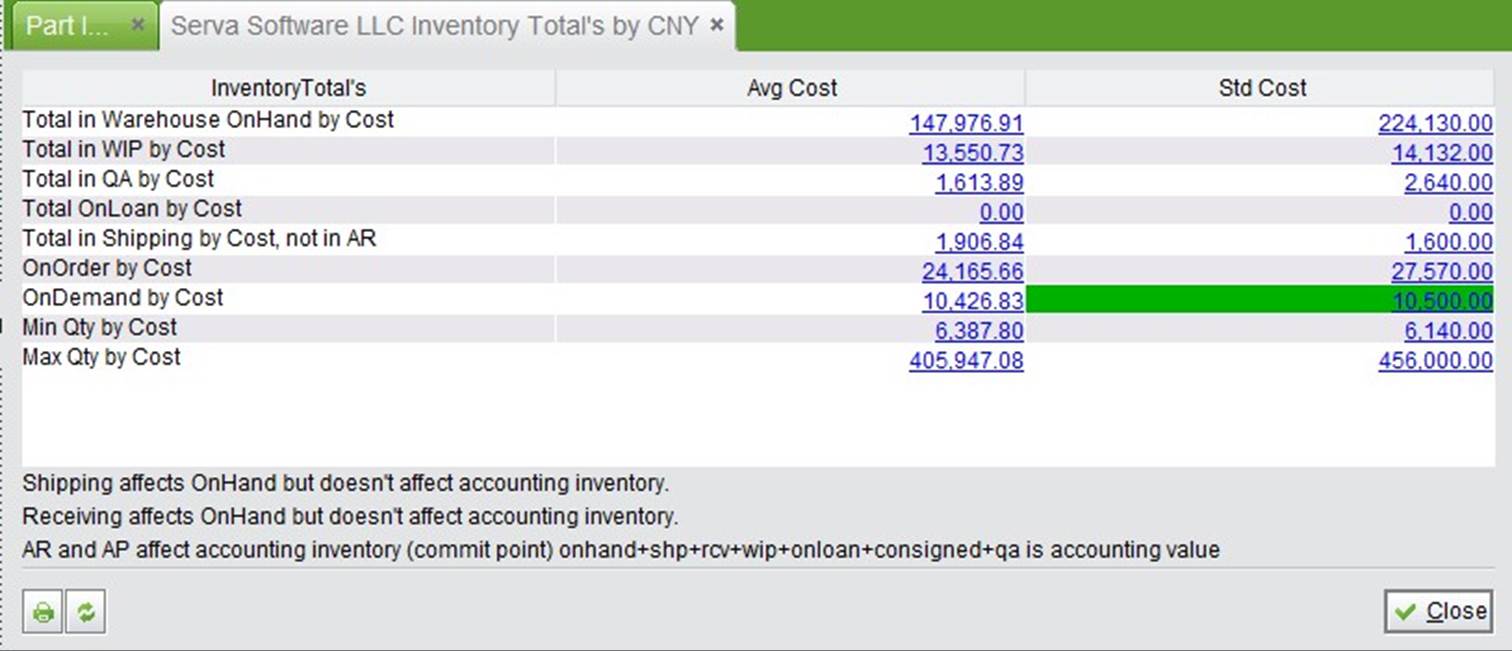
The button “Total by $” at the top left can be used to check all types of inventory amounts by both Avg Cost and Std Cost for all the parts. Click the amount in the search result will open the detailed part list or ref docs.
 |
If you are the warehouse manager, this info center will help you to know the shipping and receiving numbers of the current month and year in one minute. Instead of giving a long and complex report, this info center aims to display the essential information you require in a simple way.
Click “Warehousing Info Center” button under the “Info Center” tab to see the results as below:
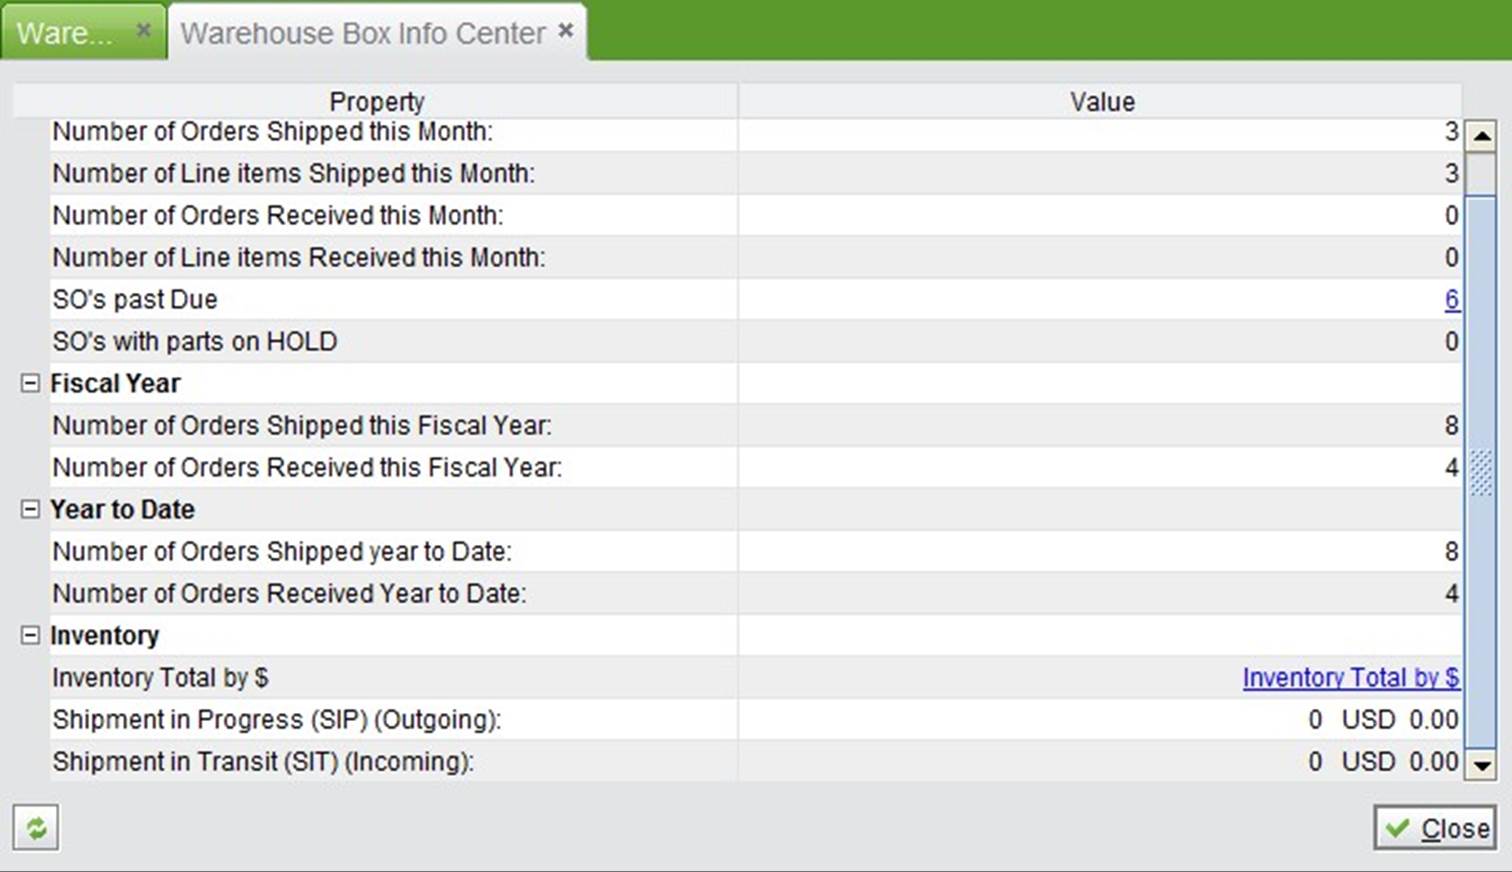 |
The search result is divided into four groups which are: This month, Fiscal Year, Year to Date and Inventory.
“This Month” tells you the number of orders shipped, number of line items shipped, number of orders received, number of line items received, number of past due SO’s and number of SO with parts on hold. “SO’s Past Due” gives a link to all past due SO items for you to check.
“Fiscal Year” and “Year to Date” tell you the number of Sales Orders shipped and the number of Purchase
Orders received this fiscal year or till this date of the year. With these simple numbers, you may obtain a rough picture of the workload and completion rate of the warehouse.
“Inventory” provides three facts that you may concern: inventory total which can be open in a new window, Shipment in Progress amount (Outgoing inventory) and Shipment in Transit (Incoming Inventory). With these numbers, you will have a quick idea of the inventory value and its recent trend.
Serva Software LLC may have many warehouses; for this, 2BizBox provides a multi-warehouse function to support the company’s management. With multi-warehouse, you can add many warehouses, initial warehouse location, batch move location of parts, etc.
Before adding more warehouses, you need to enable multi-warehouse function at “Control Panel - General - Company Setting - Warehouse.” When the box is checked, you may continue to setup warehouses either in the control panel or under the “Control” tab of “Warehouse Home” sub module.
 |
After multi-warehouse is enabled in the control panel, related features will appear under the “control” tab of Warehouse Home submodule, including “2Add New Warehouse,” “2Search All Warehouse,” “Init Warehouse,” and “Batch Move Location.”
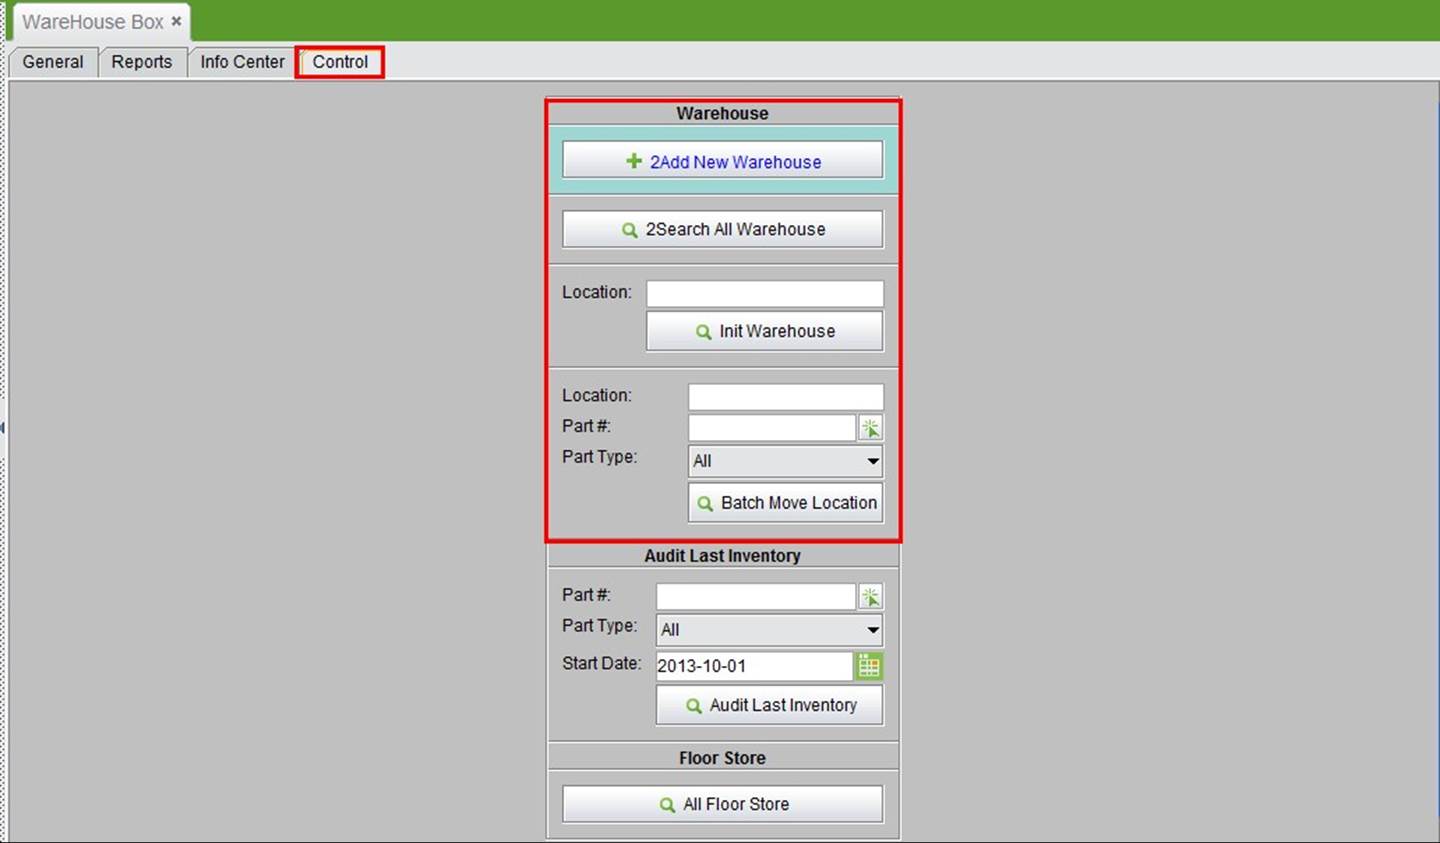 |
Click “2Add New Warehouse” to enter the adding new warehouse interface.
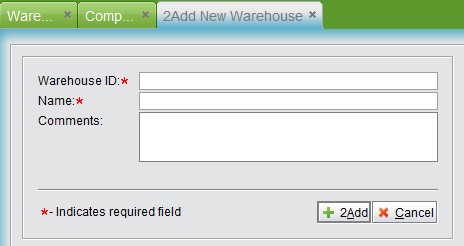 |
Input a Warehouse ID and name and click “2Add” to go to the “Updating Warehouse” interface, in which you can set whether the materials in this warehouse are allowed to transfer to other warehouses by “Batch Move Location.”
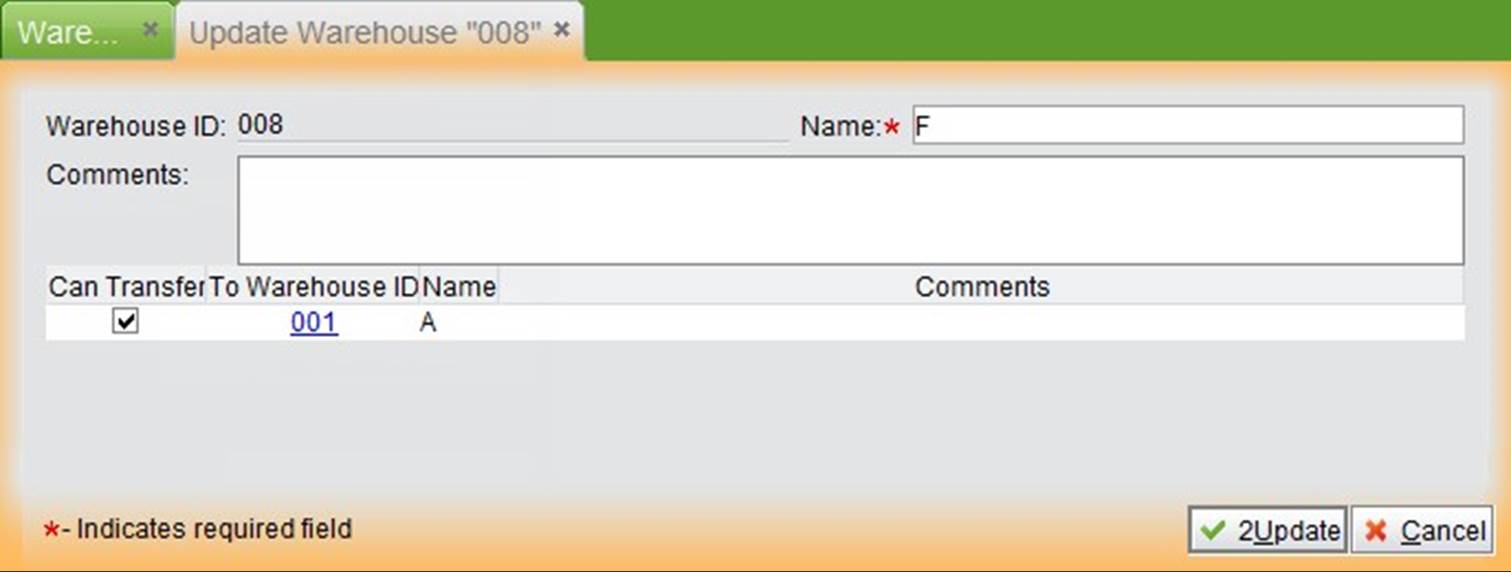 |
Click “Update” to finish adding the new warehouse.
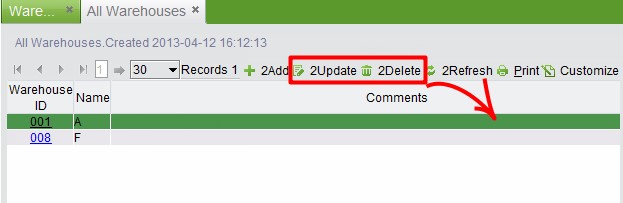
Click the button “2Search All Warehouse” to see all warehouse information. At the search results interface, you can add one new warehouse, or edit and delete it.
 |
Click the “Setup Warehouse” button in the Control Panel will also open this window.
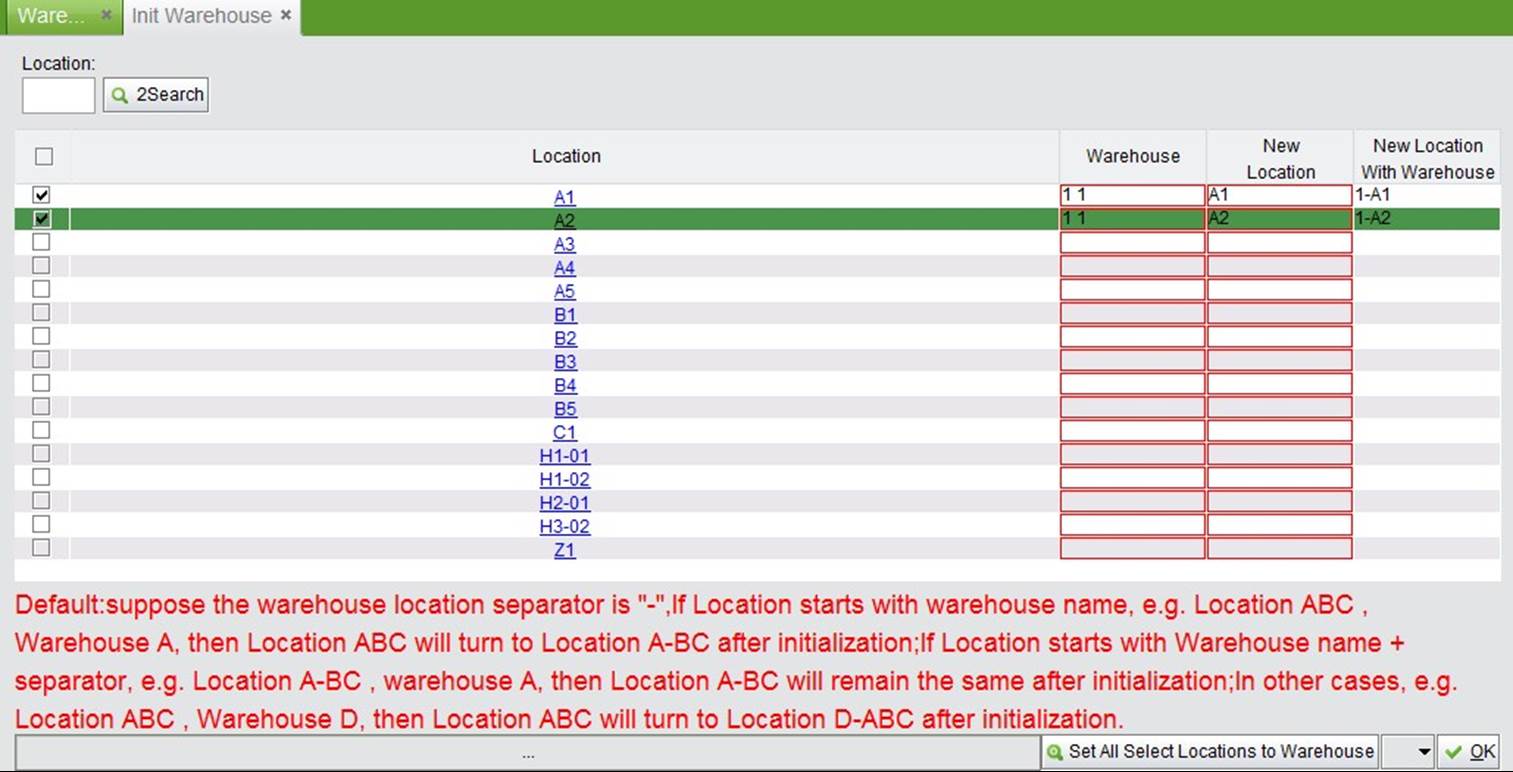
To differentiate relationships between location and each warehouse, you can name the location starting with “Warehouse Name + Separator” by initializing the warehouse. The default warehouse location separator is “-.” Click “Init Warehouse” to see how to initialize the warehouse.
To initialize location BC in warehouse A, the initialized location name become “A-BC”
To initialize location ABC in warehouse A, the initialized location name still is “A-BC”
To initialize location A-BC in warehouse A, the initialized location name still is “A-BC”
 |
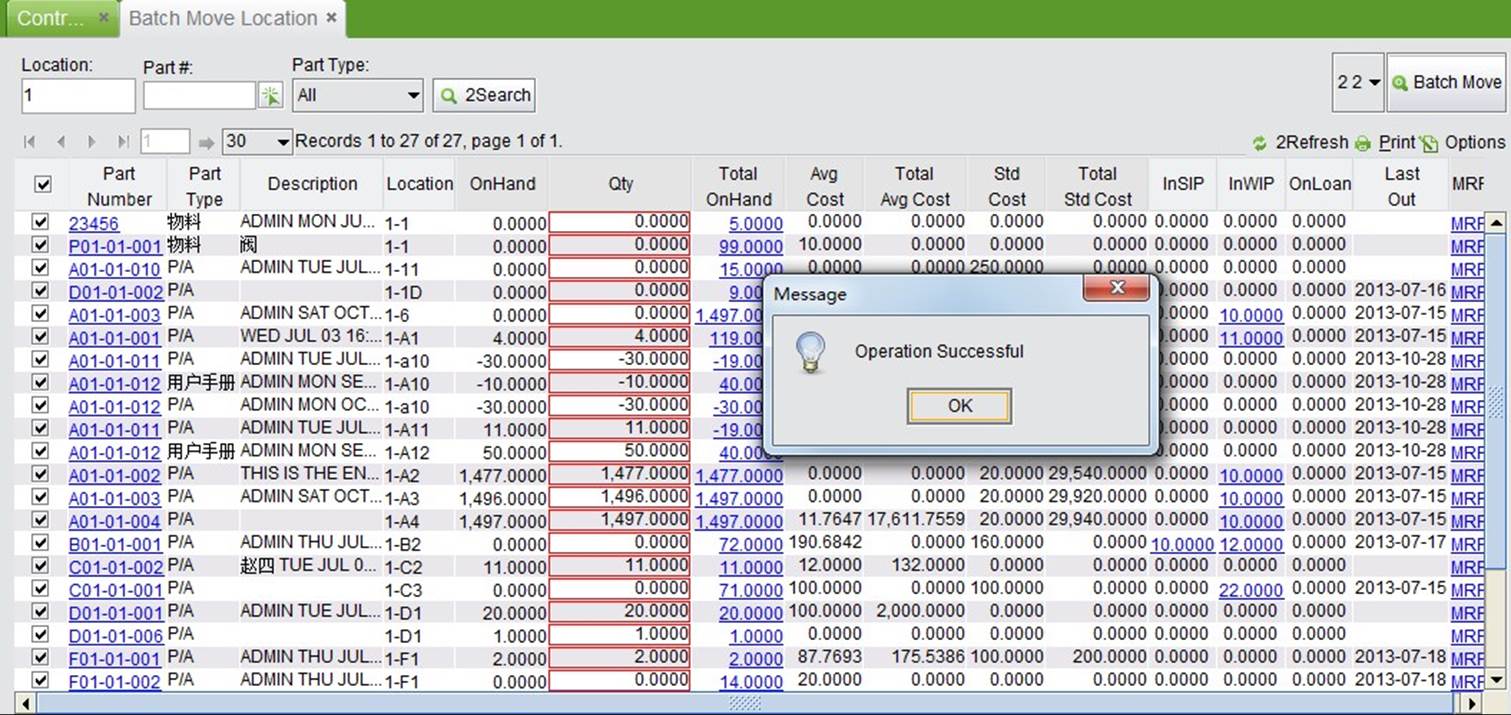
After initialization, this function allows you to batch remove locations from one warehouse to another. Use fuzzy search to list the parts and locations you want to move. In search results, select all the parts you want to move, e.g. all locations in warehouse “1,” then select the new warehouse from the dropdown menu at the top right corner. Finally click “Batch Move” to move all the selected parts to the same location in warehouse “2.”
 |
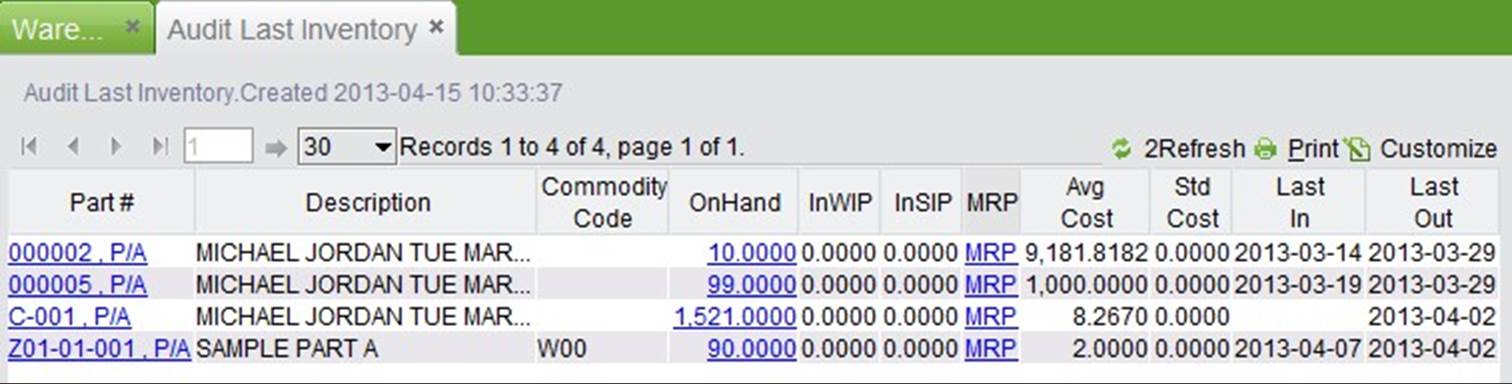
This is an audit function which helps check information on parts last in and out of the warehouse.
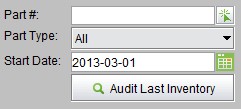 |
The audit results will appear as below:
 |
“Floor Store” is used in “Backflush” as the location for preflush or backflush. Please refer to chapter “Backflush” in “Work Order” for detail.
Shipping material and shipping produced parts can be done in the “Shipping” sub-module of the warehouse box. You can ship SO, RTV, Onloan Order, Transfer Order, Swap Orders, Non-productive Picking Orders and Disassemble Work Orders. Also, you can issue material to Work Order at this sub module.
Shipping SO is a commonly used function in the shipping module. You can arrive at the shipping interface in many ways. Shipping can be done one time in bulk or by batch number. A shipper will be generated when shipping is finished.
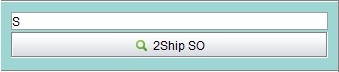
In 2BizBox, you can find related SO to ship by entering the shipping interface. You can get to the shipping interface by many different methods.
If the warehouse staff already knows the SO#, SO# can be entered here; then click “2Ship SO” to enter the shipping interface.
 |
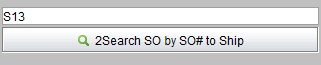
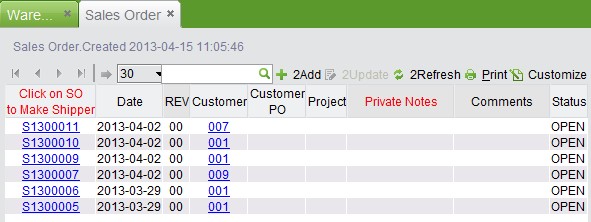
The warehouse staff can also search SO by SO# key word to do shipping. Input SO# key word here, then click “Search SO by SO# to Ship.”
 |
At the search results interface, click a SO# to go to the shipping interface.
 |
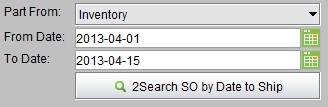
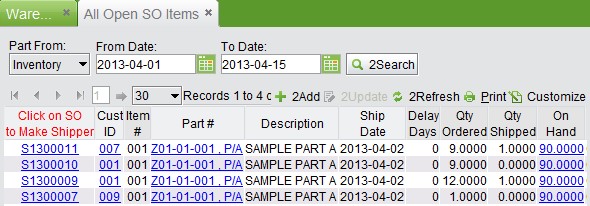
If SO# can’t be obtained, use “Search SO by Date to Ship” to see all sales items which are available to be shipped in a specified time range.
 |
At the search results, all SO items will be listed. Click a SO# to go to the shipping interface.
 |
Following the above methods, you can enter the shipping interface, shown below:
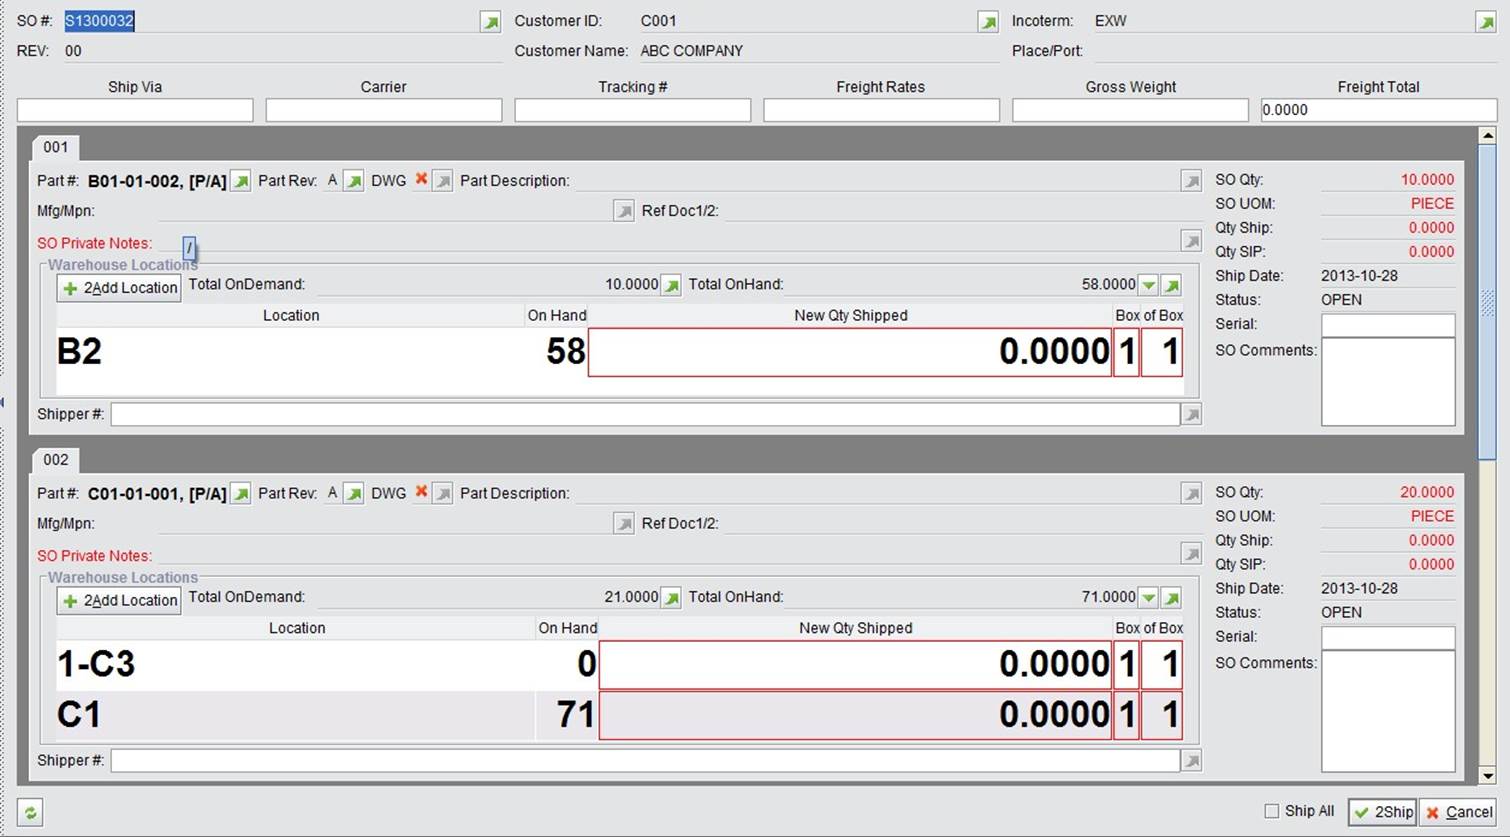 |
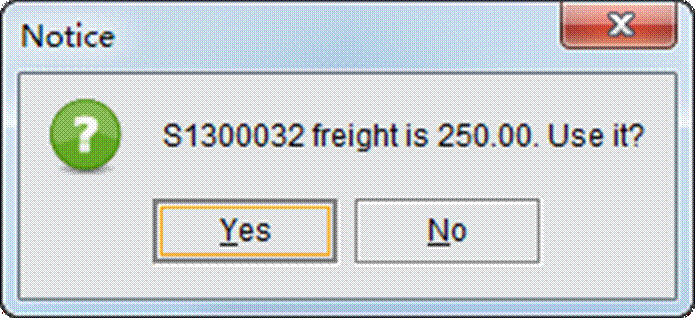
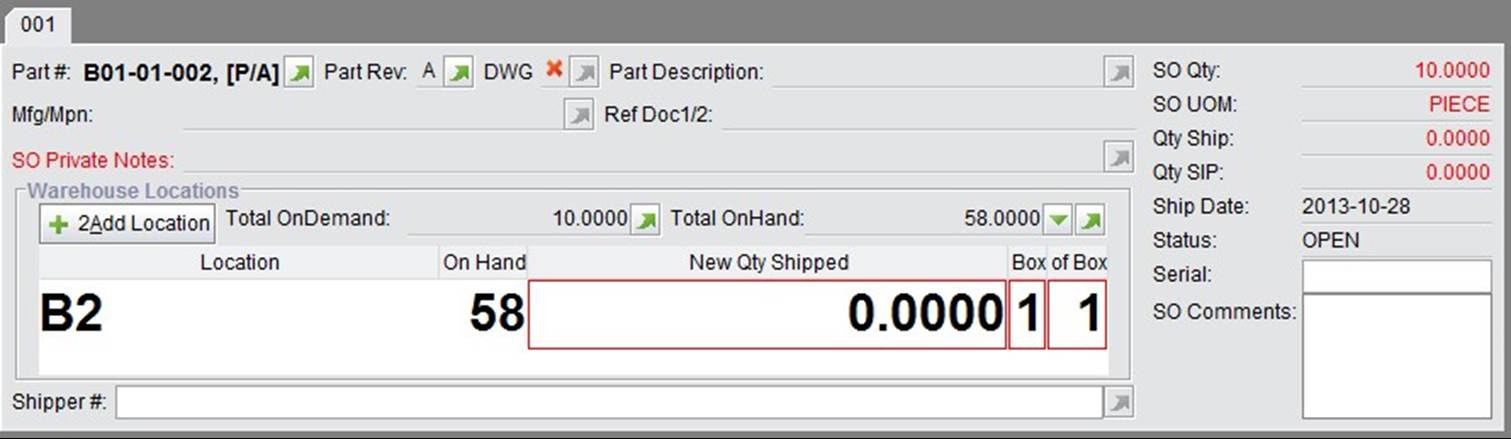
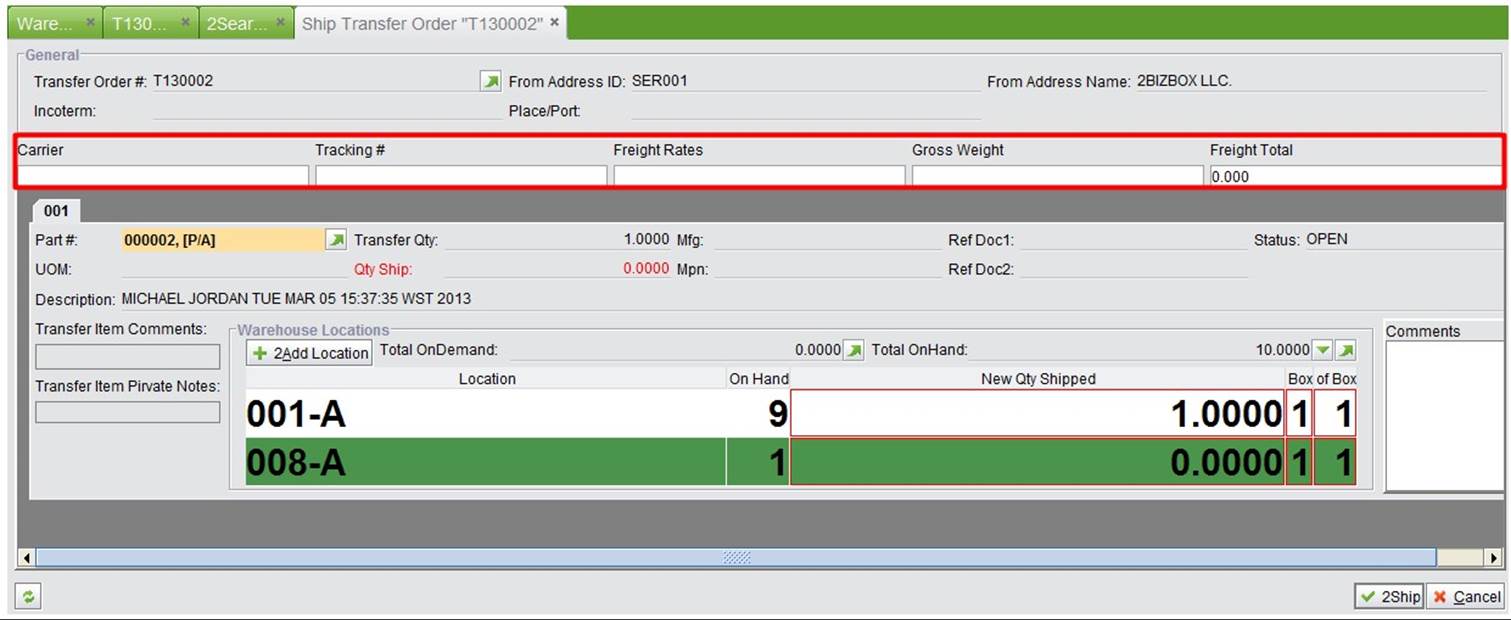
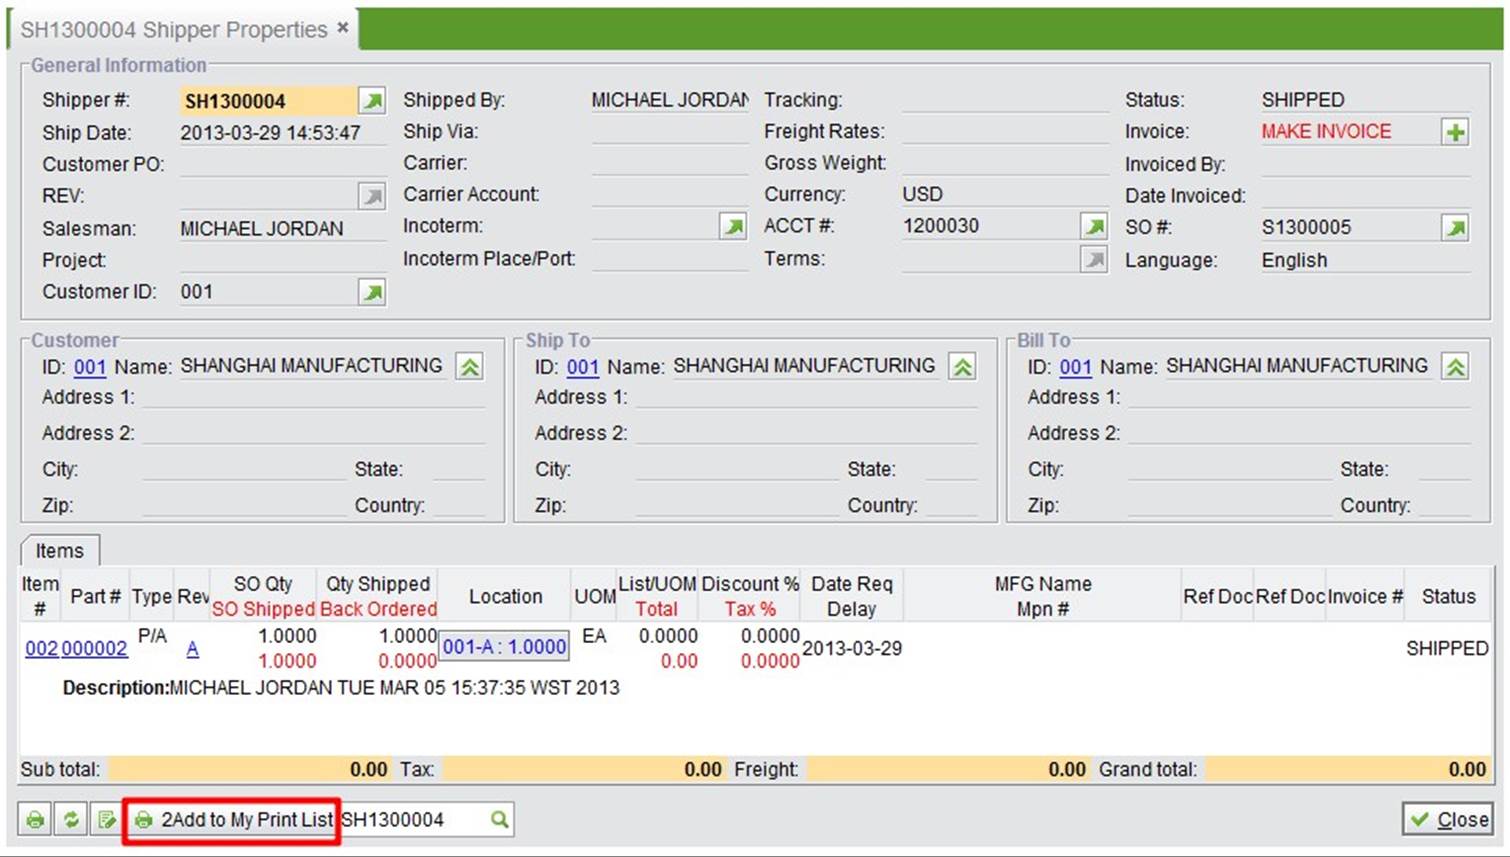
This is a typical shipping interface in 2BizBox composed by the General Information at the top, and the items below. The general information required to fill in contains “ship Via,” “Carrier,” “Tracking#,” “Freight Rates,” “Gross Weight” and “Freight Total.” If you’ve set the freight in SO, the system will open a window to ask whether to use it. If a freight fee is changed, you can click “No” and input the changed fee.
 |
The shipping item quantity can be filled in the “New Qty Shipped” from the corresponding locations. SO Items can be shipped by several times, but no more than the SO Qty, which is marked in red at the right.
 |
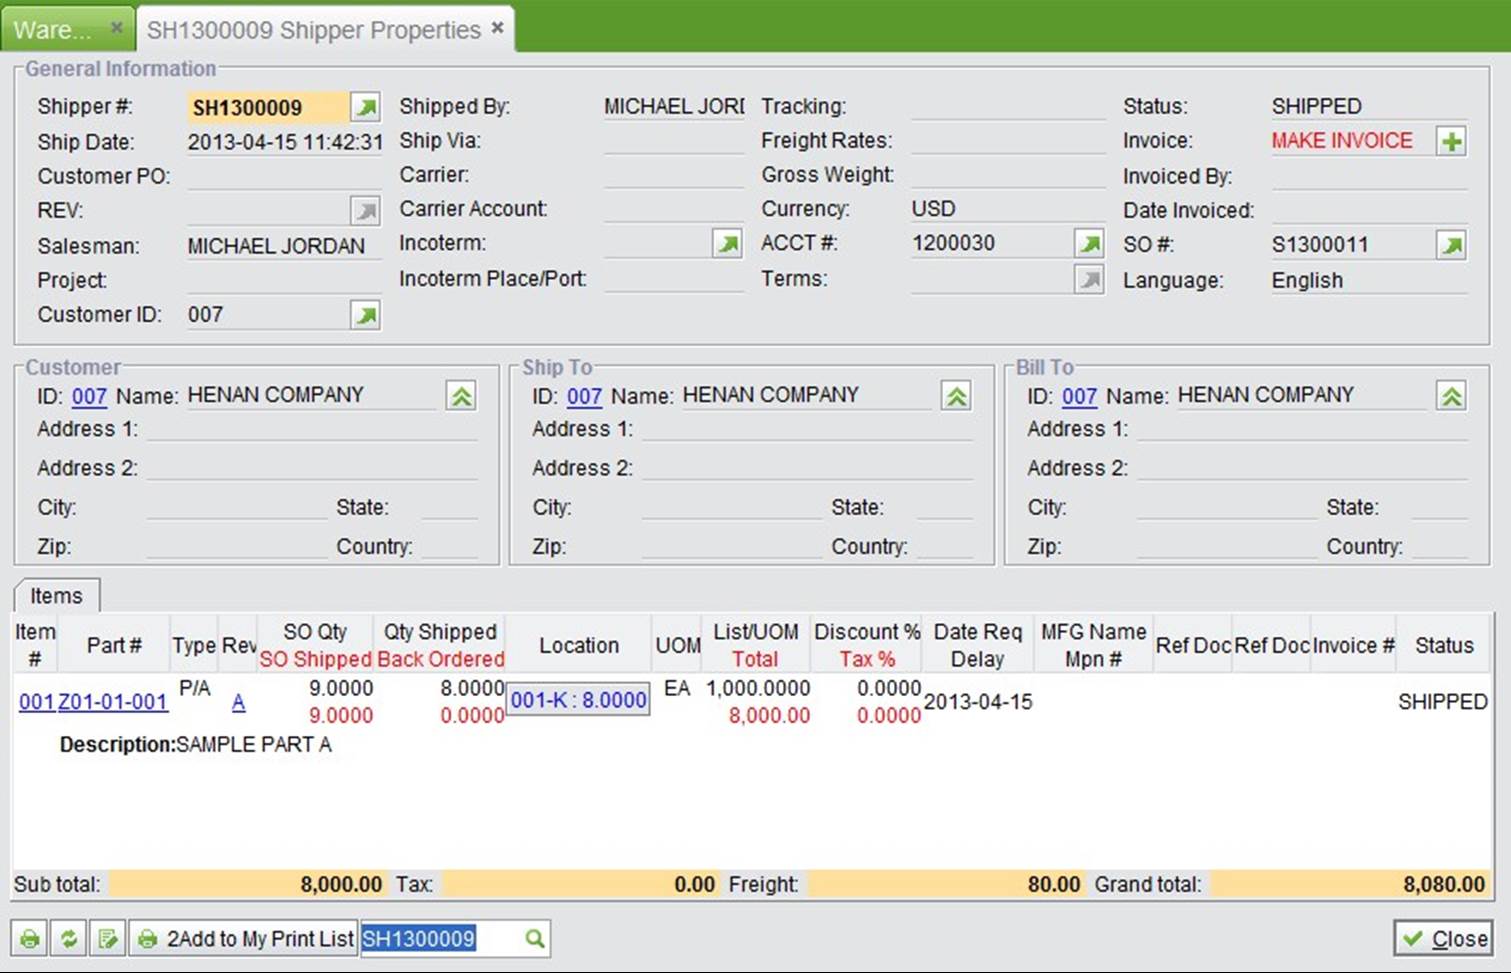 |
After shipping, the Shipper status becomes “Shipped.” If you make an invoice (AR) for the shipper, its status will become “Closed.” You can separate one SO to ship; a shipper will be generated after each shipping for the SO. The SO will be closed when all sales part items are shipped.
Under the “General” tab of “Shipping” sub module, you can run SO and Shipper search reports to track and manage your shipped Sales Order.
Use “SO#,” “Customer ID,” “Part#,” “From Date” and “To Date” to search for Sales Order items that have been shipped.
Input full Shipper#, and click the button to view the Shipper properties.
Input the keyword of Shipper# to search for related Shippers.
Input a SO# keyword to search Shippers of related SOs.
Input the keyword of “Salesman” to search related Shippers.
Input keyword of Customer ID to search related Shippers.
Use this function to search Shippers by various conditions, including the time range of the Shipper Date, Shipper#, SO#, Project, Part#, Part Type, Customer ID, Shipper Stautus, ACCT# and Warehouse which the shipped part belongs to.
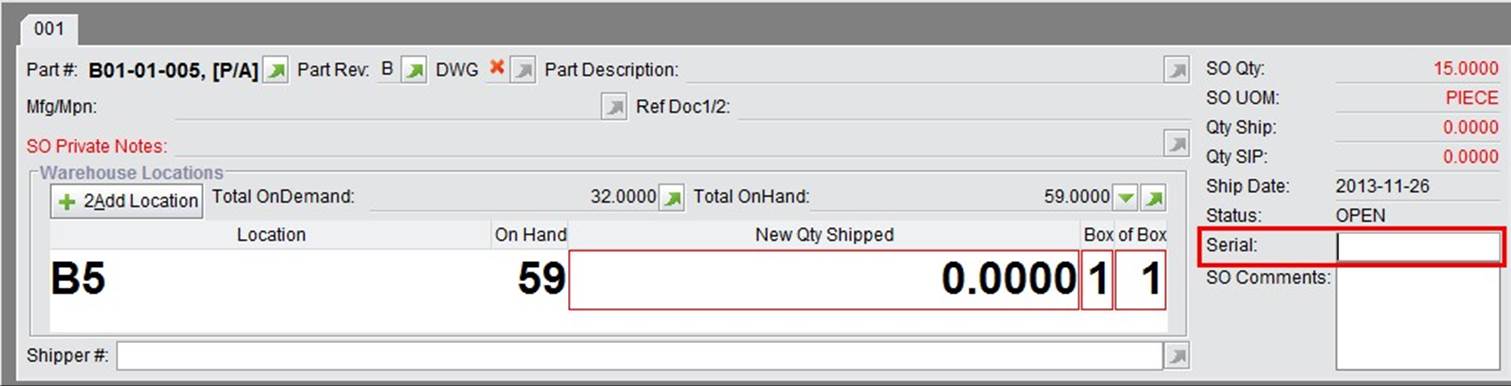
Use this function to search Shippers by shipped part’s serial, which is added in the shipping interface as a tracking number. The serial can be printed on the Shipper and sent to customer.
 |
Under the “General” tab of Shipping sub module, another important “shipping” function is issuing parts to a Work Order. You may consider it as an “internal” shipping action. WO issuing can be done in many places in 2BizBox, such as in Part Detail Interface and the Work Order Box.
There are several ways to go to the issuing parts to WO interface in Shipping sub module.
Input a full WO# and item# to go to the WO issuing interface.
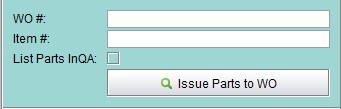 |
List Parts inQA: “inQA” is a special location to temporarily strore parts with quality issues. e.g., when some parts are broken during the production, you can put it to “inQA” location to decide whether to repair it or scrap it later. If you would like to issue parts inQA to a Work Order, you can check this option. Otherwise, parts inQA will not appear in the Issuing interface.
Input a WO# keyword here to search for Work Order Items to issue.
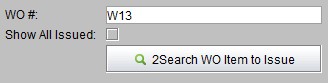 |
Show All Issued: check this option to show all issued Work Order items at the search results. Otherwise, search result will show WO Items with unissued parts in part detail.
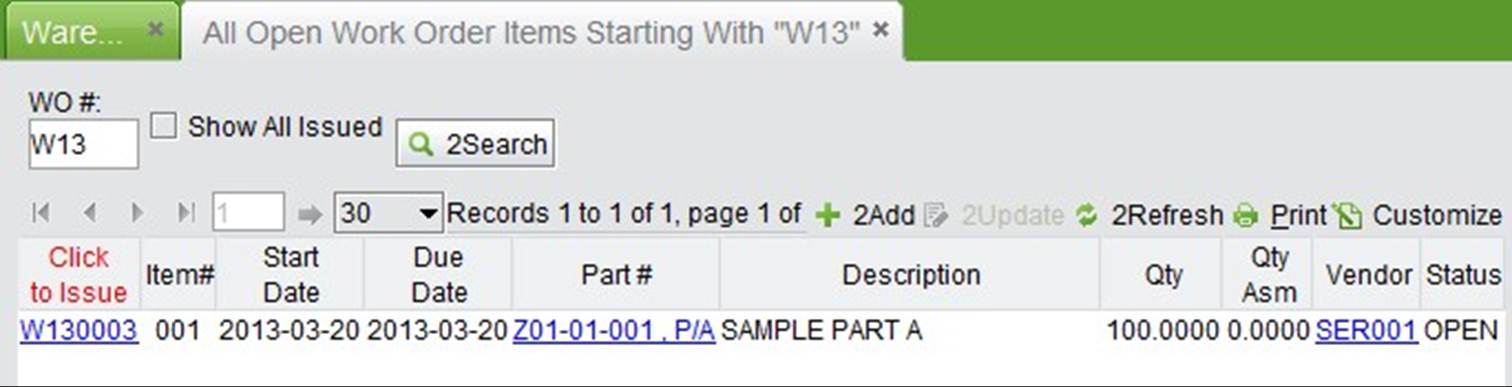
In the search results interface, click a WO# to go to the issuing interface.
 |
Input a WO item’s part# keyword to search for Work Orders to issue. At the search results interface, click a WO# to go to the issuing interface.
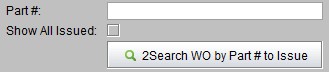 |
Show All Issued: check this option to show all issued Work Order items at the search results. Otherwise, search result will show WO Items with unissued parts in part detail.
Search all WO items available to issue within a specified time range. At the search results interface, click a WO# to go to the issuing interface.
 |
Show All Issued: check this option to show all issued Work Order items at the search results. Otherwise, search result will show WO Items with unissued parts in part detail.
With any of the above methods, you will go to the WO issuing interface, which is almost identical to the SO shipping interface, except that part items in the WO issuing interface can be edited, added, or deleted. Please refer to further details in the “WO Box.” At “New Qty Issued,” fill in the part quantity to be issued, or click “Issue Gap” to issue part quantity based on WO needed.
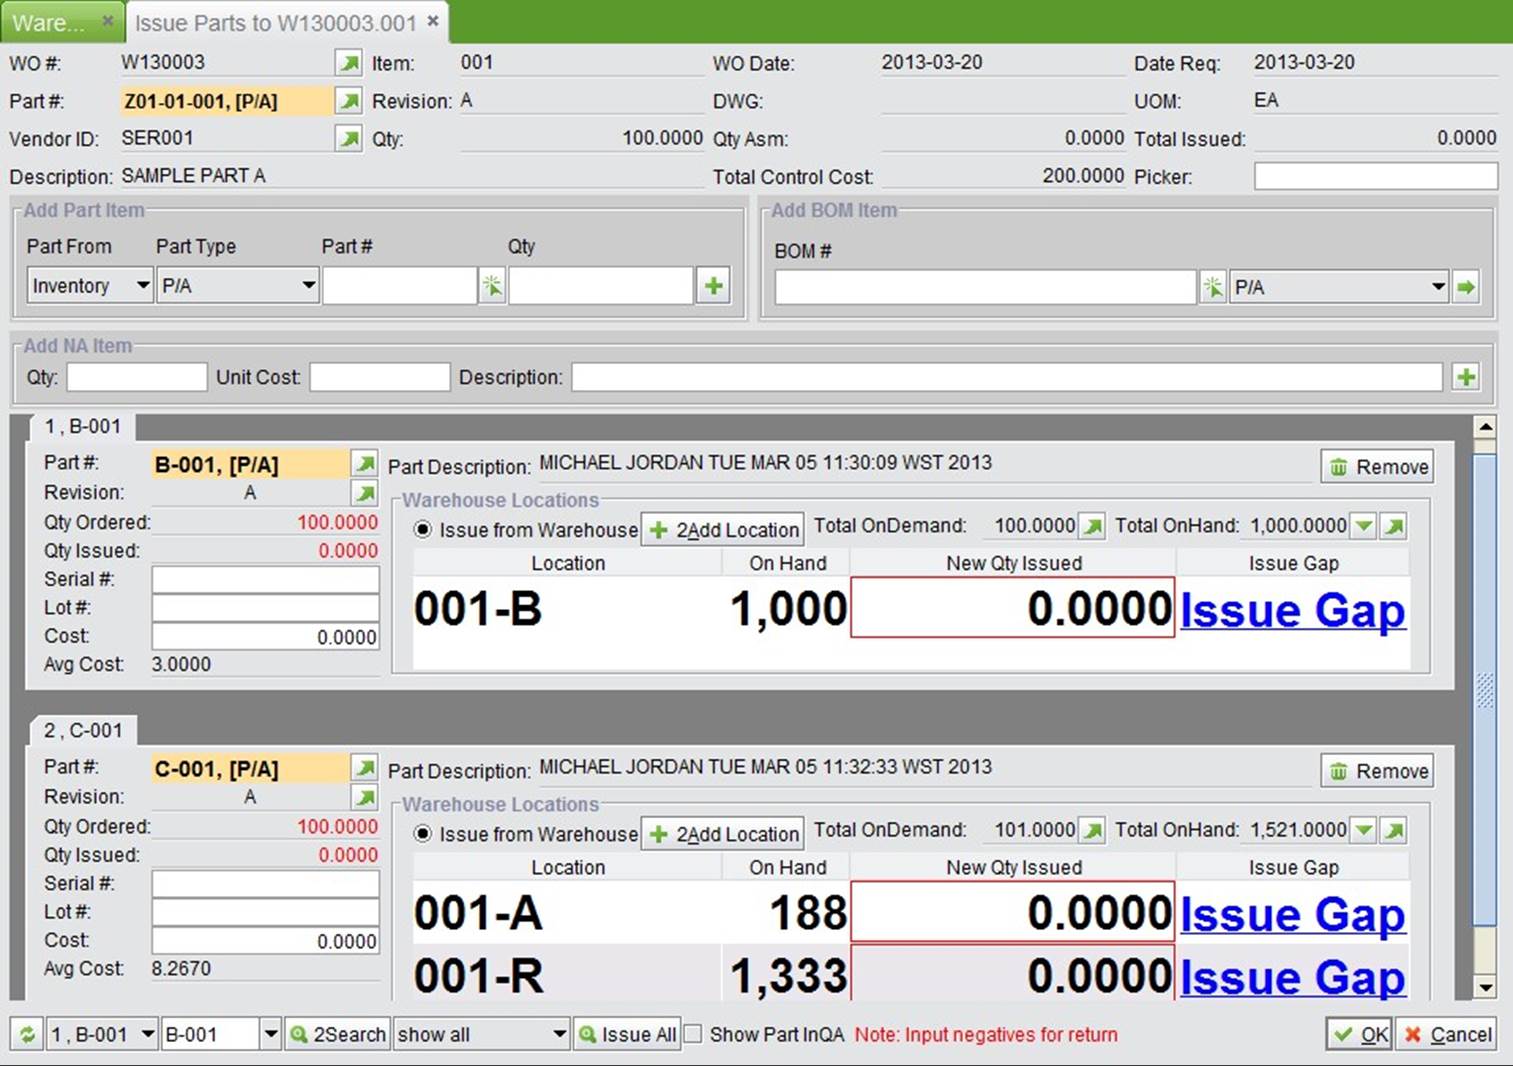 |
At the top right of the interface, fill in the name of the picker who issued the parts to WO. You can define related picker settings in the control panel module to manage the issuing of parts strictly and efficiently.
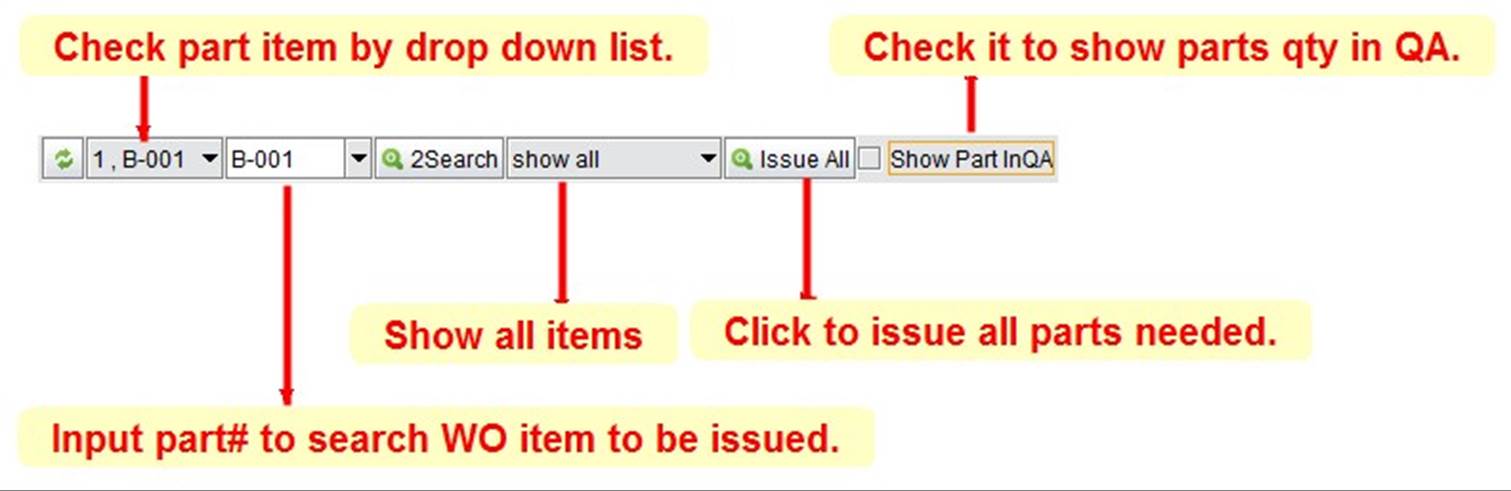
At the bottom of the issuing interface, there are several buttons that you can use to look up an item to be issued. The function of each button is explained below:
 |
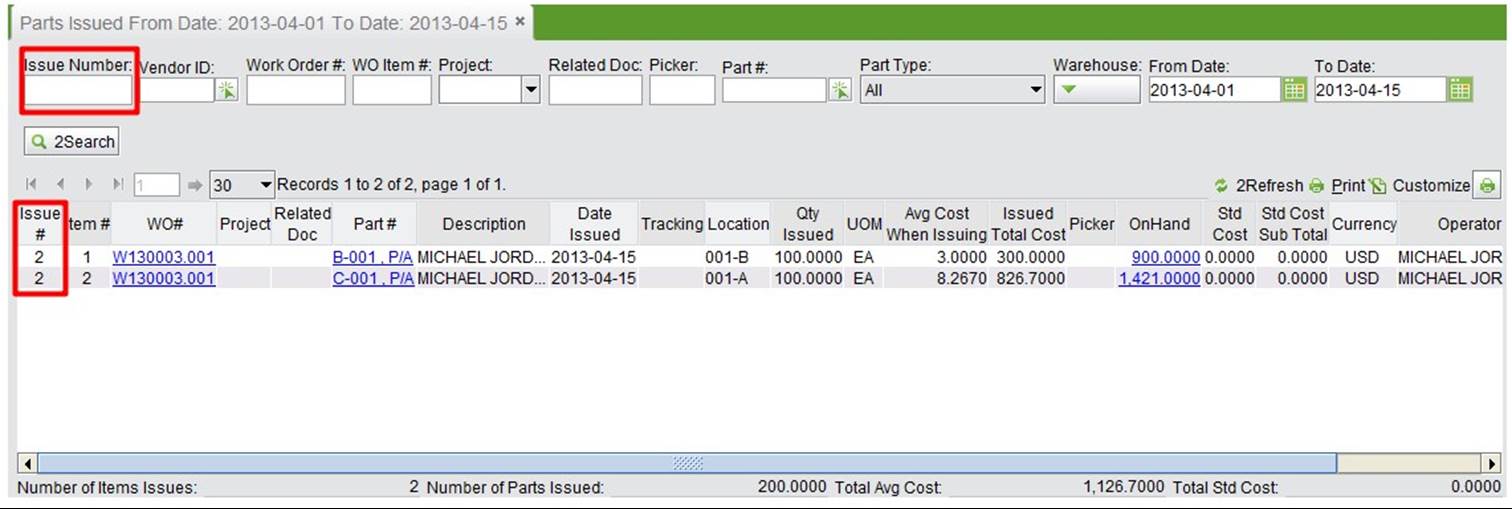
When all issuing information is filled out, click “OK” to issue parts. Issuing a WO will not generate an issue number, because it is not a shipper. After issuing parts, go to the “Part Issued” interface, where you can search part issuing records by different conditions, e.g. by issue number.
 |
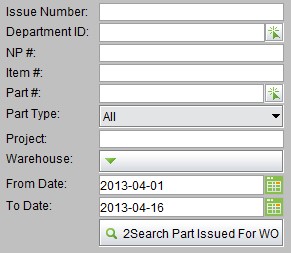
You can also check a WO part item’s issuing record by using the “Search Parts Issued for WO” fuction in the “Shipping” sub-module.
You can return products to be sent back to the vendor by using the “RTV Shipping” function in the “Shipping” sub-module after a RTV is created.
 |
Input RTV# or look up RTV# to go to the RTV shipping interface.
Input RTV # and click the button to go to the RTV shipping interface.
 |
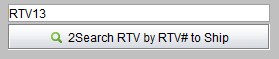
Input RTV# key word and click the button to search all RTVs. At the search results interface, click RTV# to go to the RTV shipping interface.
 |
If an NCR was created already, the goods will be shipped from QA by default.
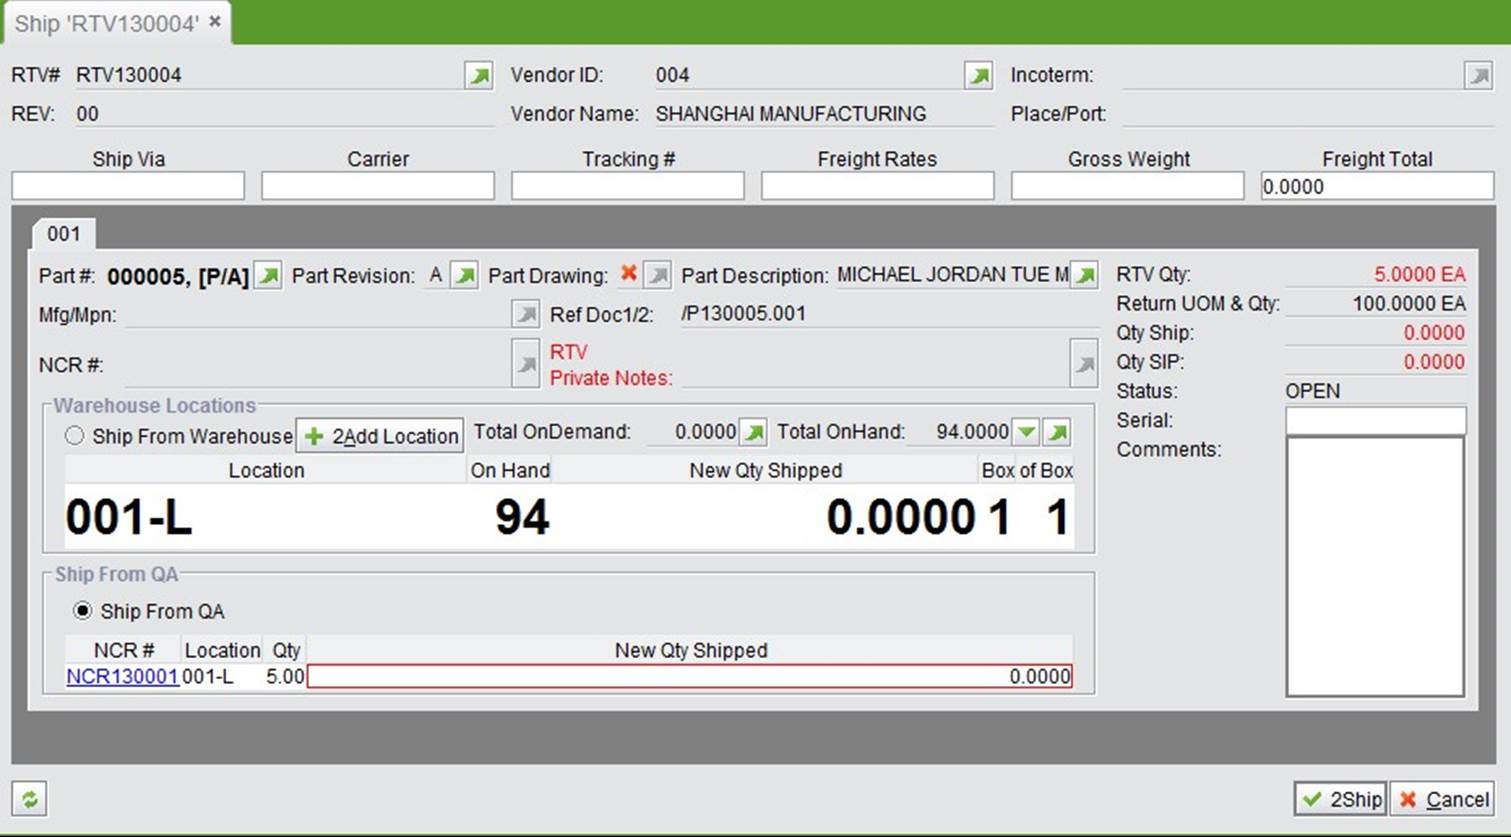 |
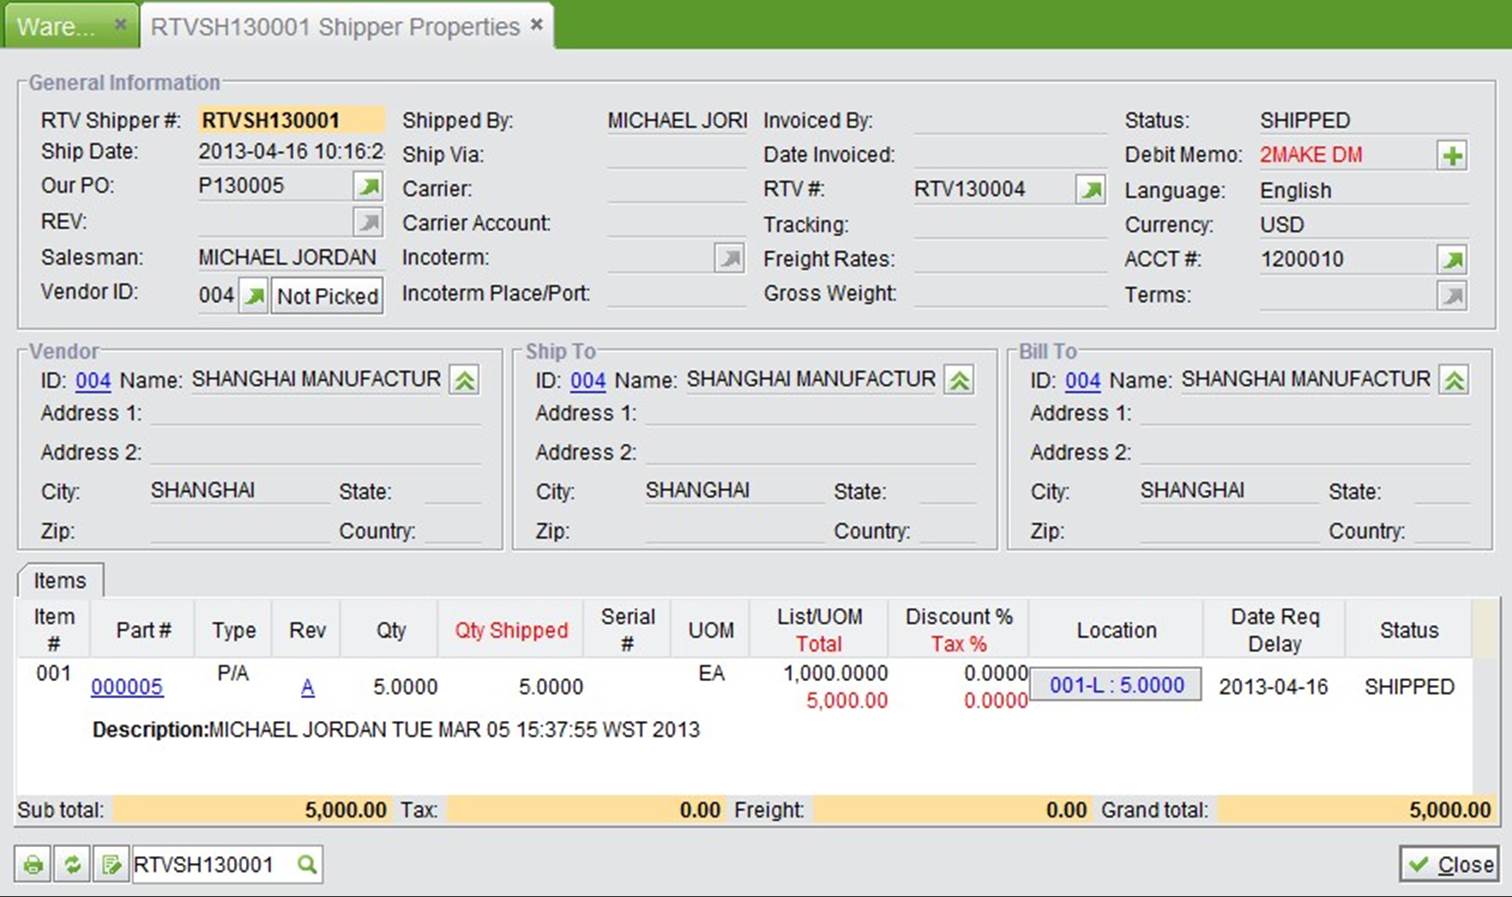
Of course, you can also choose ship from inventory. At the right side of the interface, fill in a serial# and comments for tracking and checking in the future. Fill in “New Qty Shipped,” then click “Ship” to generate an RTV shipper starting with RTVSH. After it is shipped, the part’s status becomes “Shipped.” From here, a debit memo can be created. After a DM is created, the RTV shipper status will be closed automatically.
 |
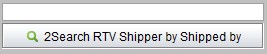
There are many different ways to look up an RTV shipper at the RTV shipping interface. Lookup RTV Shipper
Input a full RTV shipper#, and click the button to lookup a shipper.
 |
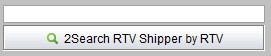
Input an RTV# key word to search for related RTV shippers.
 |
Input a vendor ID# key word to search for related RTV shippers.
 |
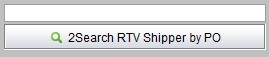
Input a PO# key word to search for RTV shippers. Corresponding RTVs will be added by a PO or will be related to a PO.
 |
Input a “Shipped by” key word to search for RTVs. The person who ships the RTV is also the creator of the RTV.
 |
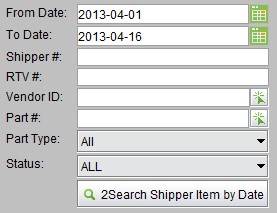
Search RTV shipper items by inputting different conditions within specified time range; the search results will be listed by time.
 |
Onloan orders are used for borrowing parts or tools among departments in the company, or lending to customer for references, among other things. When an onloan order is created, onloan shipping can be done in the warehouse module to generate an onloan shipper. When returning the parts or tools, onloan receiving need to be completed. Thus, the reason for the onloan process is quite clear: avoiding part loss.
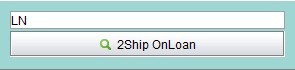 |
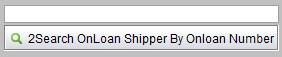
Input an onloan# key word, and click button to search onloan orders. Click an onloan order# at the search results interface to go to the onloan shipping interface.
 |
At the onloan order shipping interface, carrier and freight information can be filled in. Fill in new quantities shipped and comments, then click” Ship.”
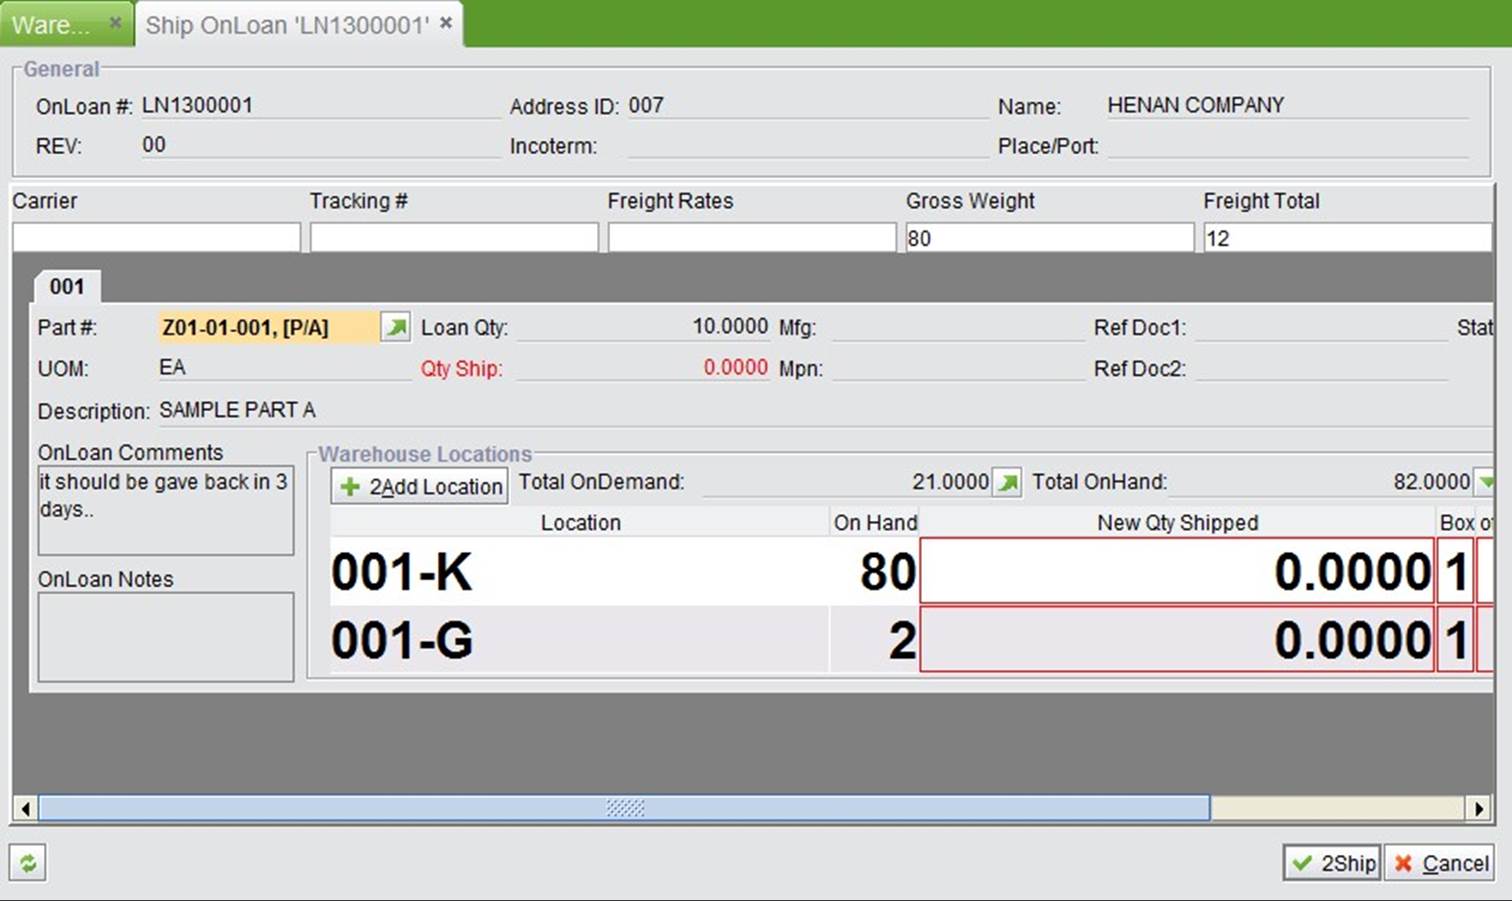 |
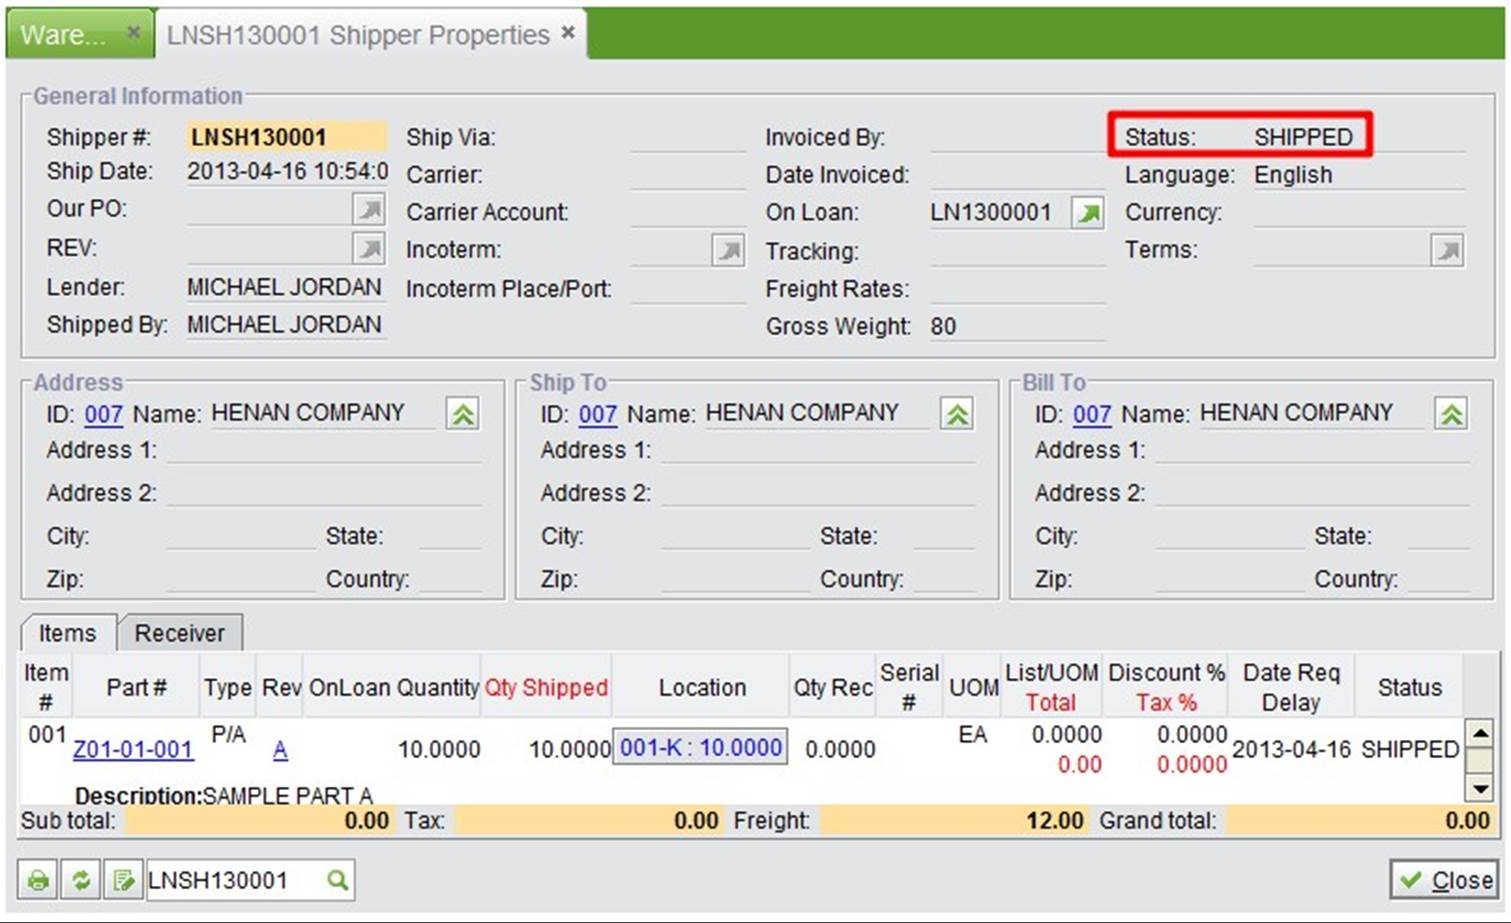
After shipping an onloan order, its status becomes “Closed.” Meanwhile, one onloan shipper starting with “LNSH” is generated with the status “Shipped.” When you are finished receiving an onloan shipper, its status will be “Closed.”
 |
2BizBox provides several methods to search onloan shippers in the onloan shipping sub-branch interface.
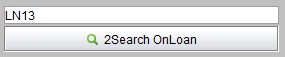
Input an onloan shipper# key word, and click the button to search for onloan shippers.
 |
Input an onloan shipper # key word to search for related onloan shippers.
 |
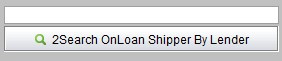
Input a lender’s key word to search for related onloan shippers. Fill in the lender name when creating an onloan order.
 |
Input a customer/vendor/department ID# key word to search for related onloan shippers.
 |
Input a customer/vendor/department ID# key word to search for related onloan shippers. Search results will be listed by item.
 |
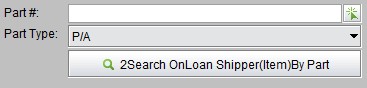
Input a part# key word to search for related onloan shippers; search results will be listed by item.
 |
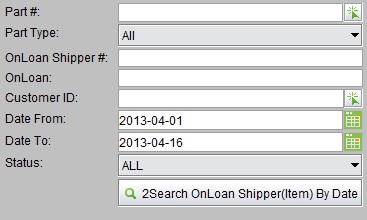
Search for onloan shippers by inputting different conditions within specified time range; search results will be listed by item.
 |
The Transfer Order feature is used for transferring among different warehouses or different locations in one warehouse. Please refer to further details in the “Warehouse Module->Transfer Order” Chapter. Transfer orders include inner transfers and outer transfers. Inner transfers do not need transfer shipping, they only require clicking the button at the bottom of the transfer order to indicate a location transfer. Outer transfers require transfer order shipping.
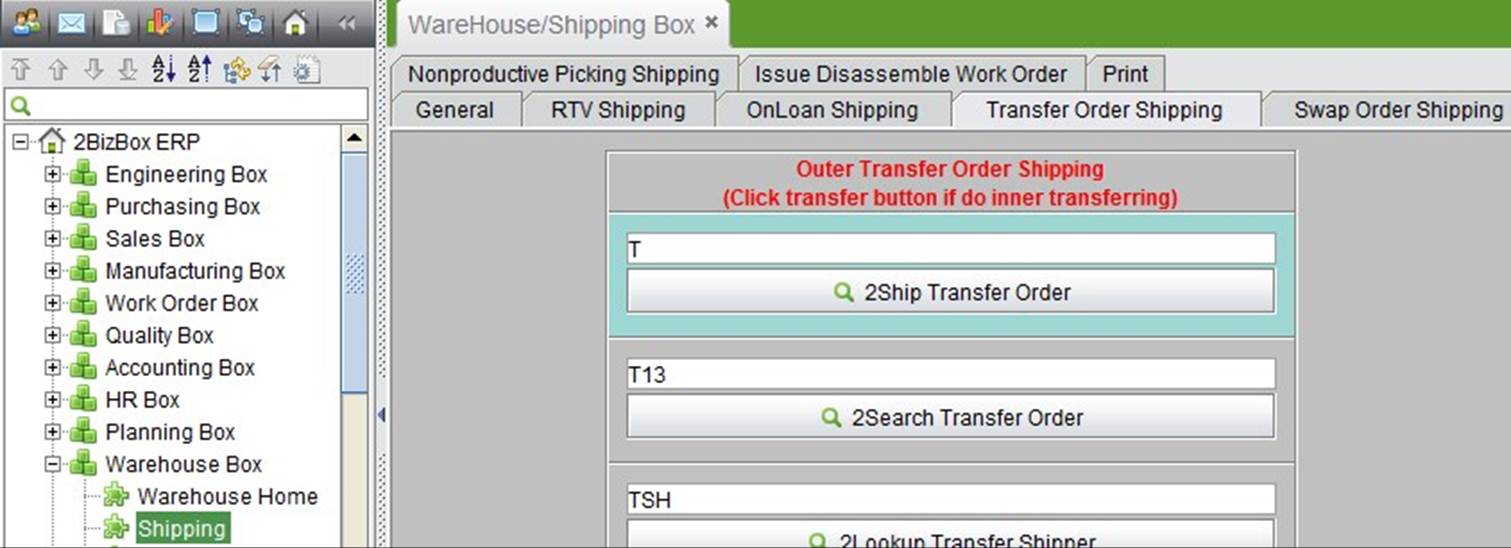 |
Input a full Transfer Order#, and click the button to go to the transfer order shipping interface.
 |
Enter transfer order key words to search, then click a transfer order# at the search results interface to go to the transfer order shipping interface.
 |
Input a transfer order’s carrier and freight information here. After filling in the “New Qty Shipped” and comments, click “Ship.”
 |
After shipping, the transfer order’s status will be “Closed.” Meanwhile, one transfer order shipper starting with
“TSH” will be generated with “Open” status. After receiving from the transfer order shipper, the status will be” Closed.”
2BizBox provides several ways to look up transfer order shippers.
Input a full transfer order shipper# to look up its details.
 |
Search for a transfer shipper by date, transfer shipper# and other conditions.
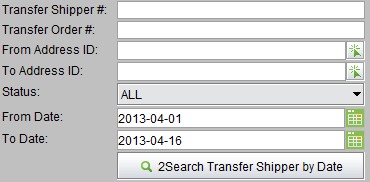 |
Search for transfer shipper items by date and other conditions. You can specify part# to search related transfer shippers.
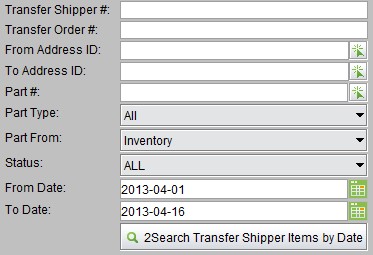 |
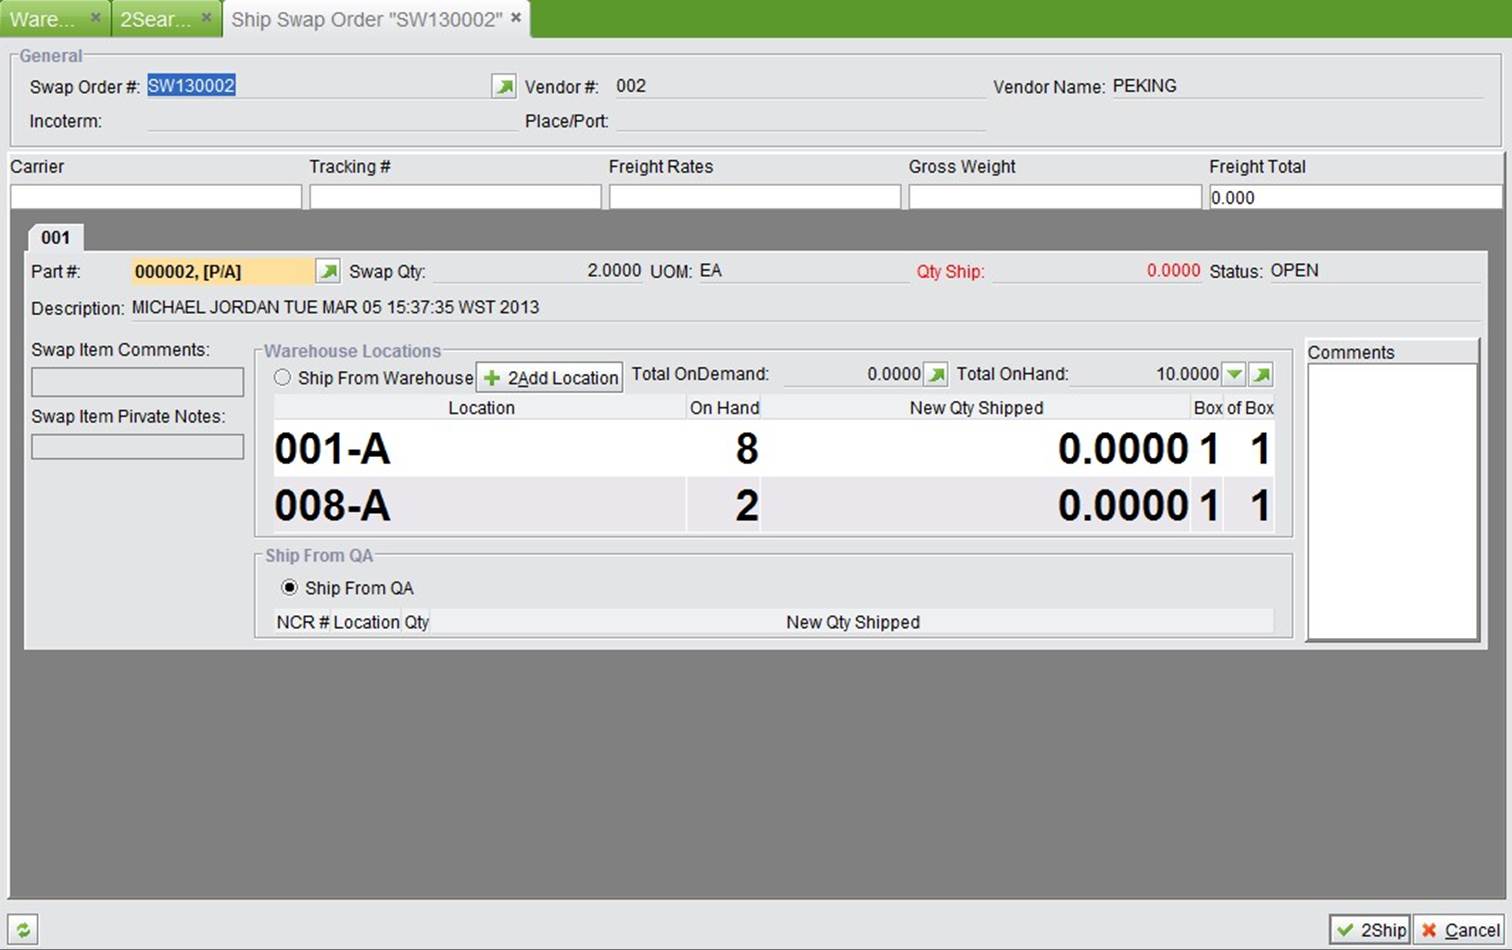
A Swap Order is used when a good purchased from a vendor has a problem and needs to be exchanged. After a swap order is created, ship it at “Swap Order Shipping” in the warehouse module.
 |
There are two methods to go to the swap order shipping interface. One is to look up, the other is to search.
 |
 |
Swap order is the default shipping from NCR. IF no NCR is created for the part, you can ship the part from inventory directly. Input the new quantity shipped, and click the “Ship” button.
 |
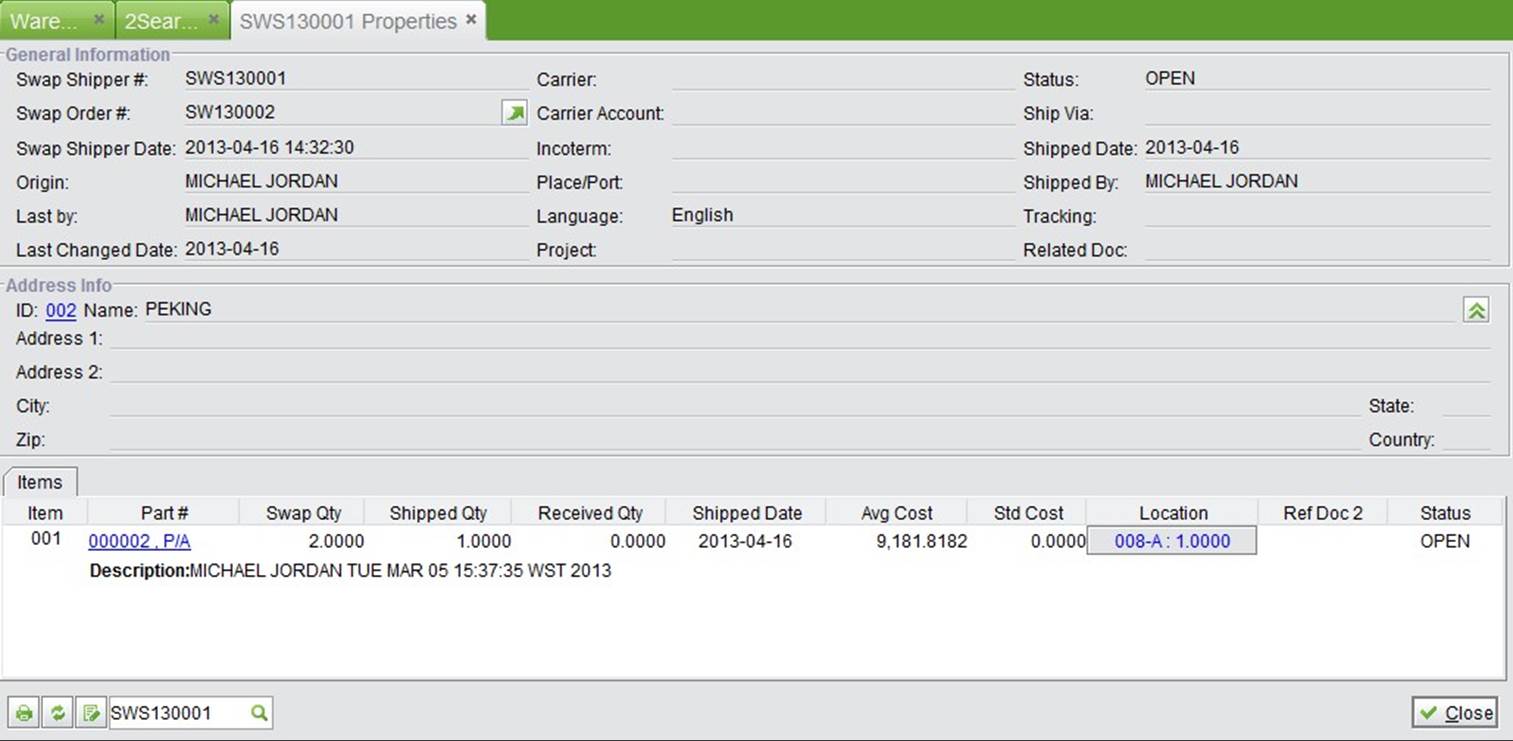
After shipping, the swap order status becomes “Closed.” Meanwhile, one swap shipper# starting with “SWS” is generated with an “Open” status. After receiving a swapped part, you can complete receiving in the warehouse module. Afterwards, the swap shipper’s status will be “Closed.”
 |
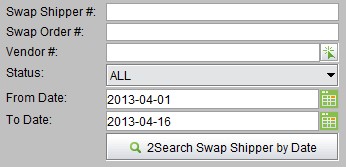
There are several ways to look up a swap shipper.
Input a full swap shipper#, and click the button.
 |
Search for a swap shipper by conditions like swap shipper#, swap order#, status, or vendor# within a specified time range.
 |
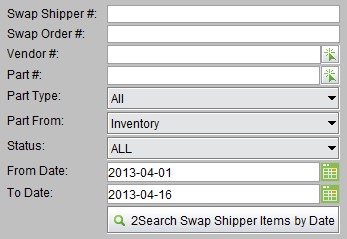
Search swap shipper items by date and other conditions.
 |
Nonproductive picking is used for picking nonproductive materials, like office goods. You can set a separate account# for it, and shipping for “Nonproductive Picking” in the warehouse module.
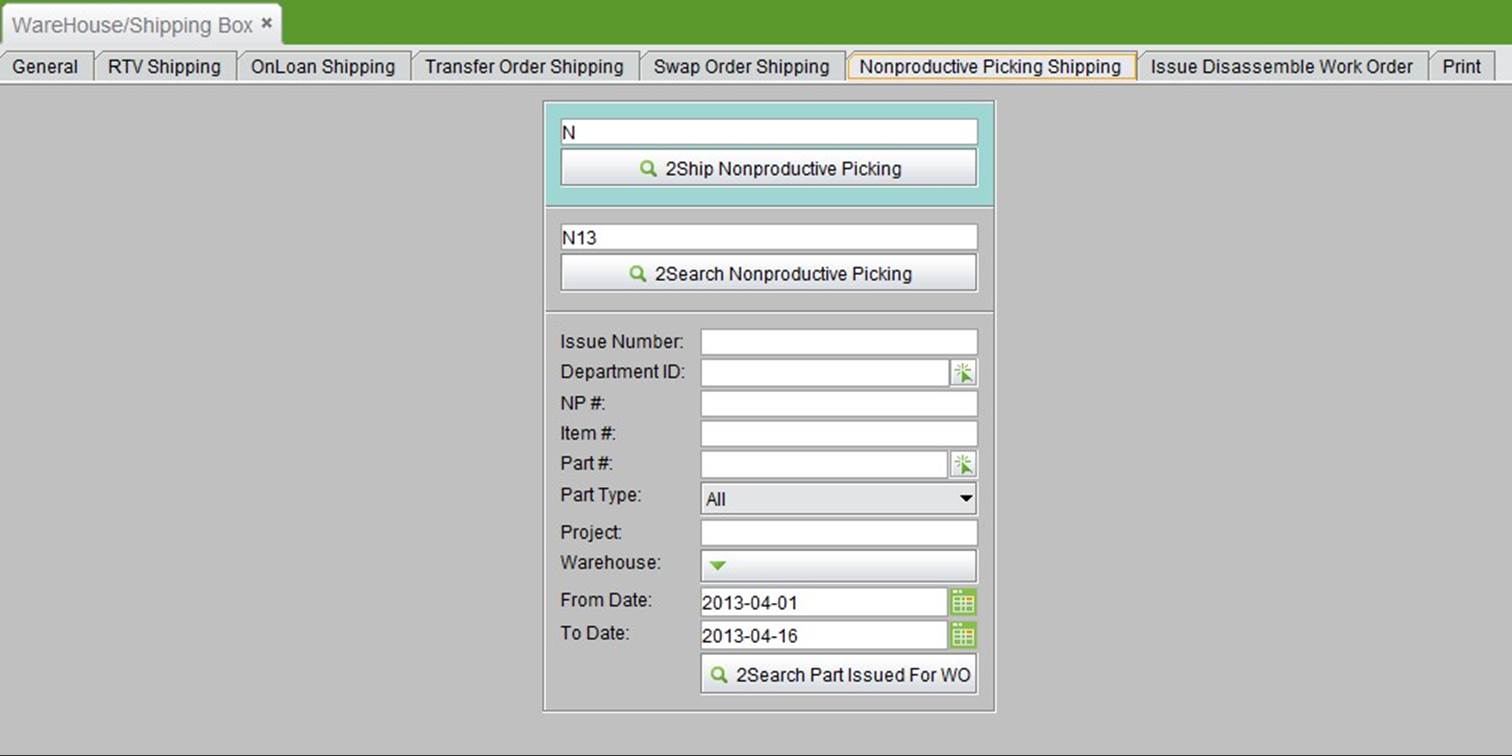 |
There are several ways to get to the nonproductive picking shipping interface. You can look up or search nonproductive picking to ship. Or you can click “Ship” at the bottom of the nonproductive picking property interface to ship quickly.
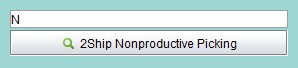
Input the full non-productive picking# here, then click the button to go to the shipping interface.
 |
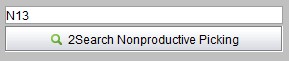
Input the non-productive picking# key word, then click its number at the search results interface to go to the shipping interface.
 |
At the shipping interface, you can fill in the picker name. Input a new quantity and click “OK” to ship.
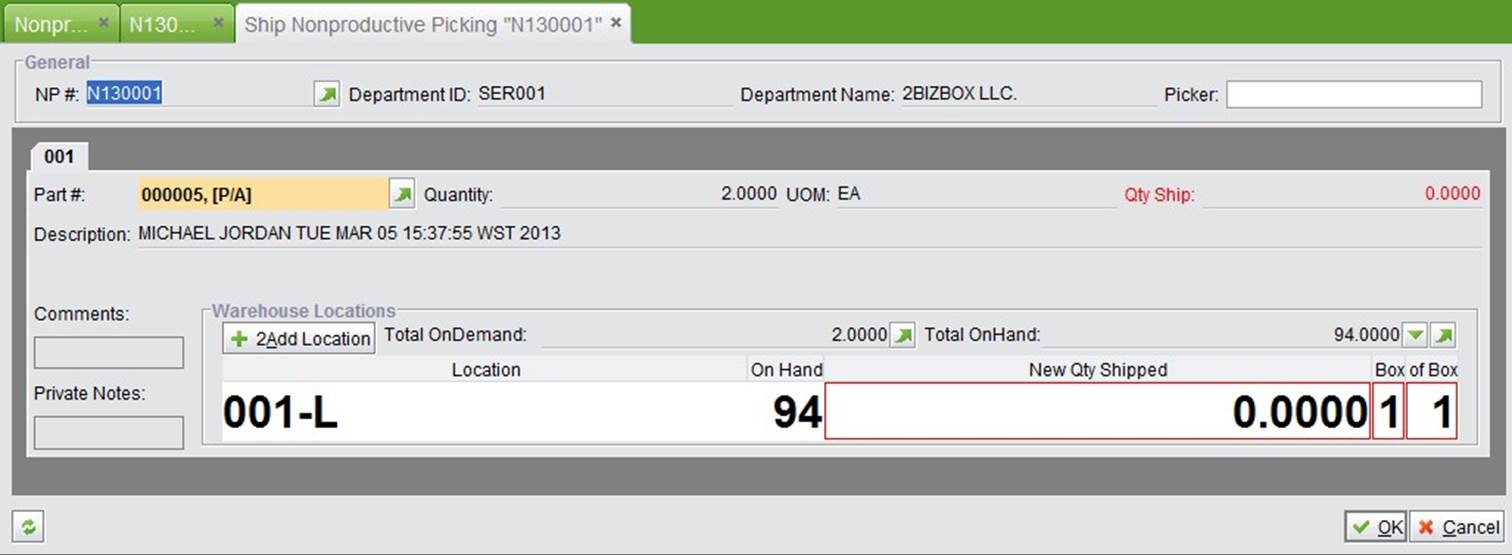 |
After shipping, you will be taken to the part issued interface, where you can see the issue# and detailed issuing information.
 |
Meanwhile, the nonproductive picking status become “Closed.” You can click “Issue Detail” to see more. You can also see issued parts in nonproductive picking by entering different conditions for searching.
 |
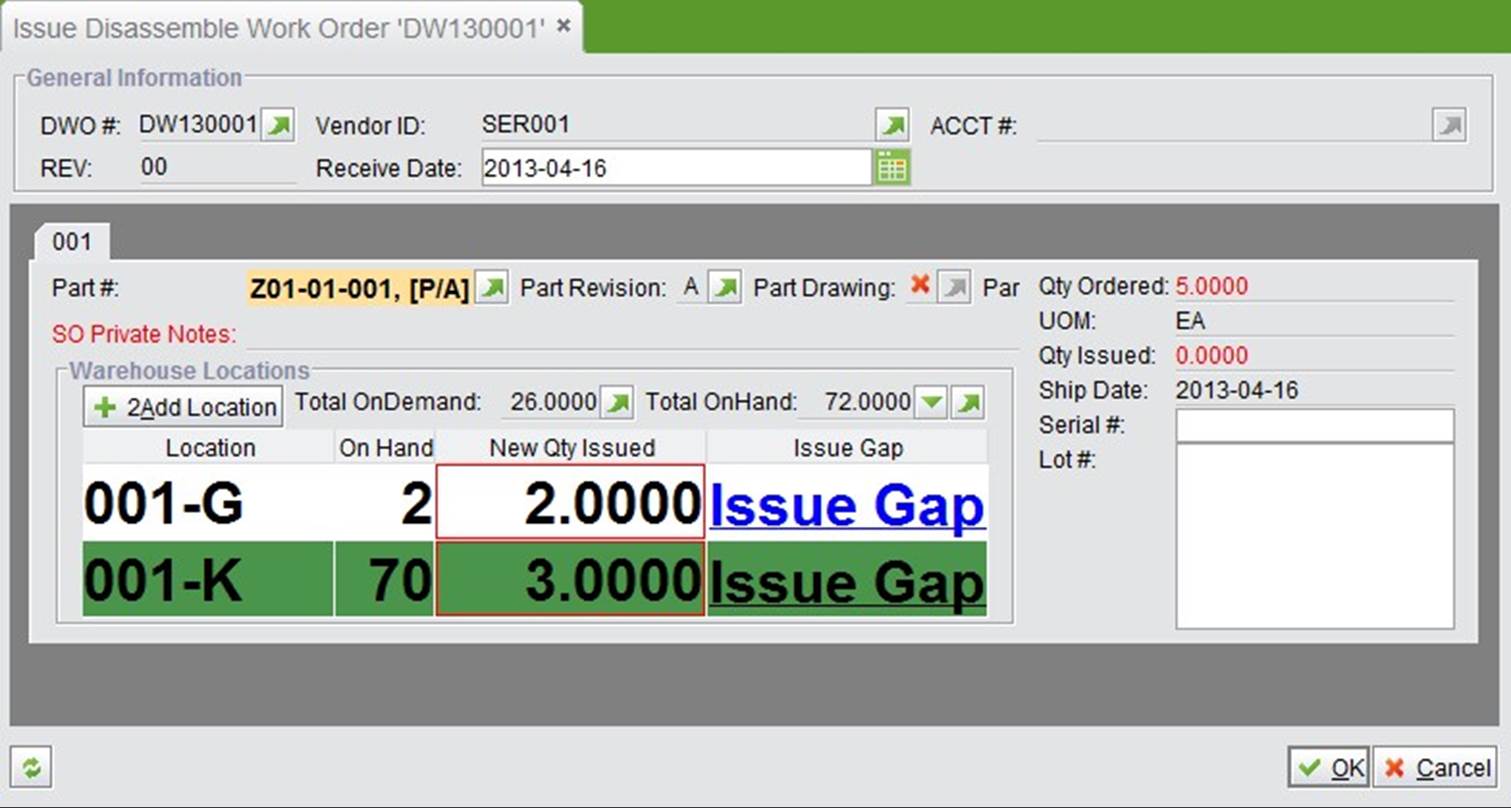
The Disassemble Work Order function is used to disassemble parts via work order. Once a DWO (Disassemble Work Order) is created, issuing can be done in the “Issue Disassemble Work Order” sub branch.
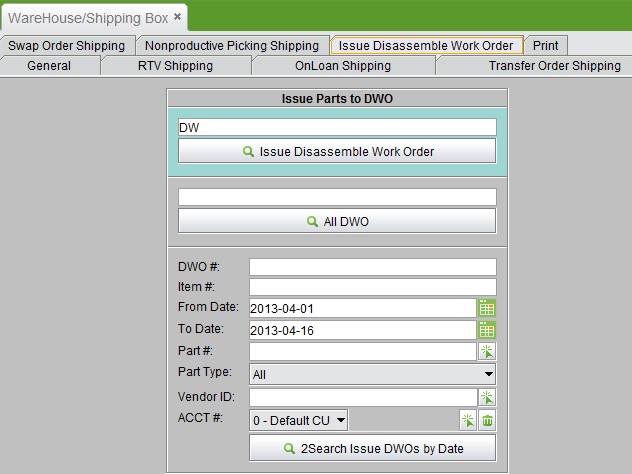 |
You can go to the DWO issuing interface by inputting a DWO# or searching a DWO#.
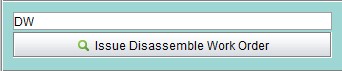
Input a DWO# here, then click tthe button to go to the DWO issuing interface.
 |
Input a DWO# key word to search, then click a DWO# at the search results interface to go to the DWO issuing interface.
 |
The part item in the DWO issuing interface is a BOM part to be disassembled. Simply fill in the BOM part quantity and click “OK” to issue.
 |
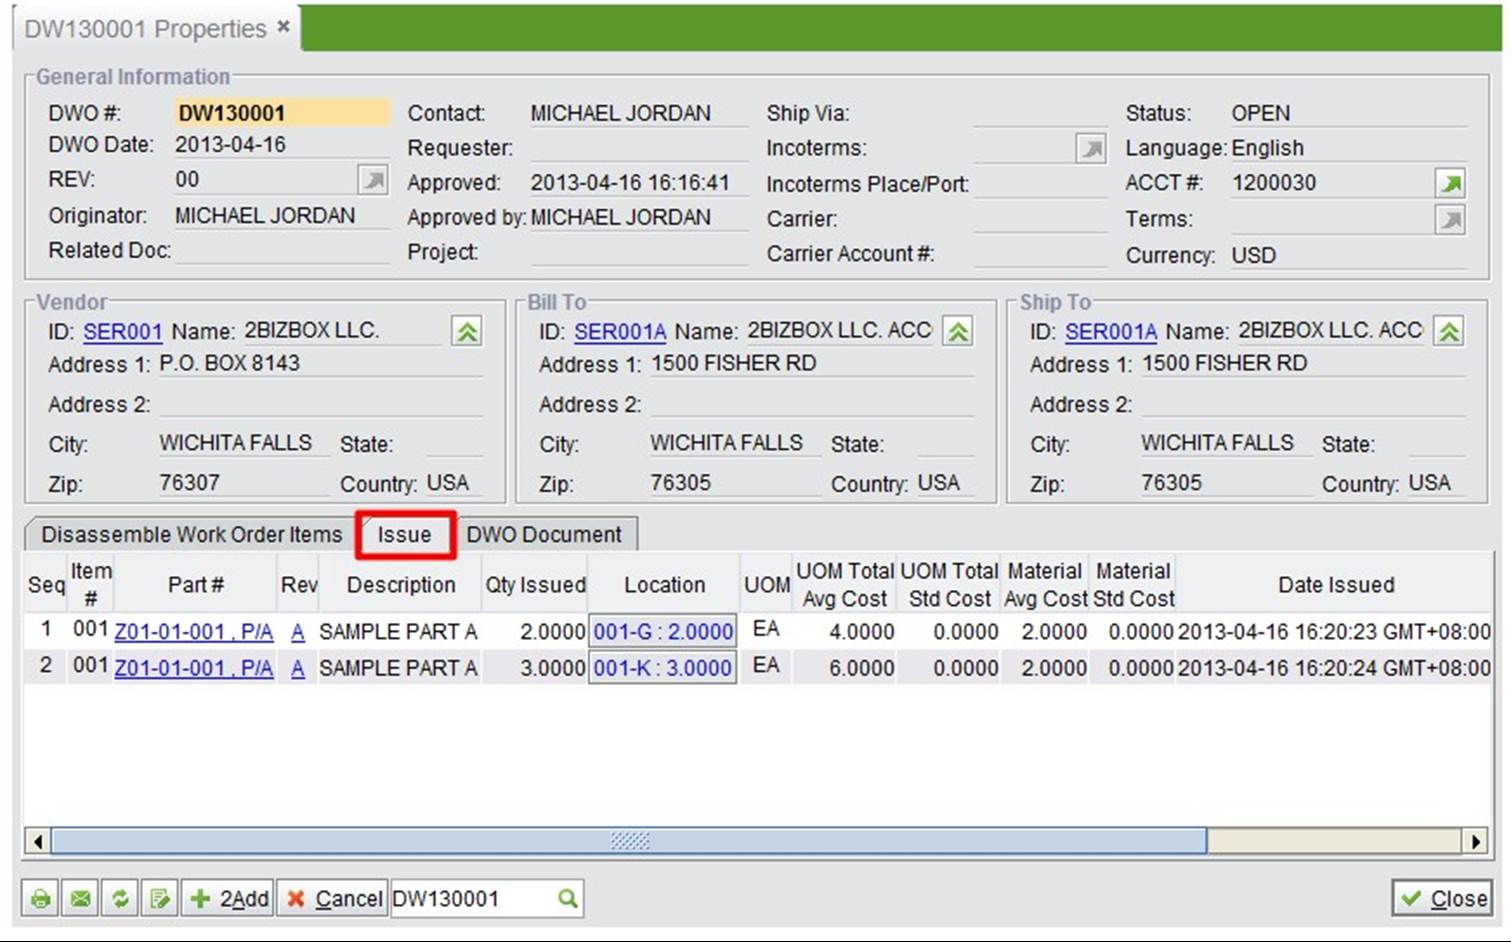
After issuing, go back to the DWO property interface. At the “Issue” tab, you can see the disassembled part issuing record.
 |
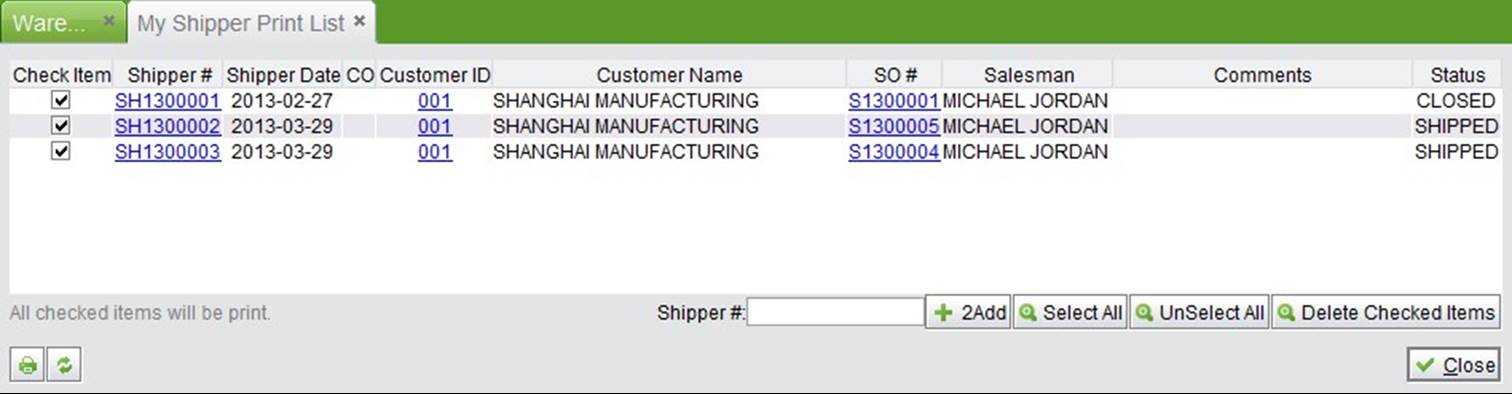
At the “Warehouse Module->Shipping->Print” interface, you can add a SO shipper print list. Click the button to go to the “My Shipper Print List” interface. Add a shipper# at the bottom of it, then click “Add” to add a shipper. You can add a shipper with any status. Also, you can delete an added item by selecting it.
 |
In addition, you can click “Add to My Print List” at the bottom of shipper property interface.
 |