2BizBox® Manual |
Go back to 5.0 Main |
Scheduler Management is used to set task running time and frequency in the 2BizBox system. Eventually, it will automatically realize common operations for notification and data import/export features. At present, a scheduled task can be divided into 4 categories: notify, import, export and others. To notify a task is to remind receiving and issuing parties by setting the task’s running time and message receiver. To import and export a task is to utilize synchronous data sharing in a company by importing or exporting part and drawing information to a specified server. Other tasks include sending unread mail notices, backing up the database periodically, etc.
All tasks can be scheduled as show below in the table:
Task Type |
Notify |
Import |
Export |
Other |
Task Name
|
SO ship notify |
Import drawing |
Export drawing |
Unread notice notify |
WO issue notify |
Import part information |
Export part information |
Backup inventory |
|
WO recevie notify |
Export sales BOM data |
|||
|
|
|||
|
PO receive notify |
|
Export sales BOM’s MFG and picture |
|
Go to “Control Panel”->”Scheduler”->”Scheduler Management” where you can see all tasks to be scheduled. Click “Add” to add a new task. Here you can set a task’s time range, run time, start time, end time, email address, etc. Click a task’s “Name” to see all task types in a drop down list.
 |
Choose a task which needs to be scheduled from the drop down list, then set up the time range, run time, start & end date, receiver address and task retry time. Different tasks have different parameter settings. For example, notify type tasks require that you set how many days are needed to send an advanced notice; export/import tasks need a set task’s server, etc. We will introduce them one by one in the following instructions.
The scheduler task-adding interface looks like this:
 |
Time Range: Set up a task’s running frequency here. For example, time range could be several months each year, several days each month, specified day each week, or running some specified task each day. Scheduler Run Time: Set the exact running time for a scheduled task. Click the button “+” to save and add multiple running times here.
Start Date: The scheduled task’s start date. Tasks will run beginning on the start date.
End Date: The scheduled task’s end date. Tasks will stop running on the end date.
Parameters Format/Setting: Parameter will differ depending on the task. This will be explained in detail later. Copy email to: If a task is running successfully, information will be sent to the email listed here. Set the mail server in the control panel module to enable sending emails here.
Report exception to: If a task fails to run properly, exception information will be sent to the email address listed here.
Send notice: Check “Check this to send notice” box to users to receive running time messages. Click the “Pick” button to add multiple receivers. Choose an email address to receive notices; if the task is running successfully, a notice will be sent to the email provided. Fill out an email address to receive exception notices; if the task fails, exception notices will be sent to the email address provided.
Retry times: Number of times to retry when running a task fails.
Retry interval (Minute): Time intervals between retrying when running a task fails. Comments: Enter related task comments.
Task notification can be used by setting an order date in advance. To illustrate this concept, we will explain an example using SO Ship Notify below. This operates very similar to a WO or a PO.
SO ship notify is used to send shipping notices to related system users before a SO shipping date. You can set the notification running time range (frequency) manually. For example, we set the notify running time at 9: 00 each day, so the “Time Range” was set as “Daily” and Scheduler Run Time at hour 9 and Min 0. Click the “+” button to finish this step.
 |
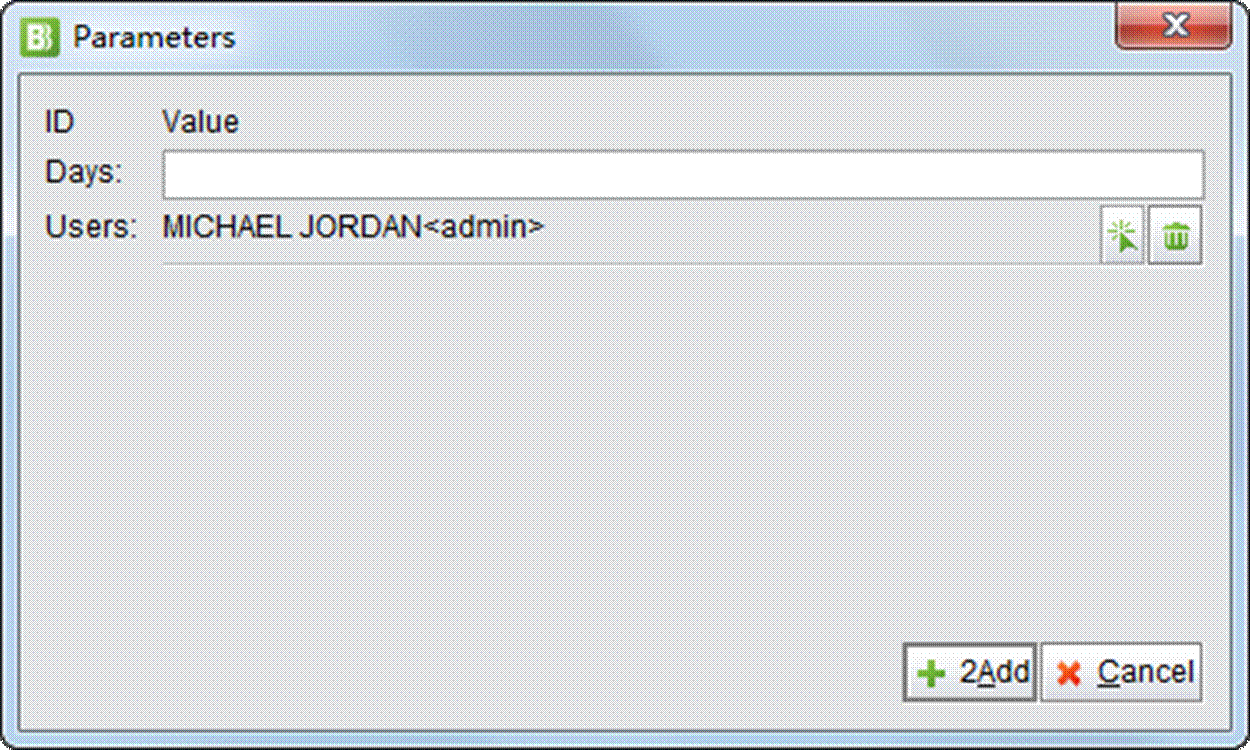
You will also see a task’s parameter format as “days =? users = ?” When chosing a “SO ship notify,” the parameter days=“days =?” indicates how many days before the user will receive a shipping notice. “Users =?” Indicates who will receive the notice. Select the “Pick” button after the “Parameters” to enter the setting interface.
 |
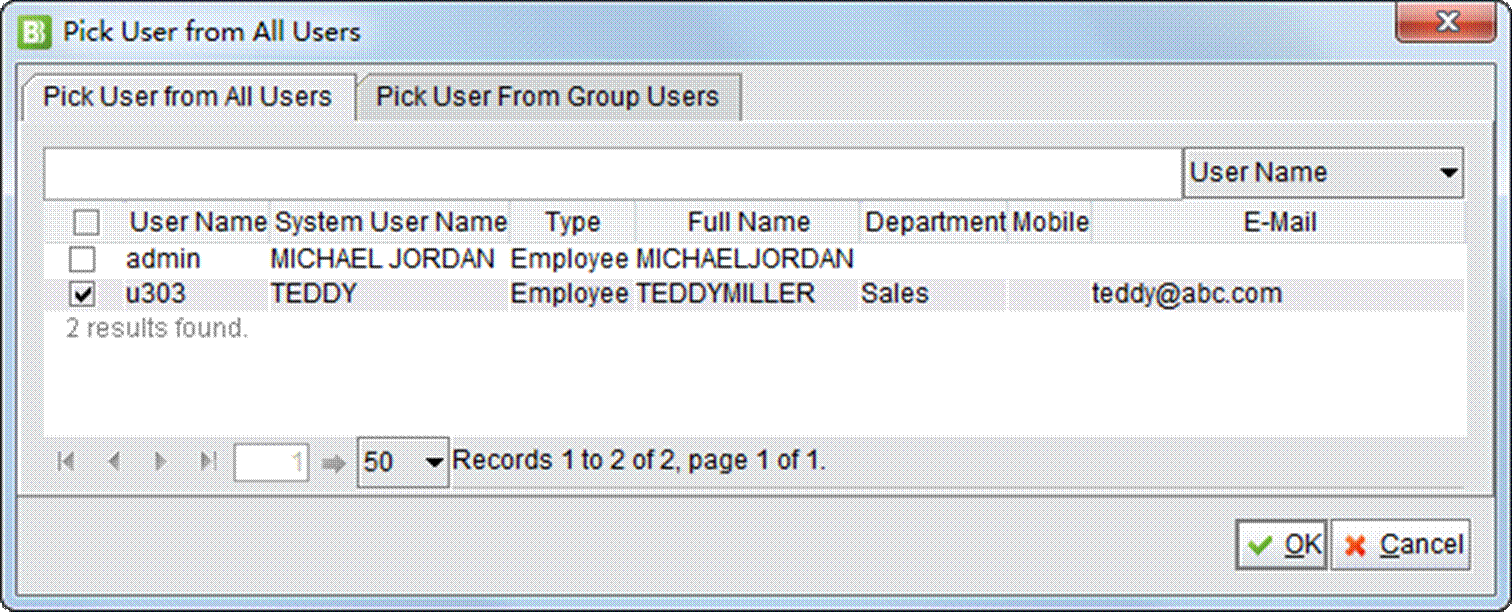
In the “Days” field, input how many days in advance you would like to send notice to the related user to do the SO shipping. Click “Pick” to select receiving users; many users can be selected here.
 |
Note: the SO ship notify will be sent to the system user’s email, not the system user’s notice centers
“Received Notices.” Therefore, the system user checked here must have a valid email address, otherwise, the task notify will fail.
After completing the notify settings, click “Update”, this will take you back to the “Scheduler Management” interface. Here, click “Detail” to view the notification details. You can click “Run Scheduler” to test the task notifier.
 |
If there is a SO to ship suitable for notification, the related user will receive an email with subject “Sales order to ship + Company Name” showing the related shipping sales order’s detail information, as shown in the image below:
 |
Meanwhile, email addresses entered in “Copy Email To” will receive the message below to indicate that the notification runs successfully.
 |
“Notice receiver” (as indicated in the system notice center) will receive the information below with blue font indicating successful notification.
 |
If task notification fails, the “Notice receiver” from the system notice center will receive the following content, with red font indicating an exception notice.
 |
Email addresses set at “Report Exception to” will also receive the content below with red font indicating an exception notice.
 |
Work order date includes “Start Date” and “Date required”. WO issues notify refers to how many days in advance a notification must sent before a work order’s “Start Date”. It is similar to “SO Ship Notify” in that they both have the parameters “Days” and” Users.”
Work order receive notify refers to how many days in advance a notification must be sent before work order’s
“Date Required”. It is similar to “SO Ship Notify” in that they both contain the parameters “Days” and “Users”.
PO receive notify refers to how many days in advance a notification must be sent before the goods arrival date. It is similar to “SO ship notify” in that they both contain the parameters “Days” and” Users”. For more information about this, please refer to” SO ship Notify” .
The export task feature allows you to export part information, part data, drawings and drawing data. Alternatively, you may also import part information and drawings to achieve maximum data sharing amongst companies. Data to be exported must specify a company address number in order to be shared. Other export task data can be stored on FTP or the server.
To complete information sharing between companies importing and exporting parts, you must first add the shared parts to the system. Go to “Engineering Module – Part Master- Engineering Sharing Control” to add parts. Shared parts can only be imported by a company who has specific permission to share these parts. The company is only allowed to run the import task for specified shared parts. Click "Add Engineering Sharing,” to enter the add engineering sharing interface. For further information on the subject, refer to chapters 6.2.8 and 6.2.9
The steps to export and import drawings is very similar to sharing engineering parts. See the instructions in the section above for detailed information.
This information exported is 4 text file, including BOM basic information, and language description information.
The exported file can be saved to the server or uploaded to FTP; you can set these parameters in the module “Parameter Setting.”
This exported information is 2 text file, including BOM information and MFG drawing description information. The exported files can be saved to the server or uploaded to FTP; you can set these parameters in the “Parameter Setting” module.
After adding a task to “Unread Notice Notify,” an email or a message will be sent to the receiver to remind them when there is an unread notice in the system. Choose the “Unread Notice Notify” task, and click “Parameters setting” to set which email address (es) and phone number(s) are to receive the notification.
You should run “Backup Inventory” periodically. On one hand, it is used for saving and sharing; on the other hand, the backed up data can be used in “Warehouse Module->Inventory->Report-> Search Monthly Inventory Report & Search Material Inventory by Backup Need to be Audited.” You do not need to set parameters for backing up Inventory, only task running time and frequency need to be specified.
 |