2BizBox® Manual |
Go back to 0.0 Main |
The quick Start Tutorial shows operational practices for the general business process of most companies. It will cover the main 2BizBox business process. Through this chapter, you will quickly learn the functions and operational methods of 2BizBox.
If you are new to 2BizBox, it is strongly suggested that you initially operate with the tutorial. Even though the business process demonstrated in this chapter may not be suitable for your business, this tutorial will play an important role in helping you learn to use 2BizBox ERP. If you are already familiar with 2BizBox to some degree, you can skip this chapter and continue on to the next one.
The 2BizBox team has prepared a sample data package, (including part#, customer/vendor address, basic company settings) which can be downloaded at http: //www.2BizBox.com/product/download
In the following manual, we will use this sample data to introduce the basic operational flow of 2BizBox ERP.
Please follow the steps below to import the data package:
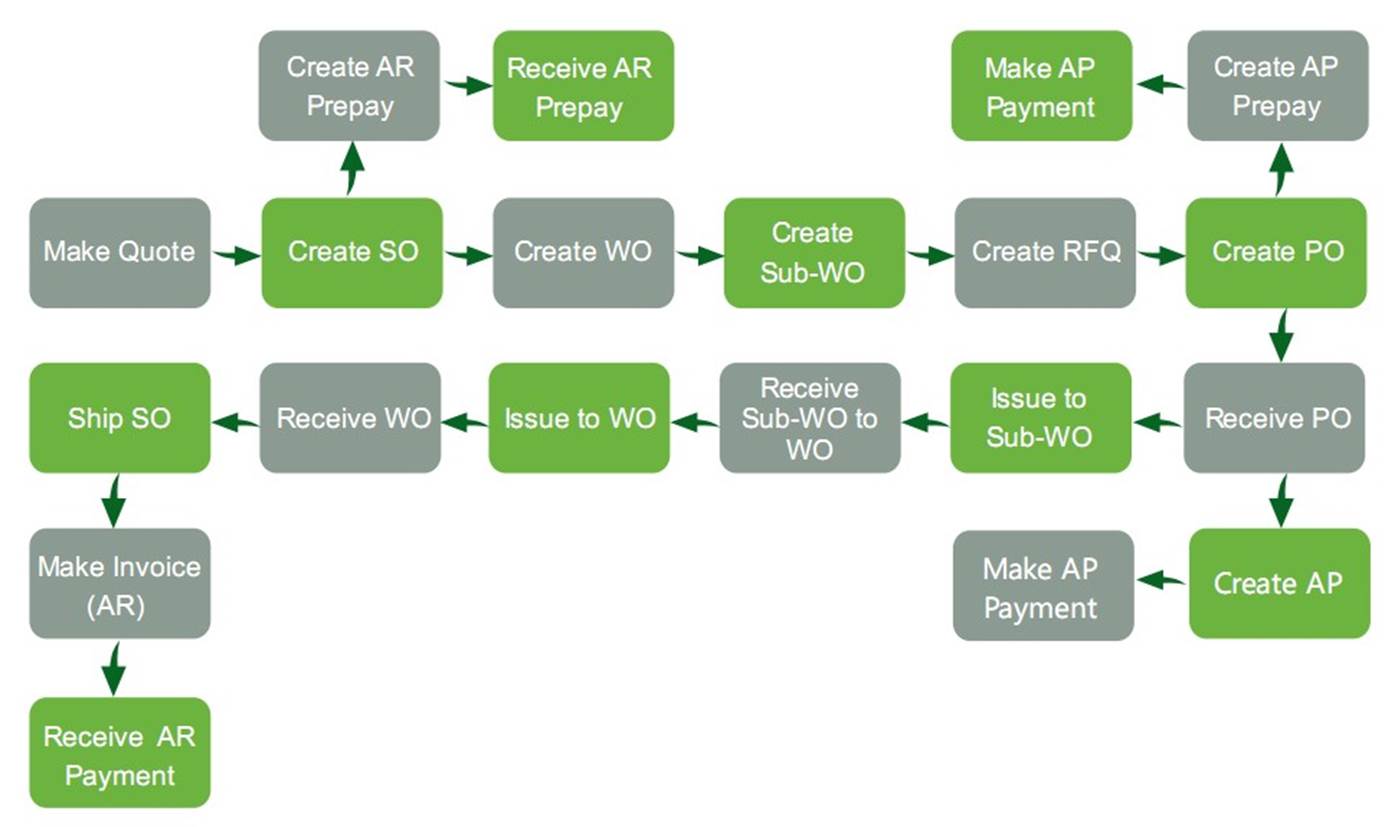
Now we will introduce the basic workflow in 2BizBox as shown in the following image:
|
When a customer A041 requests a quote for 10 parts "W00-10-903" from (2Bizbox), we can add a quote as shown in Image 4-1:
 |
(Image 4-1)
(1) Open "Sales Box" -> "Quote" -> "General."
(2) Click "2Add Quote."
(3) Fill in the Customer ID and other information.
(4) Click "2Add" to create a Quote.
By adding the Quote, we will open the "Update Quote" interface as shown in Image 4-2:
 |
(Image 4-2)
In the frame area, fill in the Part# or select the part from the picking list and fill in the part quantity. E.g. fill in Part# “W00-10-903” and quantity “10,” then click the "+" button to enter the "Update Quote Item" interface as shown in Image 4-3:
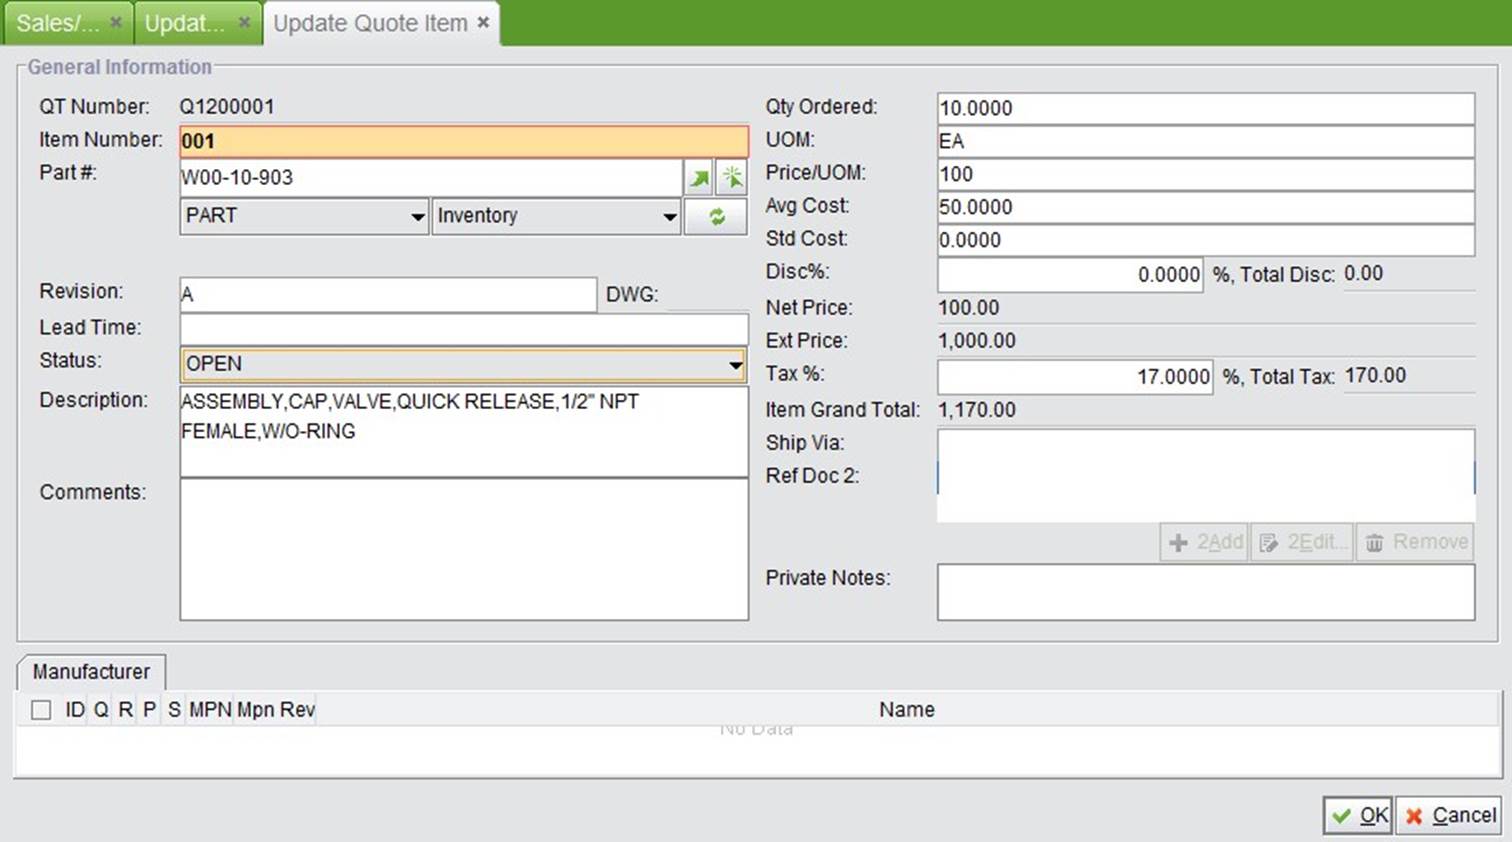 |
(Image 4-3)
At the right side of the "Update Quote Item" interface, fill in the Price, Tax % and other information. Then click "OK" to return to the "Update Quote" as shown in Image “4-2” with an added item. You can continue to add items to the Quote, then click "2Update" to save the Quote and return to the Quote Properties interface:
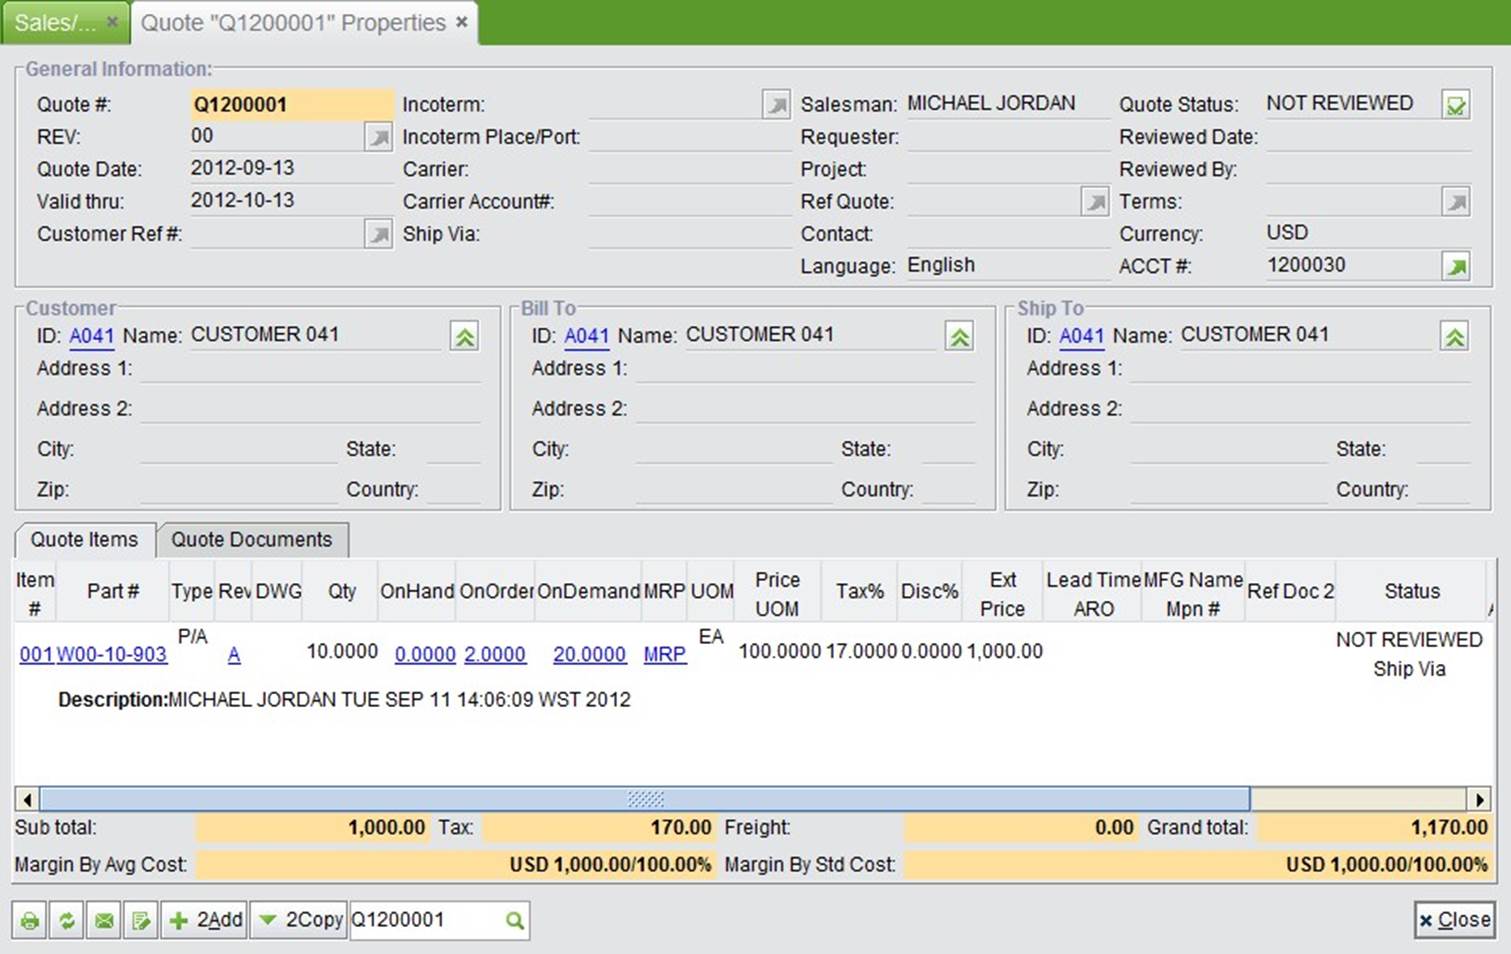 |
(Image 4-4)
The new created Quote status is “Not Reviewed.” The appropriate User is required to review and approve it before sending it to the customer. To approve the Quote, click the "Approve" button at the top right corner. See Image 4-5:
 |
(Image 4-5)
The system will record the review date and reviewer's information after the Quote is reviewed. You can print the Quote by clicking the print button“Print” at the bottom left corner as shown in Image 4-6:
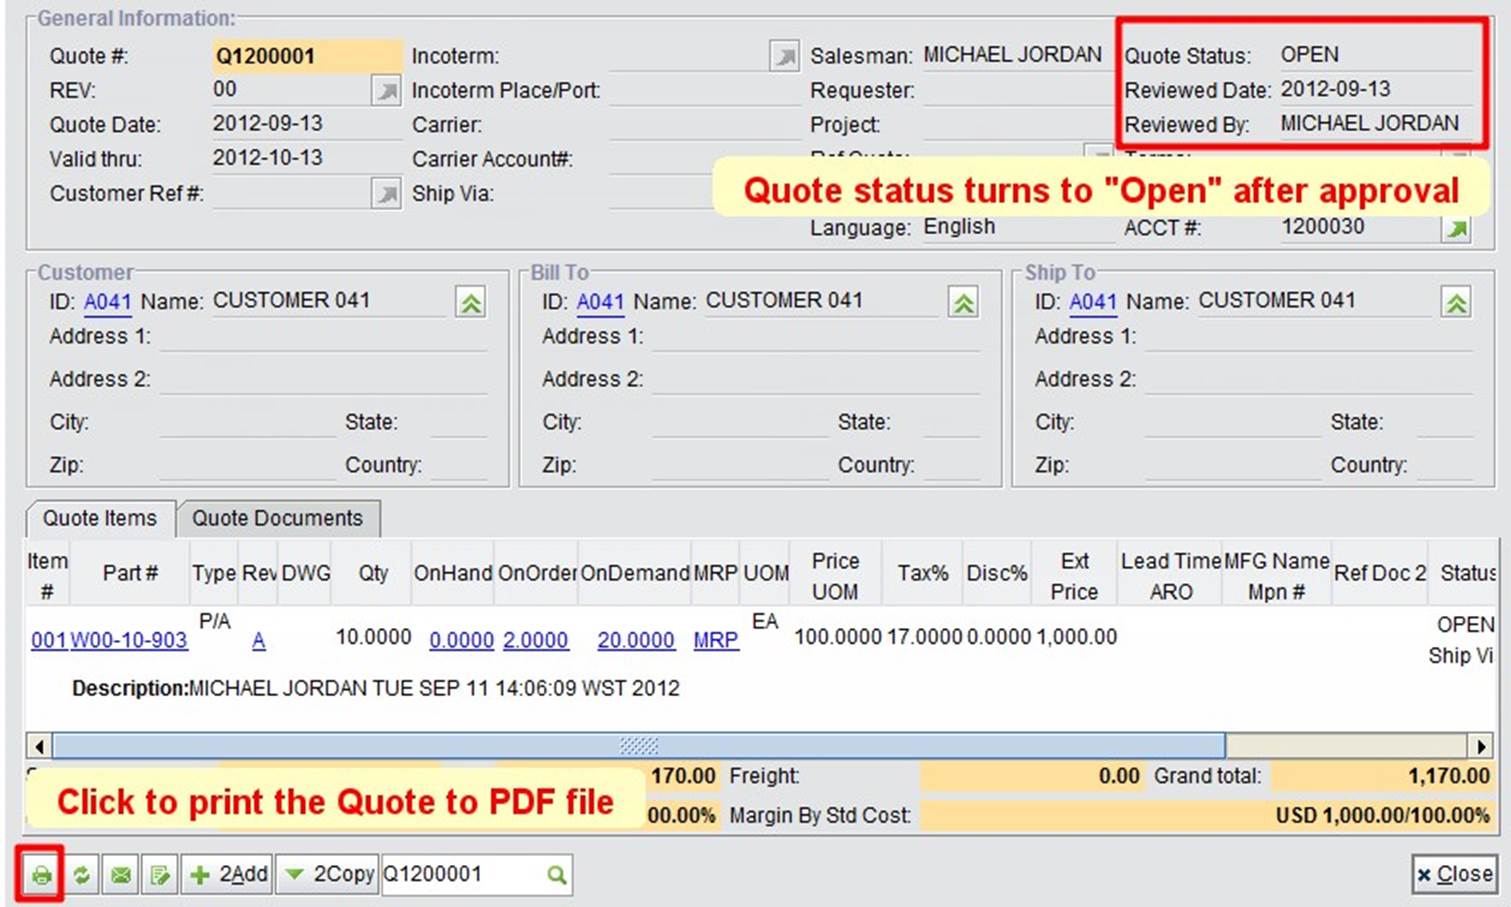 |
(Image 4-6)
The Quote can be copied to a new Sales Order after an agreement is reached with the customer. Click "2Copy” –> “2Copy to SO" as shown in Image 3-7:
 |
(Image 4-7)
A dialog window will pop up to ask if you would like to close this Quote after copy it to a Sales Order.
 |
If you want to keep this Quote open, click “No” to make a Sales Order. If you want to close the Quote, click "Yes" create a sales order and enter the "Update Sales Order" interface as shown in Image 4-8:
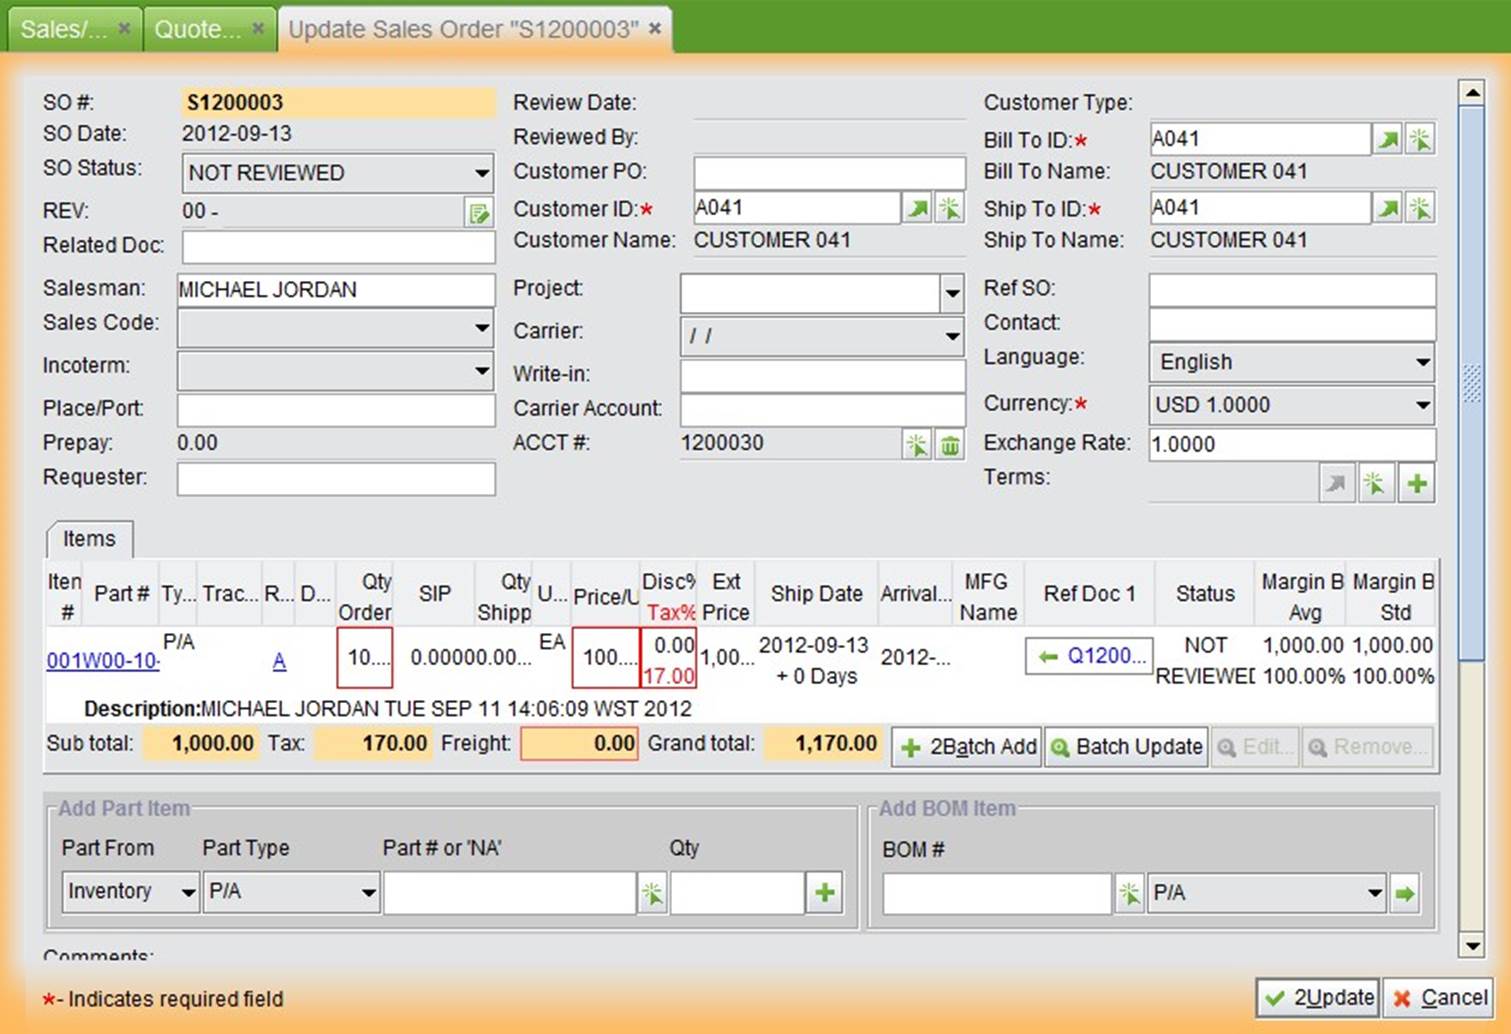 |
(Image 4-8)
Click "2Update" to confirm and save the Sales Order and return to the "SO Properties" interface as shown in Image 4-9:
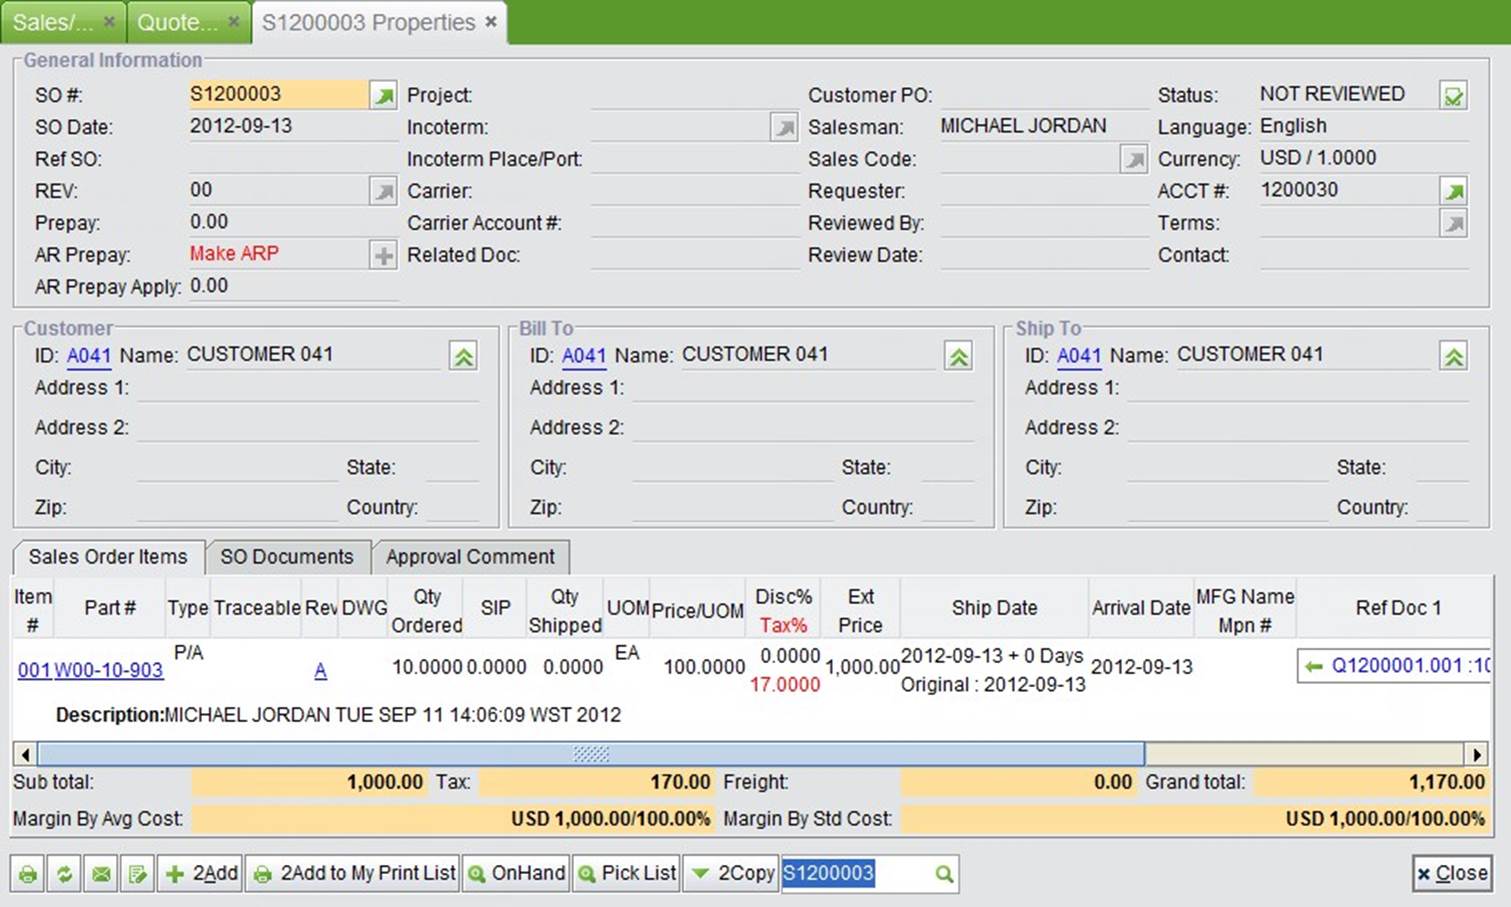 |
(Image 4-9)
After the Sales Order is created, a Reviewer can click the "Approve" button to approve it.
Suppose the contract states that 30% advanced payment is charged to the customer, so after the SO is confirmed, we create the AR Prepay on the Sales Order by clicking "+" button" as shown in Image 4-10. A dialog window with pop up to let you confirm your operation.
 |
(Image 4-10)
Click “Yes” to directly create an AR Prepay and open the "Update AR Prepay" interface as shown in Image 4-11. Then you need to add items for the AR Prepay.
 |
(Image 4-11)
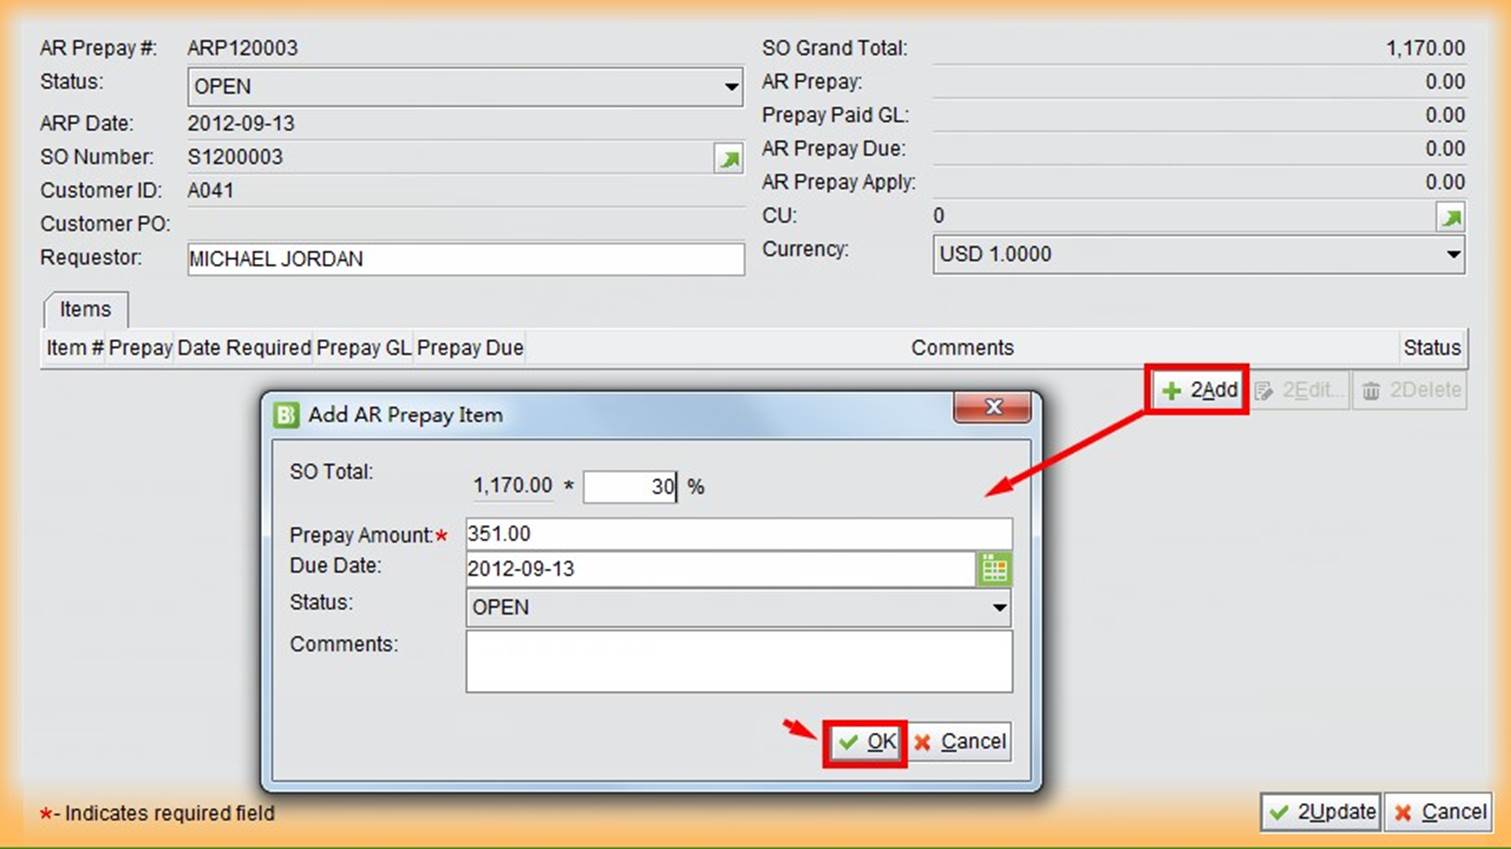
Click "2Add" to open the "Add AR Prepay Item" window. Enter the required information, including the prepay percent or amount, then click "OK" and "2Update" to save and return to the "AR Prepay" interface as shown in Image 4-12:
 |
(Image 4-12)
Now you can print the AR Prepay and send it to the customer for billing. When you receive the payment, find the AR Prepay to record the payment by click “Receiving” as shown in Image 4-13. The item status will remain “OPEN” until the “Total Paid” equals “Prepay Due.”
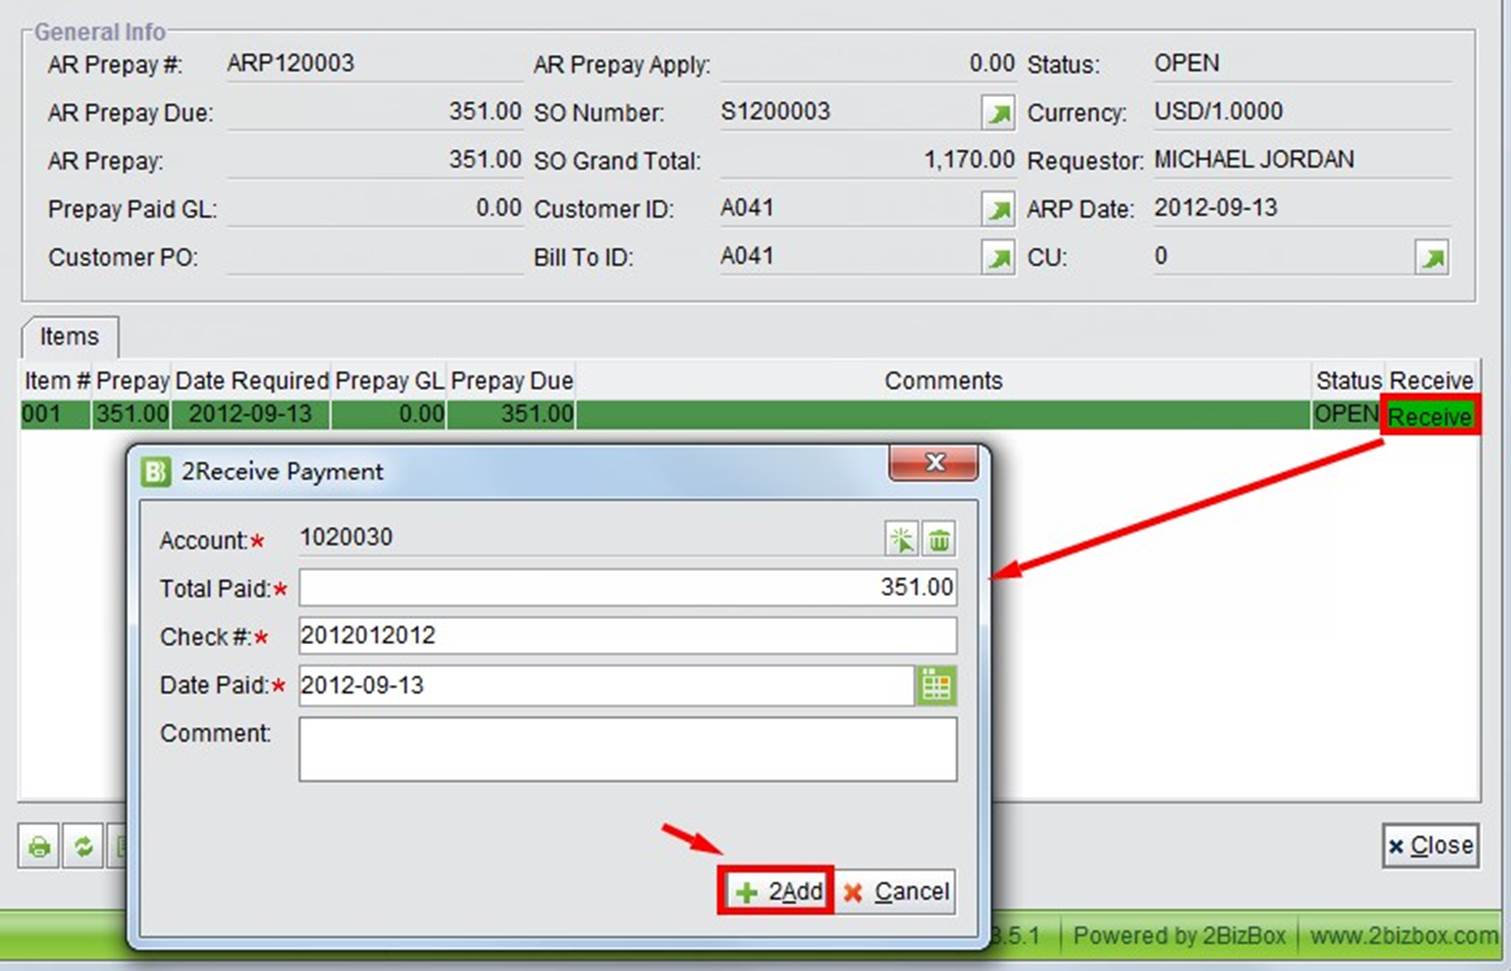 |
(Image 4-13)
After the required information is filled in, click “2Add” to submit the payment. The 2BizBox system will generate a GL transaction for the payment automatically. See Image 4-14:
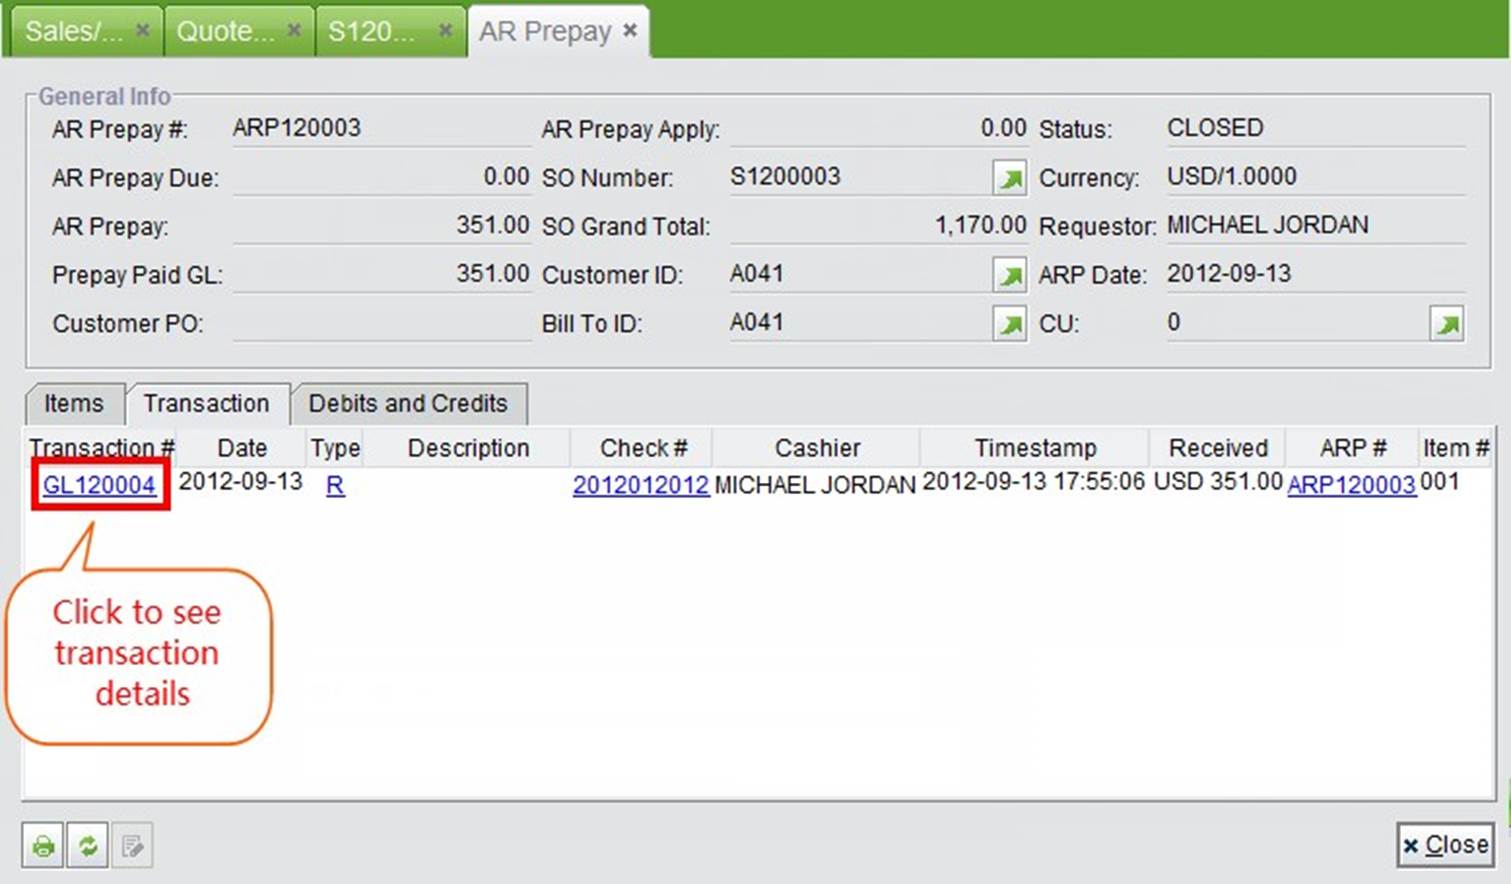 |
(Image 4-14)
By receiving the prepayment, you can start to prepare for the purchasing or production for your customer. To know if there’s enough inventory, you can run MRP in Purchasing Box. Click "2Run MRP" to check demand and shortage as shown in Image 4-15:
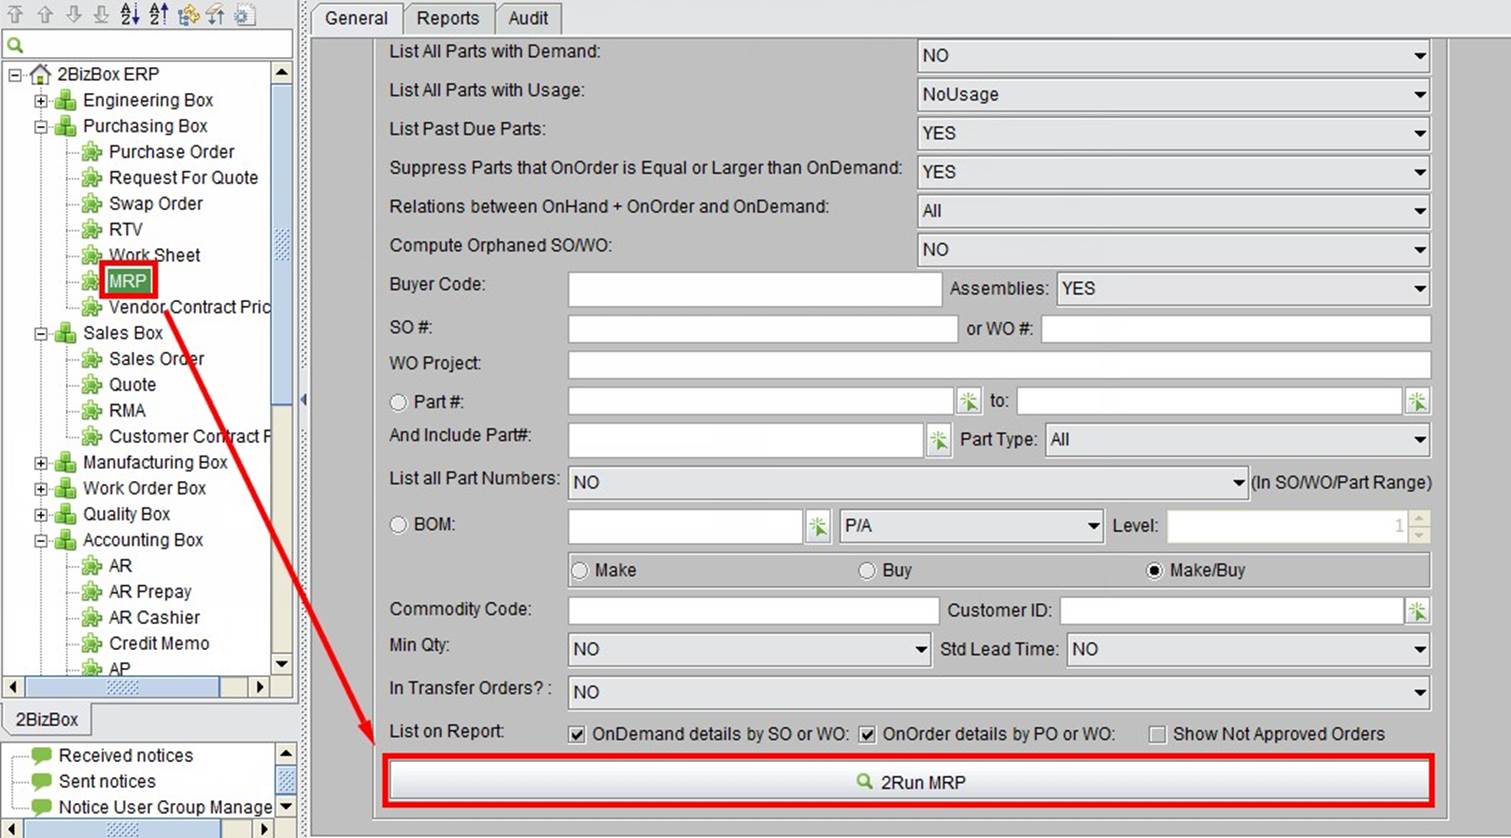 |
(Image 4-15)
Suppose the onhand quantity of “W00-01-903” is zero, then MRP result shows that 10 "W00-10-903" are in shortage, and the order comes from SO 1200003. See Image 4-16:
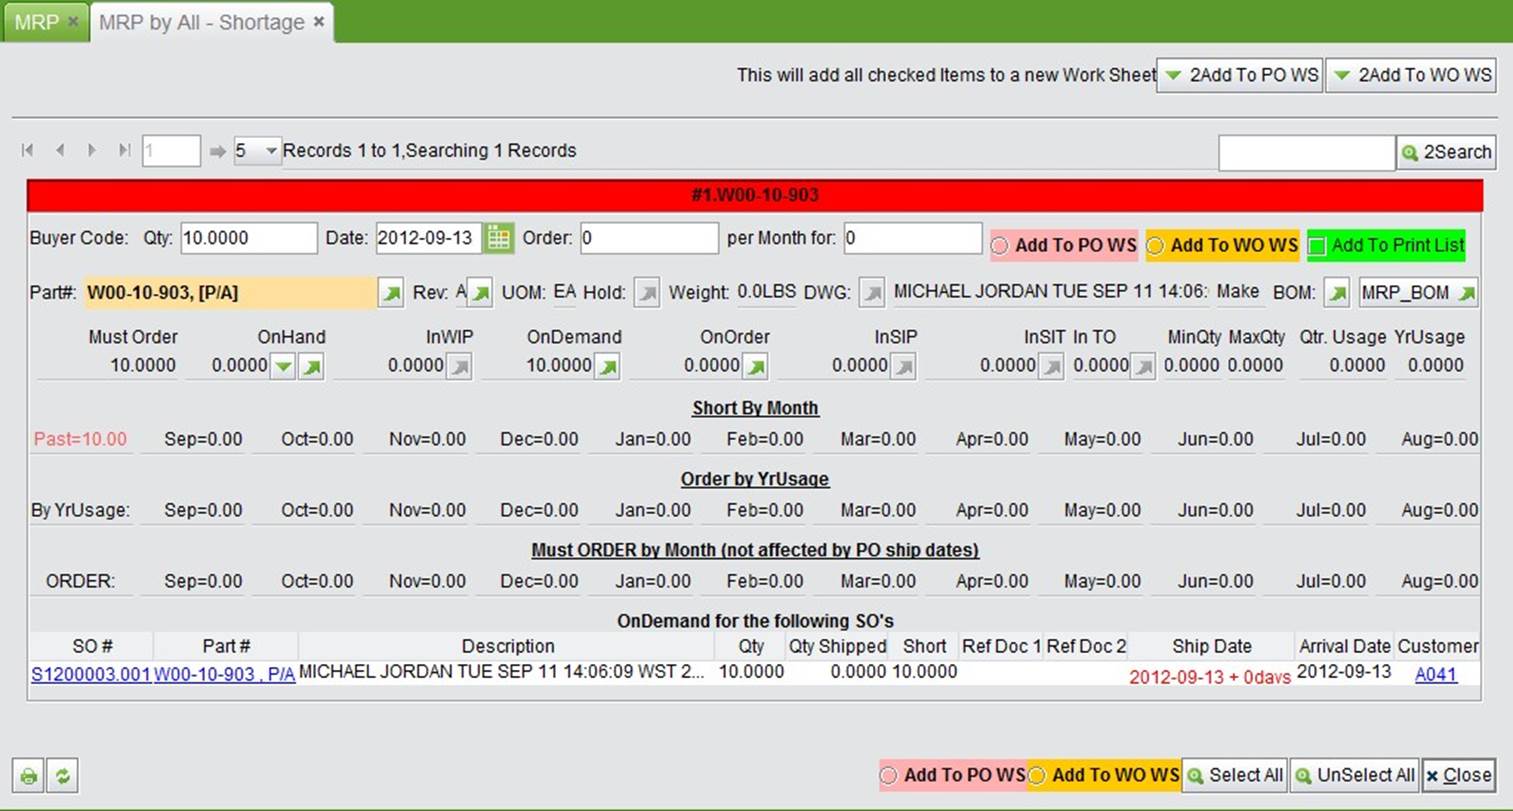 |
(Image 4-16)
The “W00-01-903” is a manufactured part, so you need to make a Work Order of 10 “W00-01-903.” In the WO Worksheet, you can directly create the Work Order: select “Add to WO WS” option of the Part and then click “2Add to WO WS” at the top right as shown in Image 4-17:
 |
(Image 4-17)
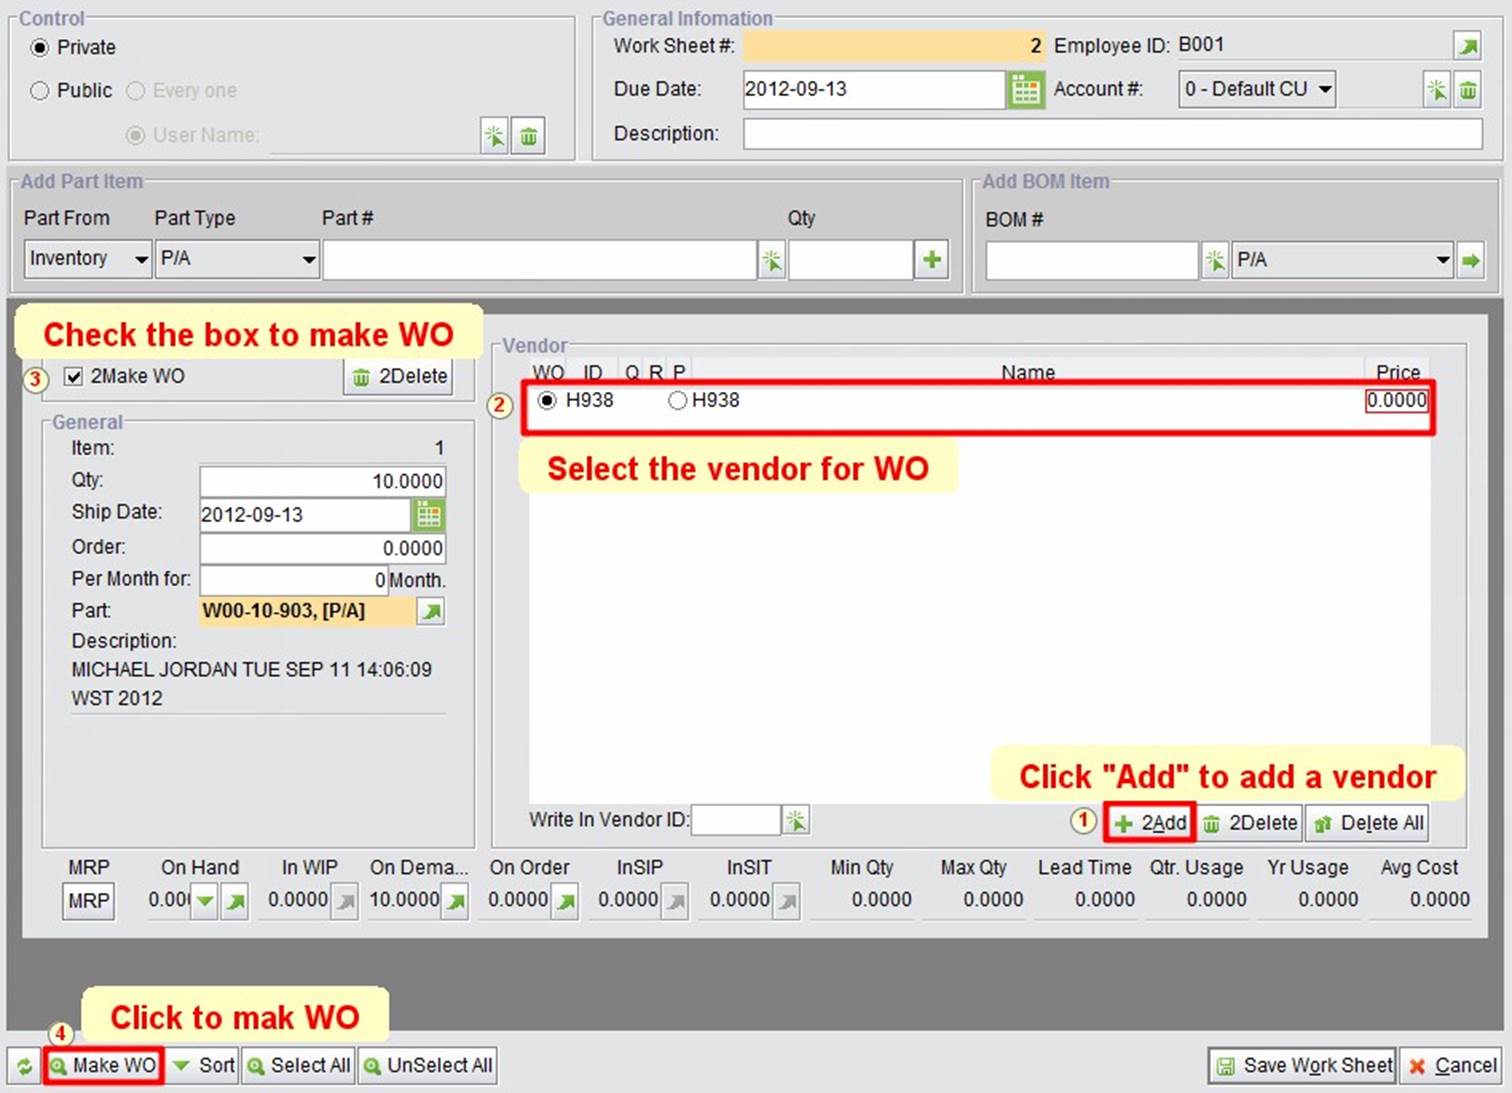
In the Work Order Work Sheet, you may follow the next steps to create the work order as shown in Image 4-18:
(1) Add a WO Vendor
(2) Select the WO Vendor
(3) Check "2Make WO"
(4) Make WO:
 |
(Image 4-18)
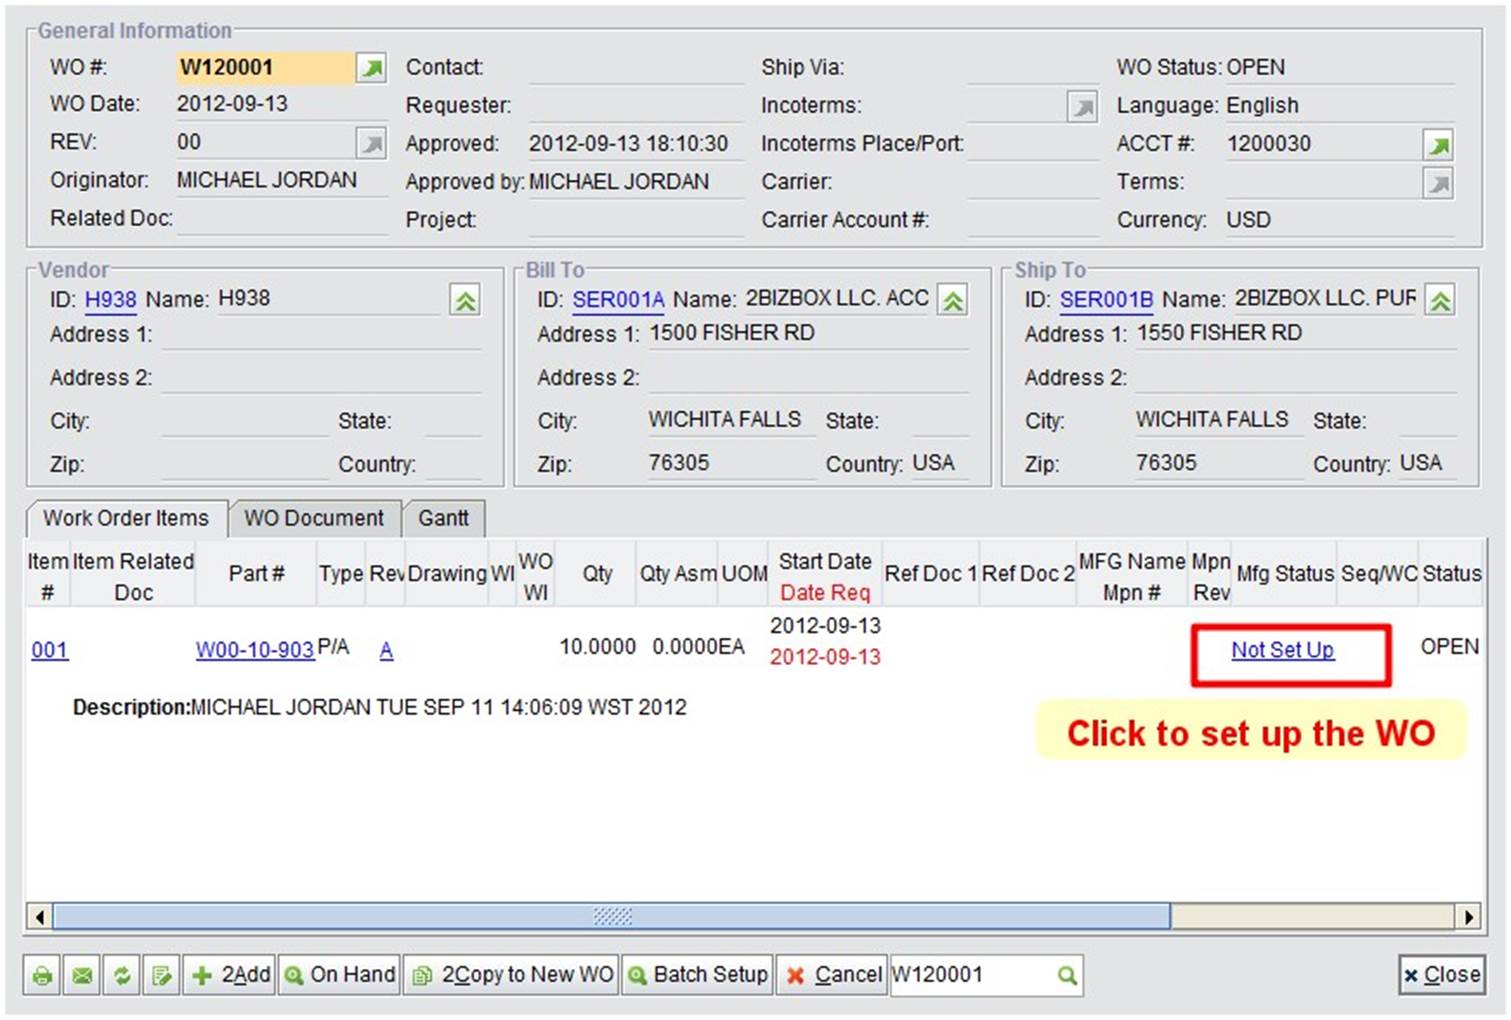
By clicking “Make WO,” a “NOT APPROVED” Work Order will be created. User with permission can approve it as shown in Image 4-19:
 |
(Image 4-19)
Now we have an open Work Order, with the item status “Not Setup” as shown in Image 4-20. Set up a WO Item means to decide detail parts for manufacturing. Click "Not Set Up" to set up for part “W00-10-903:”
 |
(Image 4-20)
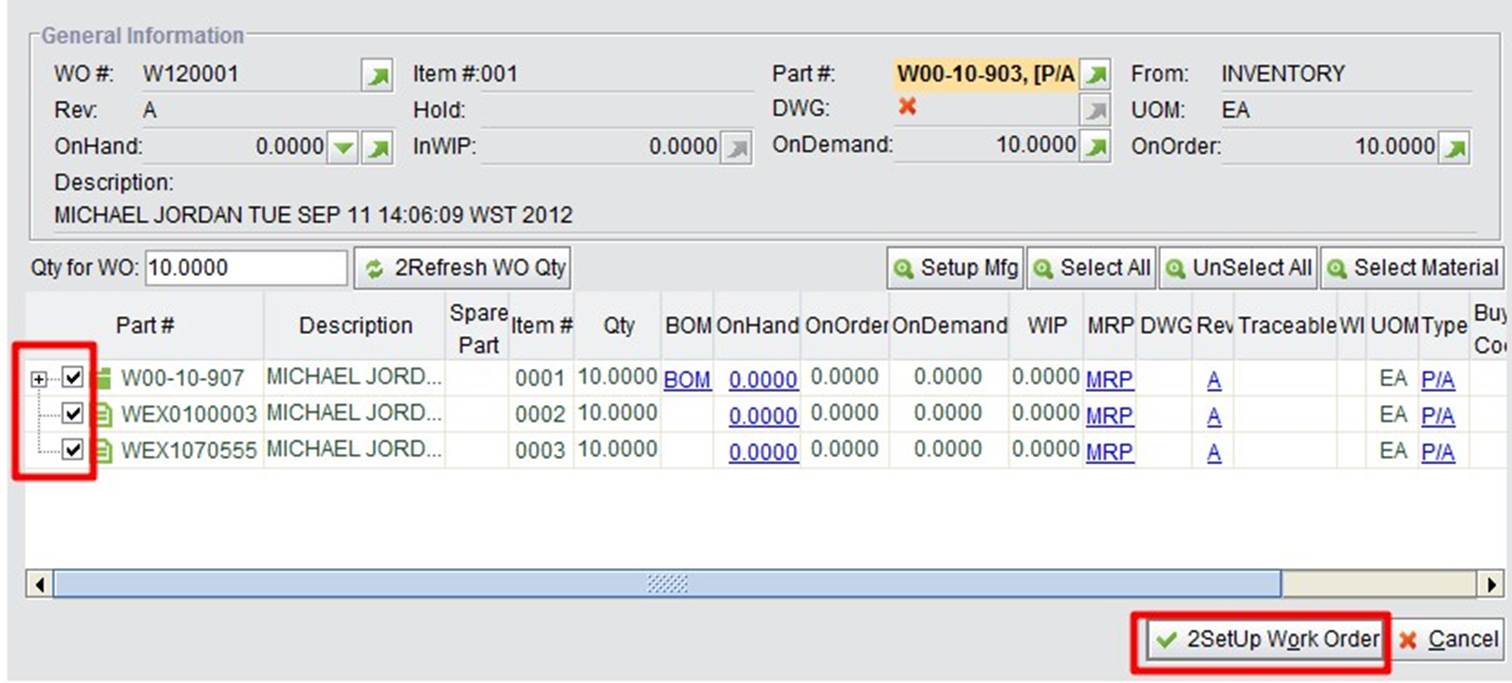
Then, you will be taken to the "Setup Work Order" interface. Here, check the parts that are needed and click "2Setup Work Order" as shown in Image 4-21:
Note: When there is a Component "W00-10-907" that is also a BOM, do not expand it, because we will create a sub-work order in the next steps.
 |
(Image 4-21)
After setting up the WO, return to the "WO Properties" interface, where the item status becomes "Set Up" now. You can click "Part detail" to see the setup parts as shown in Image 4-22:
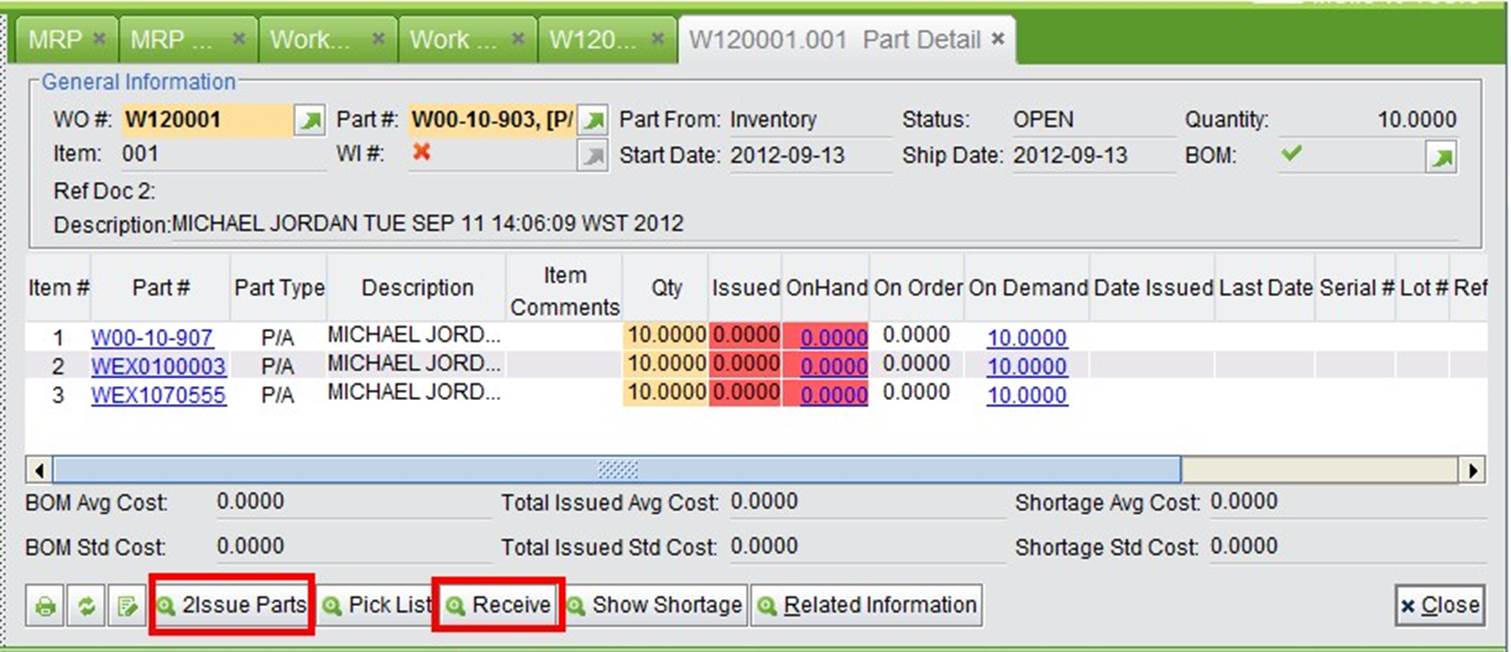 |
The "Part Detail" interface shows the items for the work order, including the quantity of issued parts, on-hand parts, etc. You can also click "2Issue Parts" & "Receive" to issue material and receive parts of the Work Order.
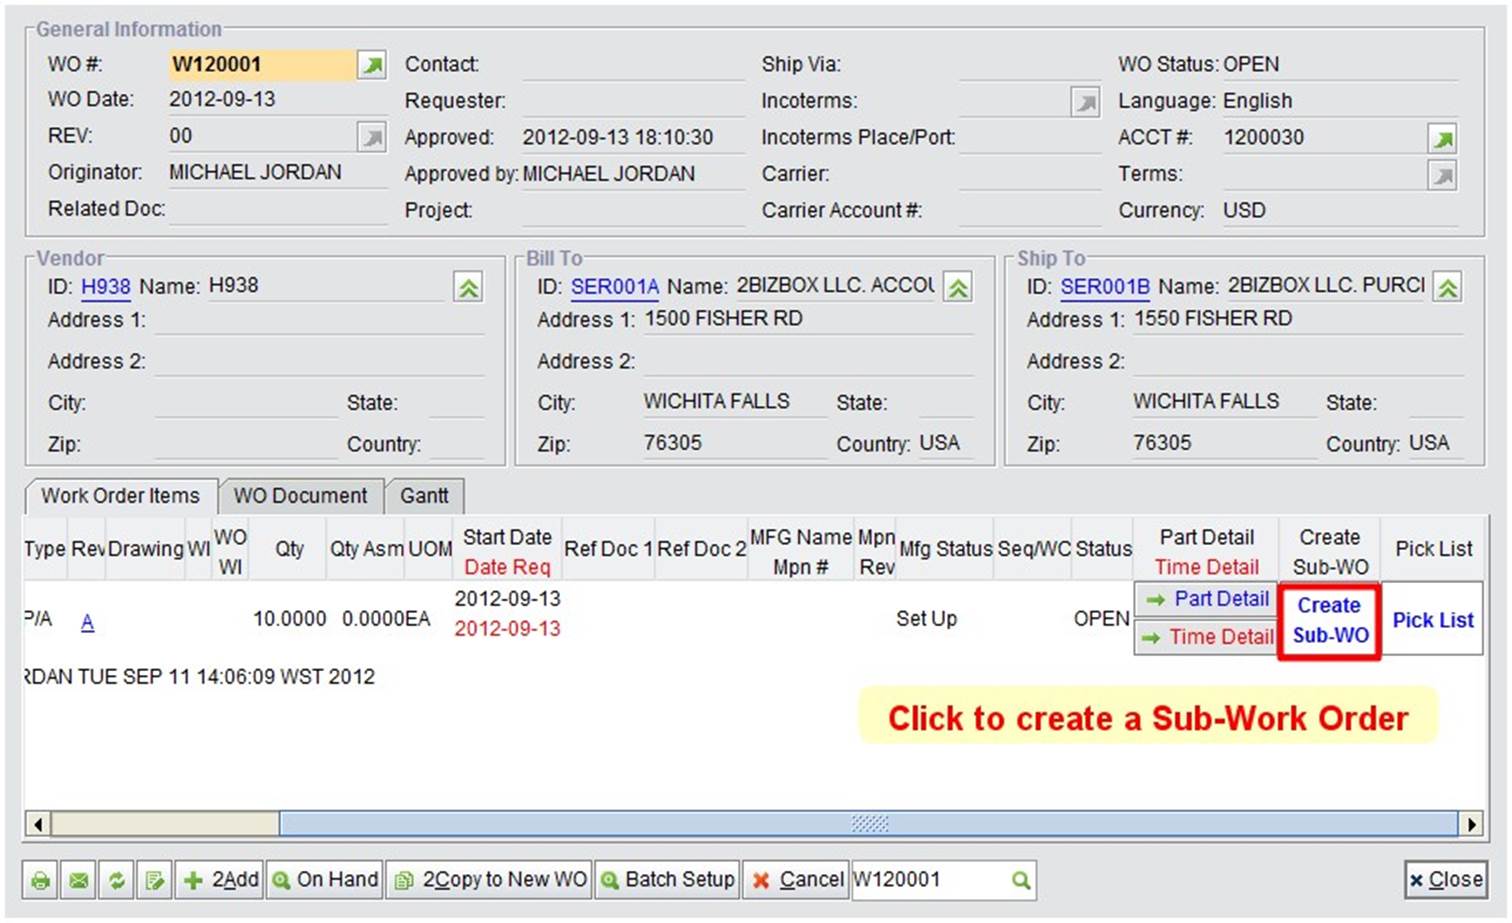
When there are multiple BOM levels in a product, such as Part “W00-10-903,” sub Work Order is required for the production. In this case, we need to make a sub Work Order for component “W00-01-907.” Return to the Work Order interface and click “Create Sub-WO” in the line item as shown in Image 4-23:
 |
(Image 4-23)
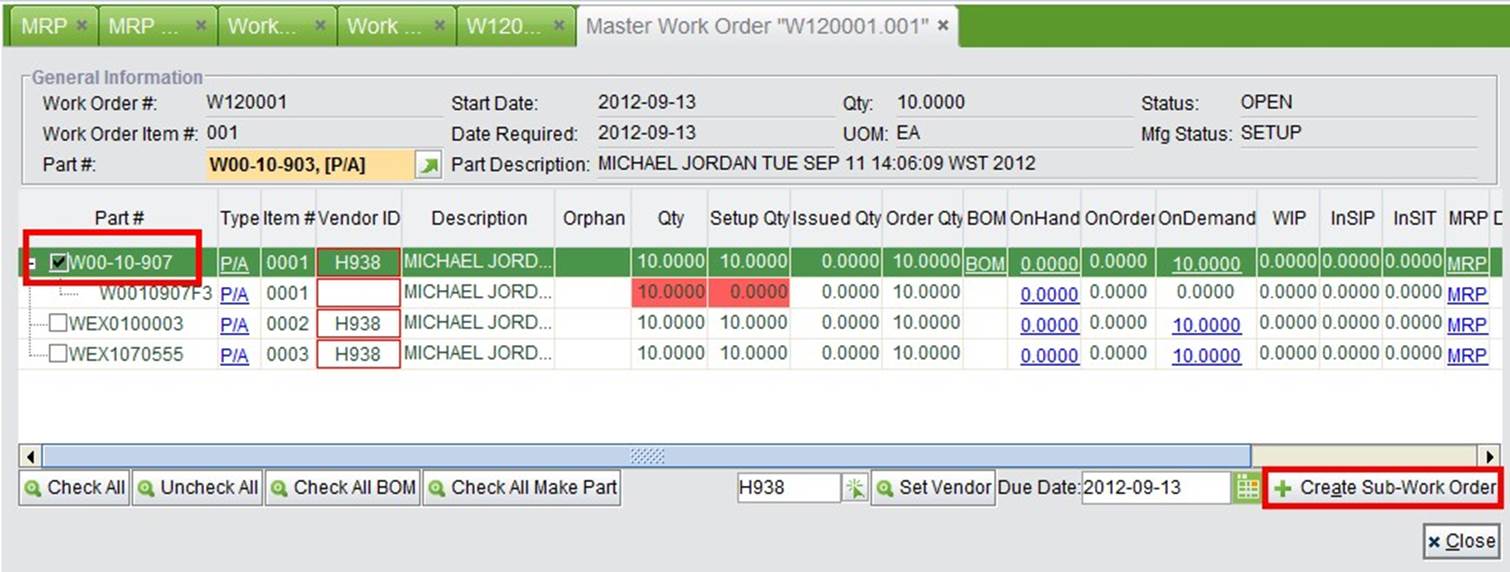
By clicking “Create Sub-WO,” you will go to the following interface. Check the Sub-Work Order component and click "Create Sub-Work Order” at bottom right corner, as shown in Image 4-24:
 |
(Image 4-24)
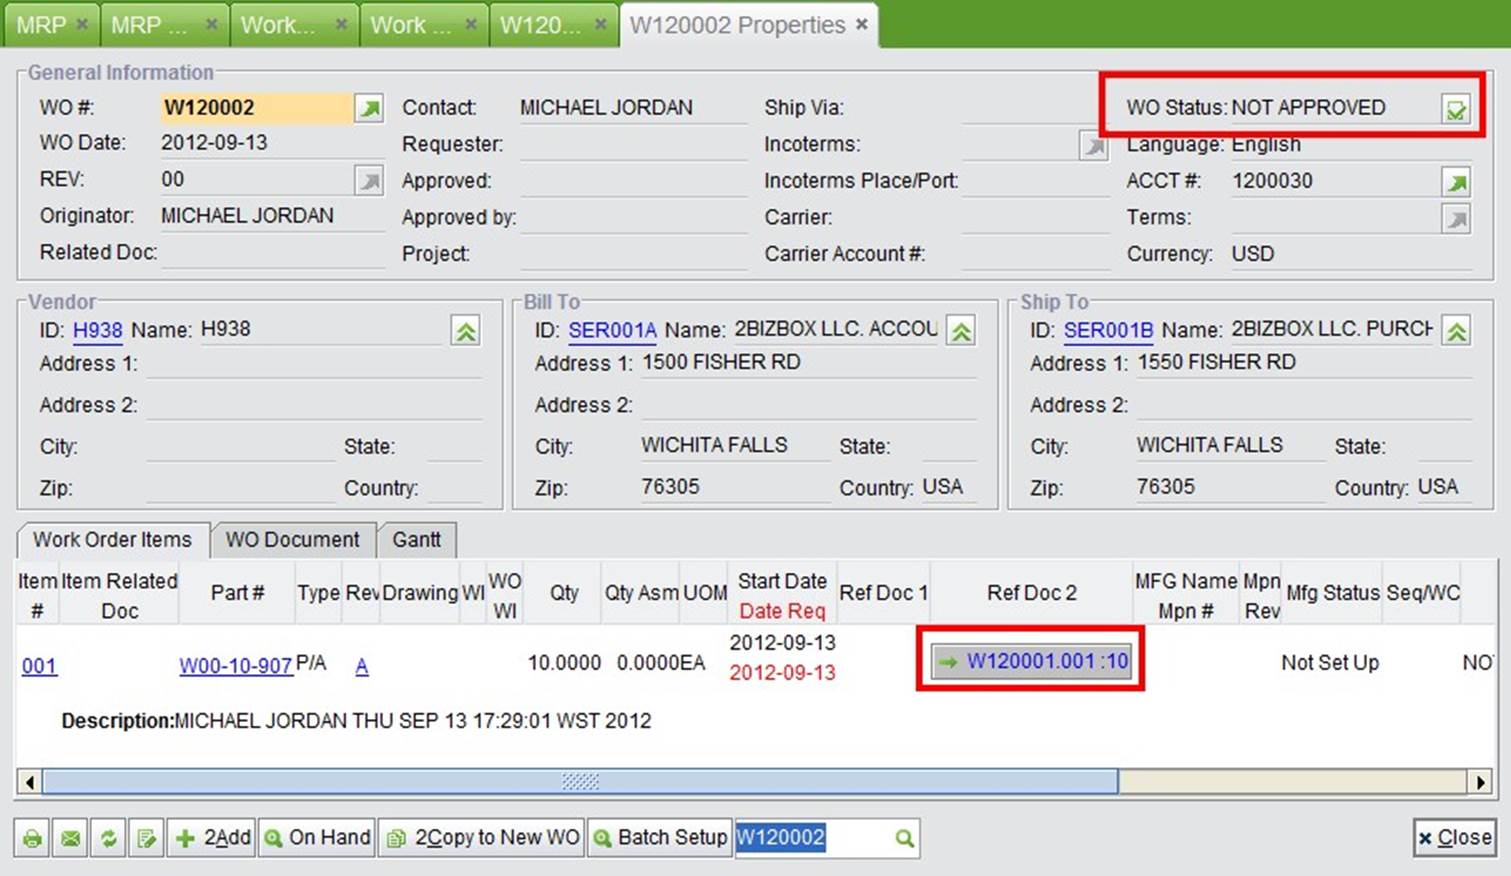
In this way, a Sub-Work Order W120002, which is related to the Main Work Order W120001, is created. See Image 4-25. You can approve and set up the Sub-Work Order according to the previous steps. If there are more sub-level components in the BOM, you can continue to create Sub-Work Orders.
 |
(Image 4-25)
Work Orders that are setup will drive demands for parts. You can run MRP again to see whether there are inadequate parts for production, and make Request for Quotes or Purchase Orders.
Go to “Purchasing Box – MRP” to run MRP. Suppose there are 10 “W0010907F3” in shortage, you can add it to a Purchase Order Work Sheet. First select “Add To PO WS” in item, and then click “2Add to PO WS” at the top right corner. See image 4-26:
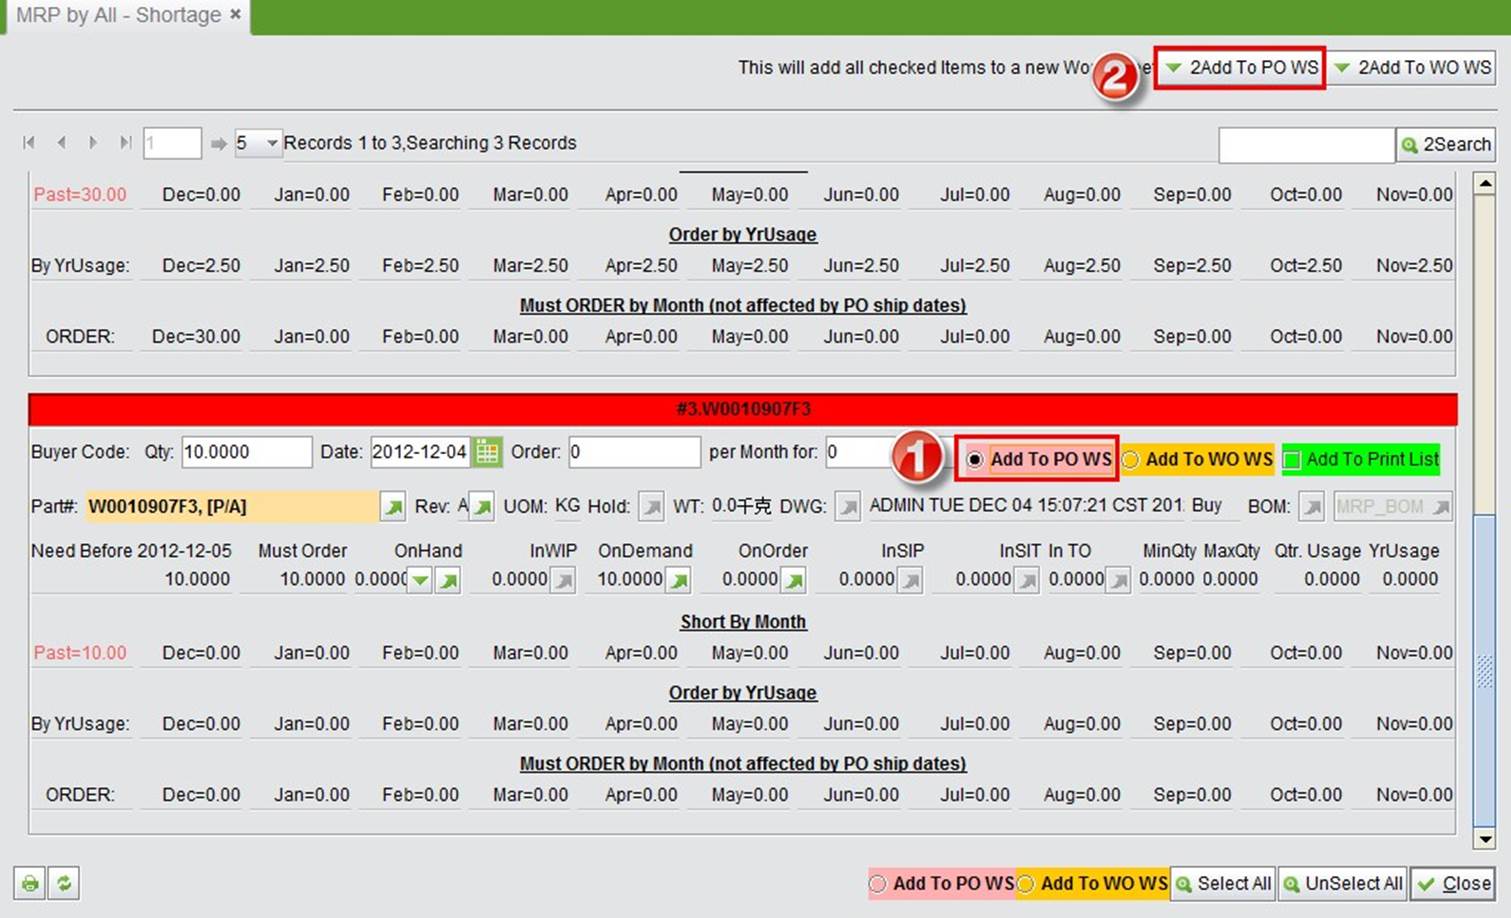 |
(Image 4-26)
PO Worksheet is very similar to a WO Worksheet. You can make RFQ and PO quickly in a PO Worksheet. To make an RFQ for 10 Part “W0010907F3,” do as following steps shown in Image 4-27:
(1) Select a Vendor for the Part; if there no Vender by default, click “2Add” to open the Vendor list;
(2) Select “Make RFQ” at the bottom right of the item info;
(3) Click “+Make RFQ” to make the Request for Quote;
 |
(Image 4-27)
By clicking “+Make RFQ,” you’ll be guided to the new created RFQ list page as shown in Image 4-28. RFQ is created by Vendors, which means if there are multiple parts from the same vendor in PO Worksheet, you will get one RFQ with multiple items; if there are multiple parts from multiple vendors, you will get multiple RFQs in this list.
 |
(Image 4-28)
The new created RFQ status is “NOT APPROVED.” Click on the RFQ# to view the detail. See Image 4-29:
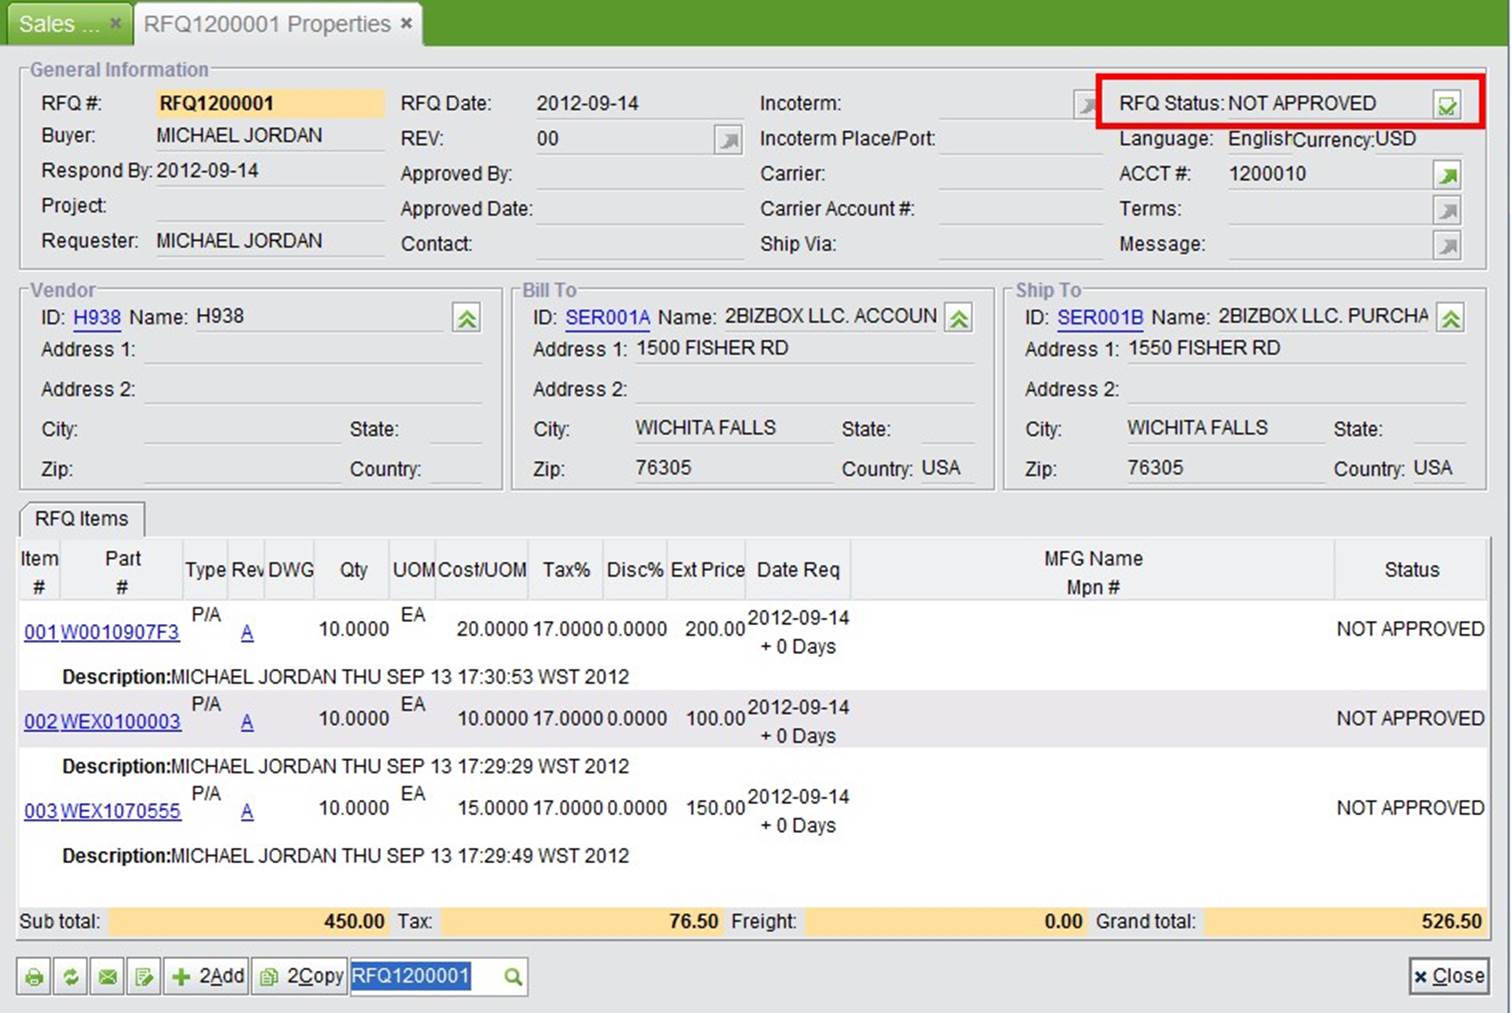 |
(Image 4-29)
Approve the RFQ and send it to the vendor. Then you can copy the RFQ to a Purchase Order.
To turn the RFQ to a Purchase Order, click "+Make PO" at the bottom of the RFQ interface, and click "Yes" to confirm as shown in Image 4-30:
 |
(Image 4-30)
The new PO must be approved before purchasing from your vendor. Image 4-31 shows an approved PO:
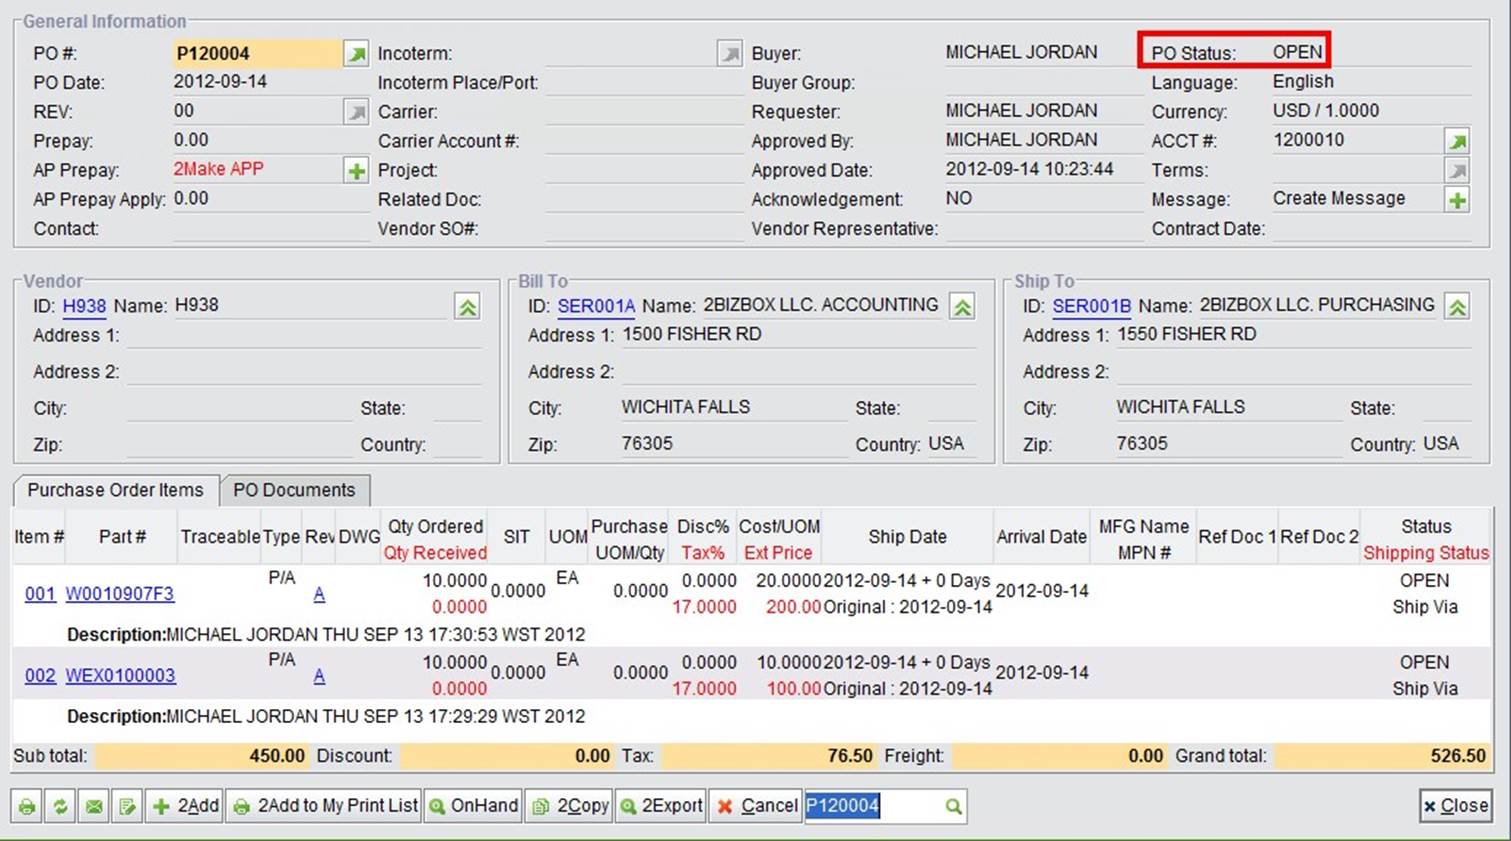 |
(Image 4-31)
Normally, a partial payment is required by the Vendor. As shown in Image 4-32, you can click the "+" button to create AP Prepay for the Purchase Order:
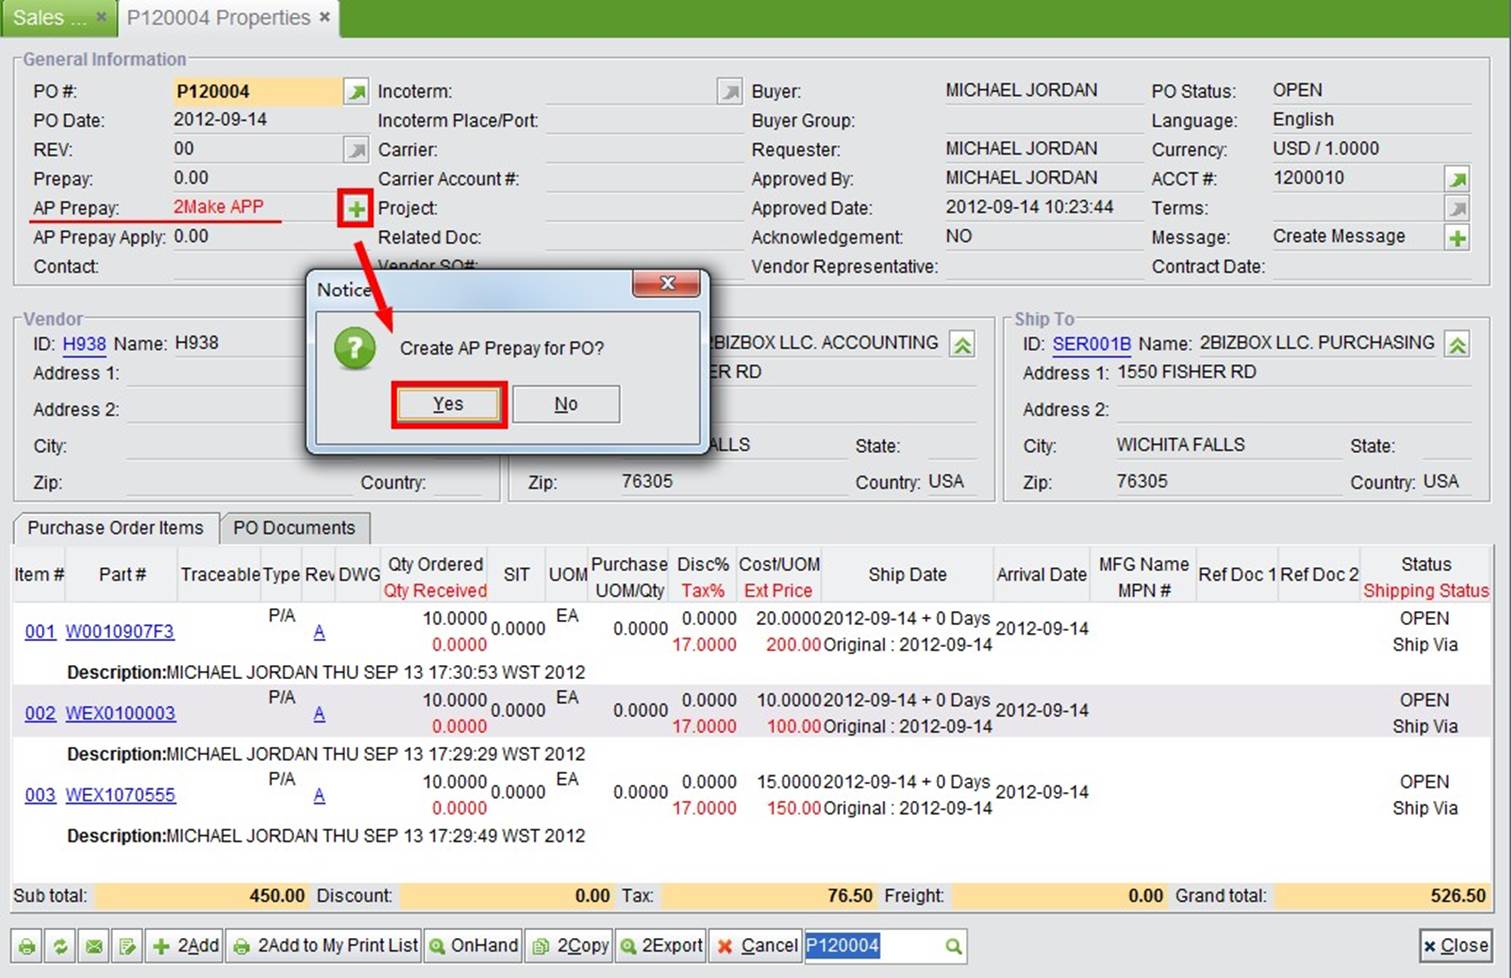 |
(Image 4-32)
In the "Update AP Prepay" interface followed, click "2Add" to add a prepaid item. See Image 4-33:
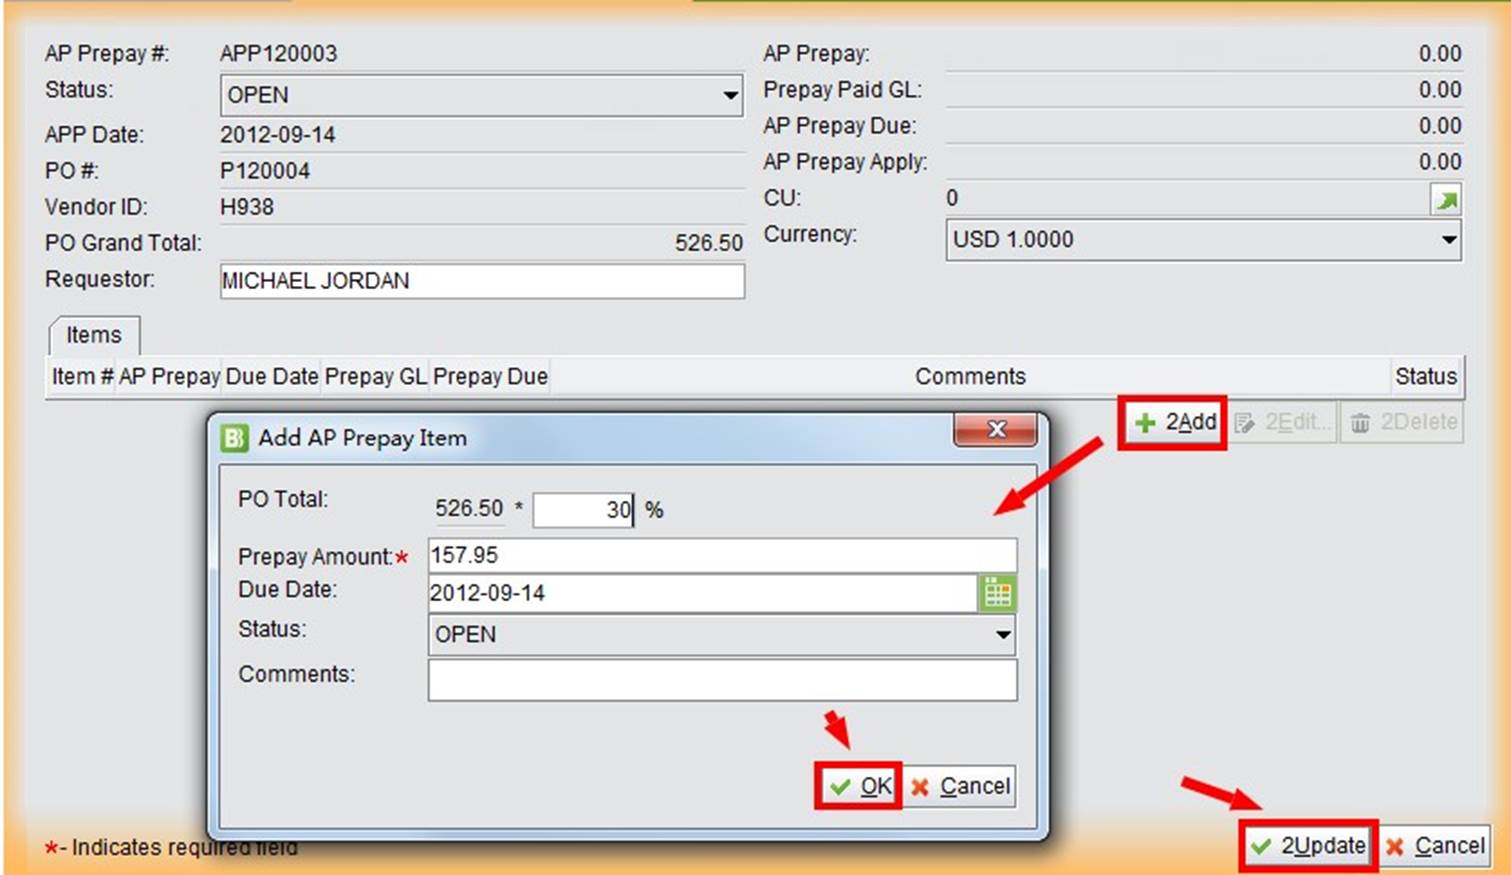 |
(Image 4-33)
Enter the payment details, and click "2Add" and "2Update" to add the payment item. After the payment is transferred to the vendor, click "Payment" to record it. See Image 4-34:
 |
(Image 4-34)
When the payment is added, the system will generate a transaction as shown in Image 4-35. You can click the GL# to see transaction details.
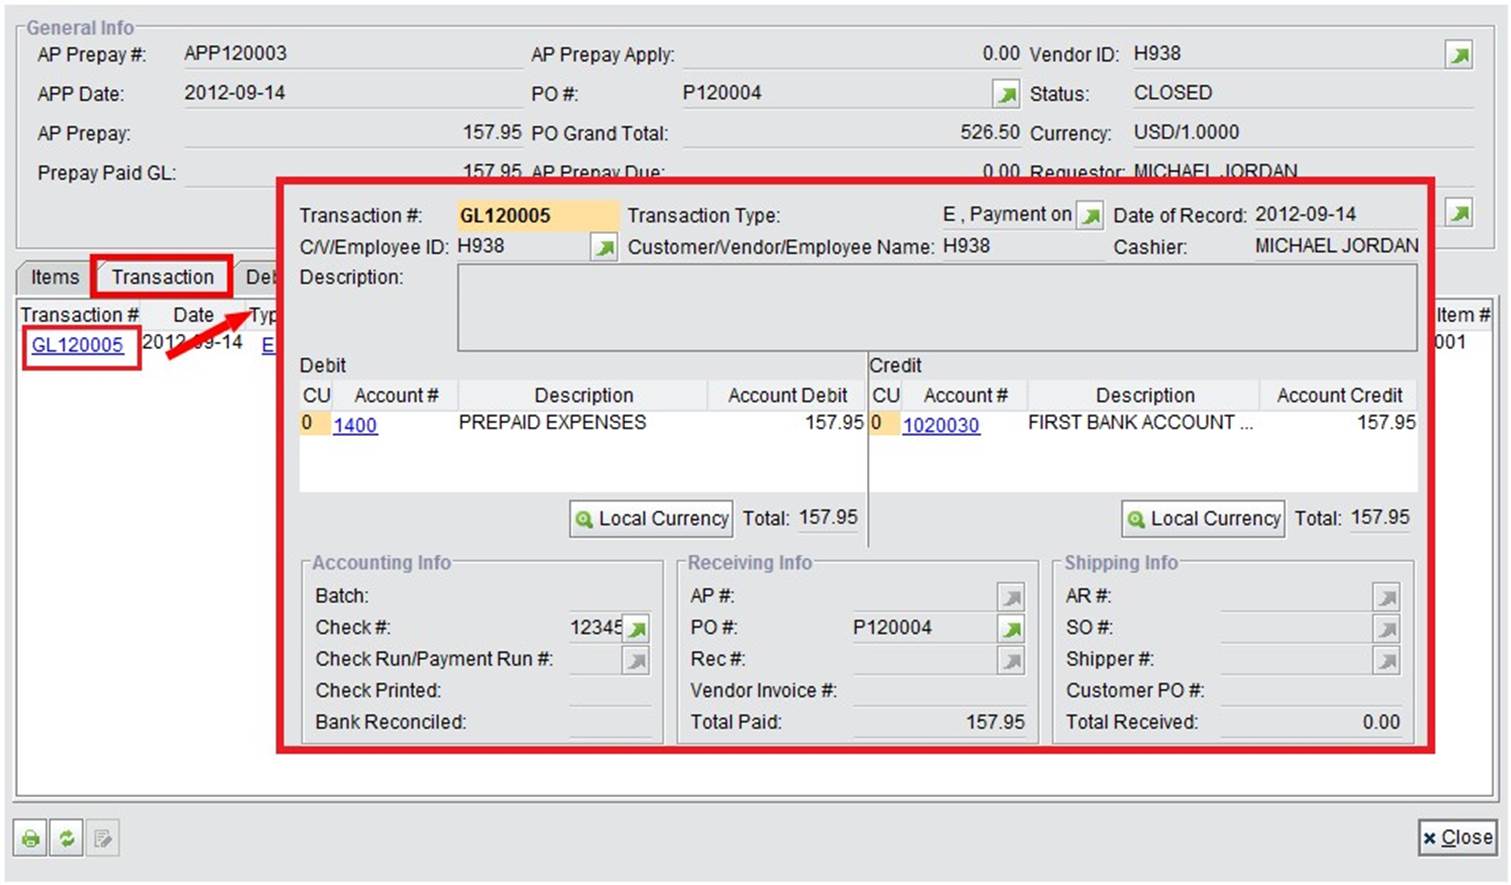 |
(Image 4-35)
To receive the parts, the warehouse staff should operate the receiving procedure in the Warehouse Box. Click "2Search PO to Receive" in "Warehouse Box - Receiving - General" to find the PO as shown in Image 4-36:
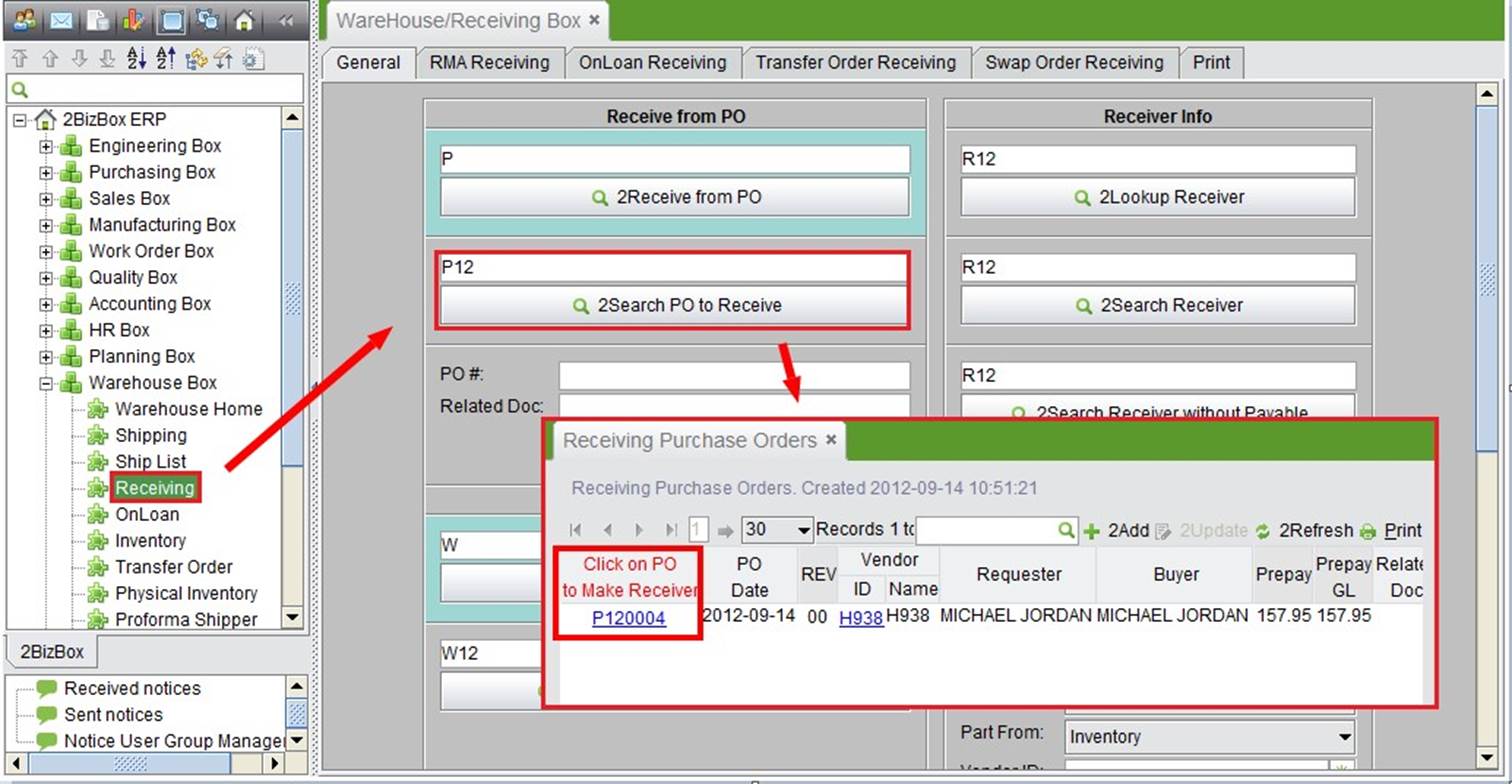 |
(Image 4-36)
Click on the PO# to receive it. It will open the "Receive Purchase Order" interface. A list of all the items not received for this PO will become visible. Enter the quantity received at the warehouse as shown in Image 4-37:
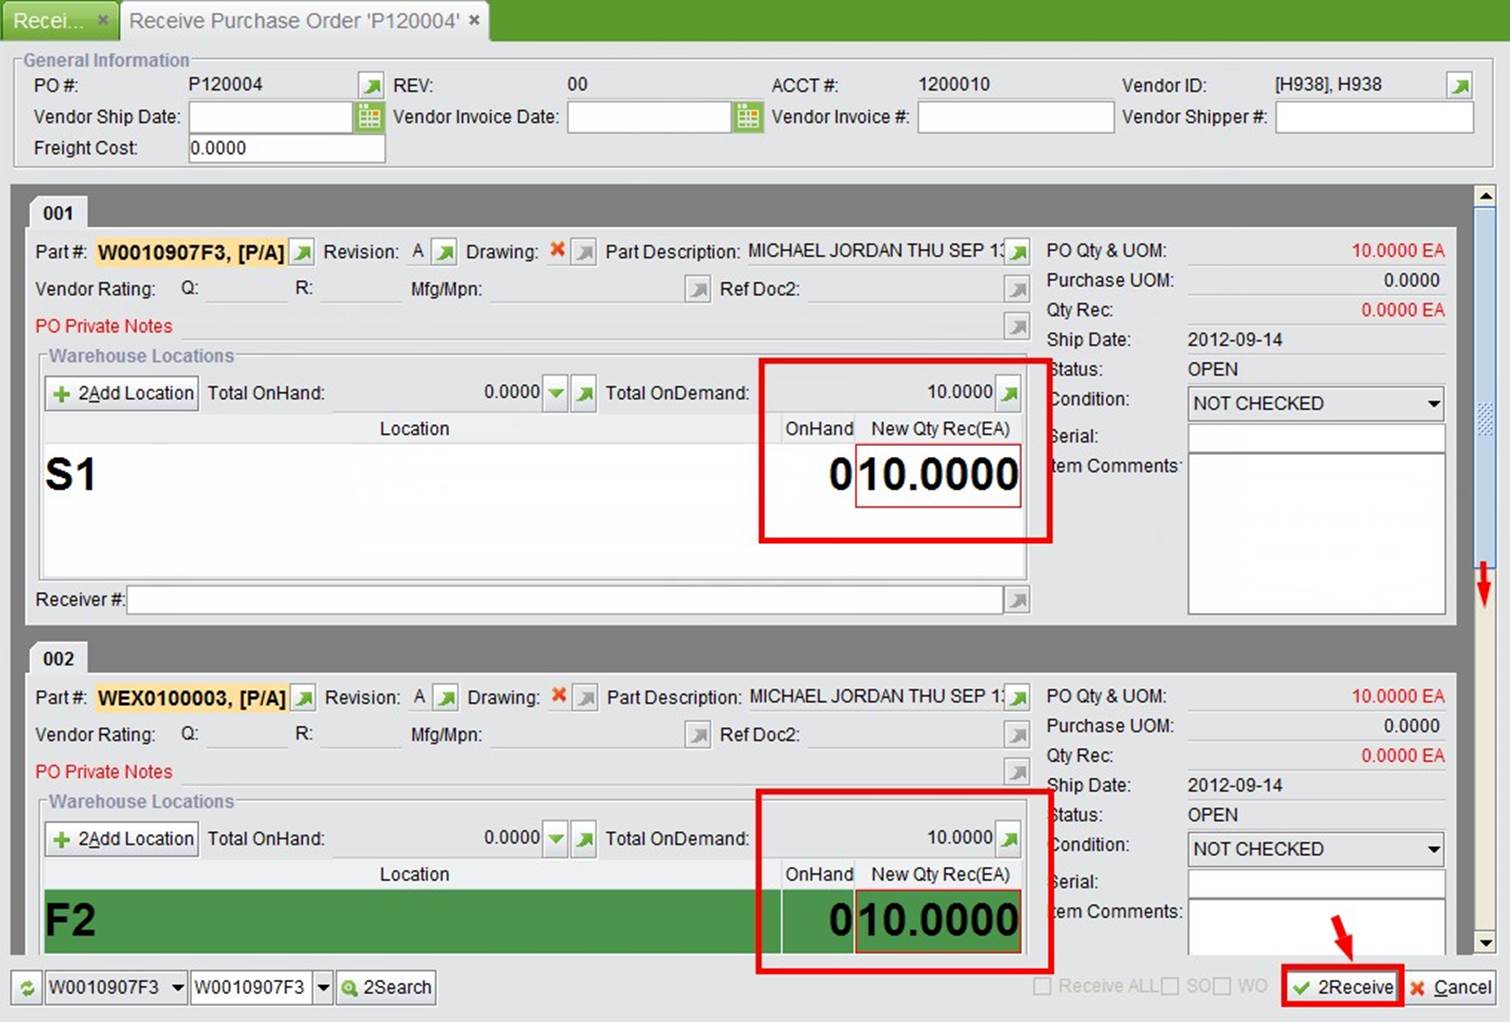 |
(Image 4-37)
Click "2Receive" to finish receiving, and generate a Receiver as shown in Image 4-38:
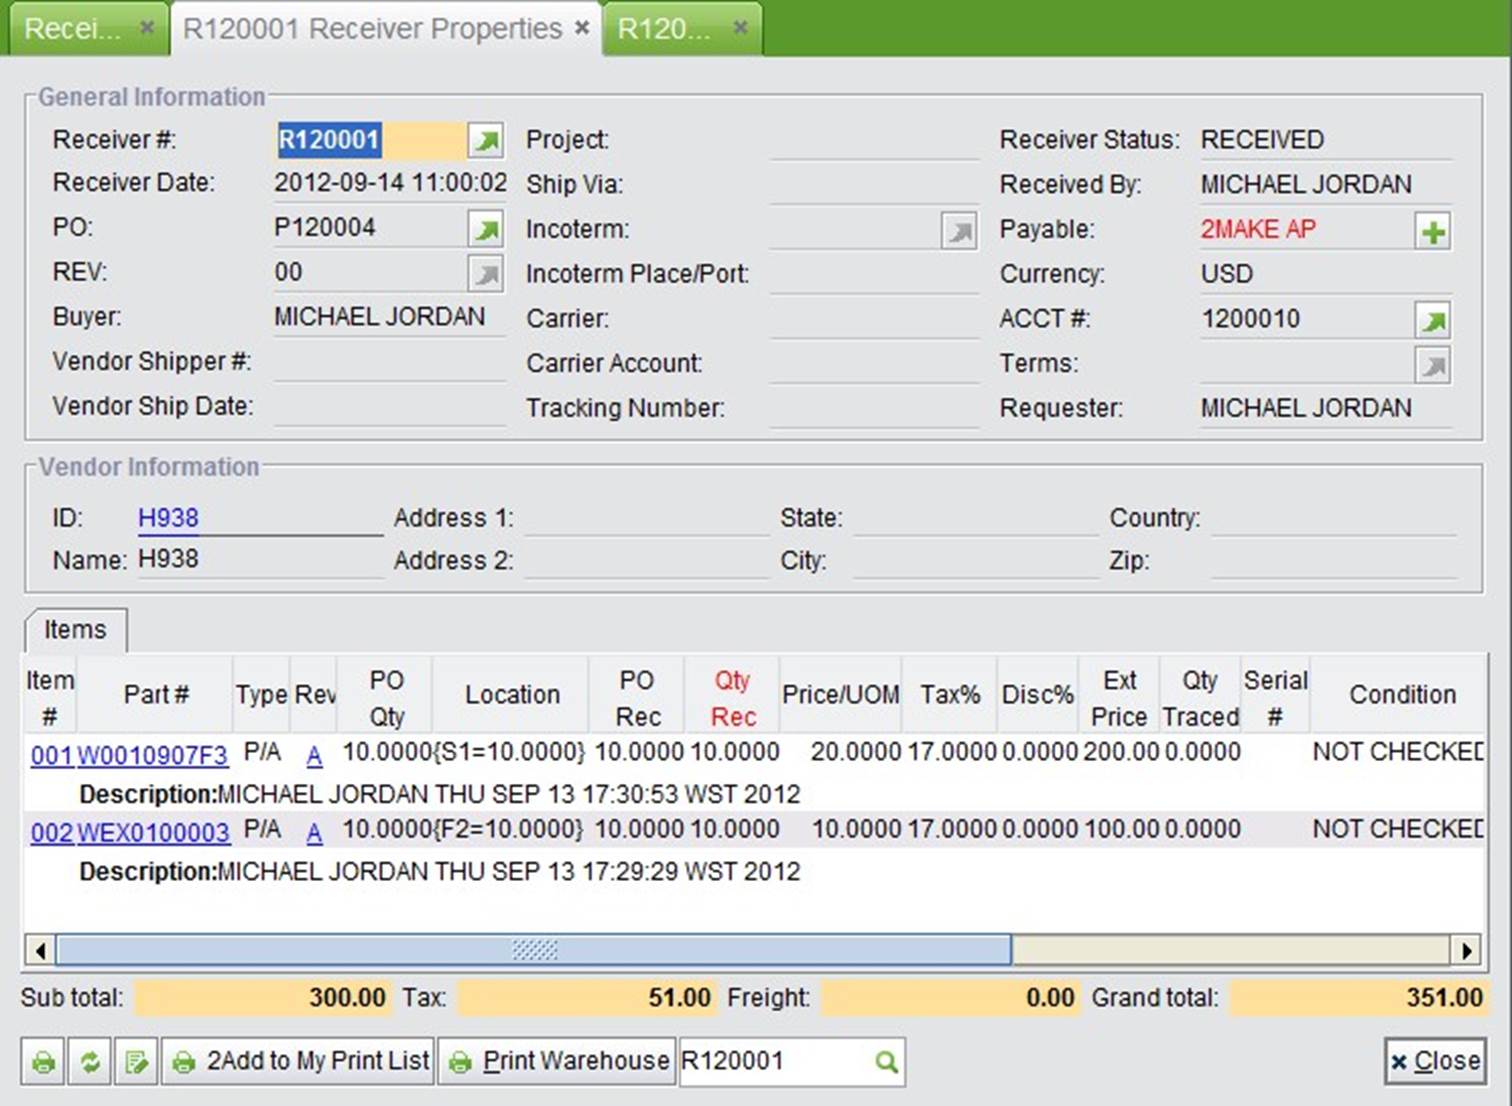 |
(Image 4-38)
Now we are ready to make the final payment for the purchase order. To find the Receiver, click "2Search Receiver without AP to Make AP" in "Accounting Box” – “AP.” See Image 4-39:
 |
(Image 4-39)
In search result, click the Receiver # to open the Make AP interface. See Image 4-40:
 |
(Image 4-40)
In the "Make AP" interface, enter the Vendor Invoice # and Invoice Total as shown in Image 4-41. If the Invoice Total is different from the Receiver Total, you can input the actual amount in the text box. If there is prepayment made to the Vendor, you can check the option “Check this box to automatically apply AP Prepayment.” To finish the AP, click “2Update” at the bottom right corner.
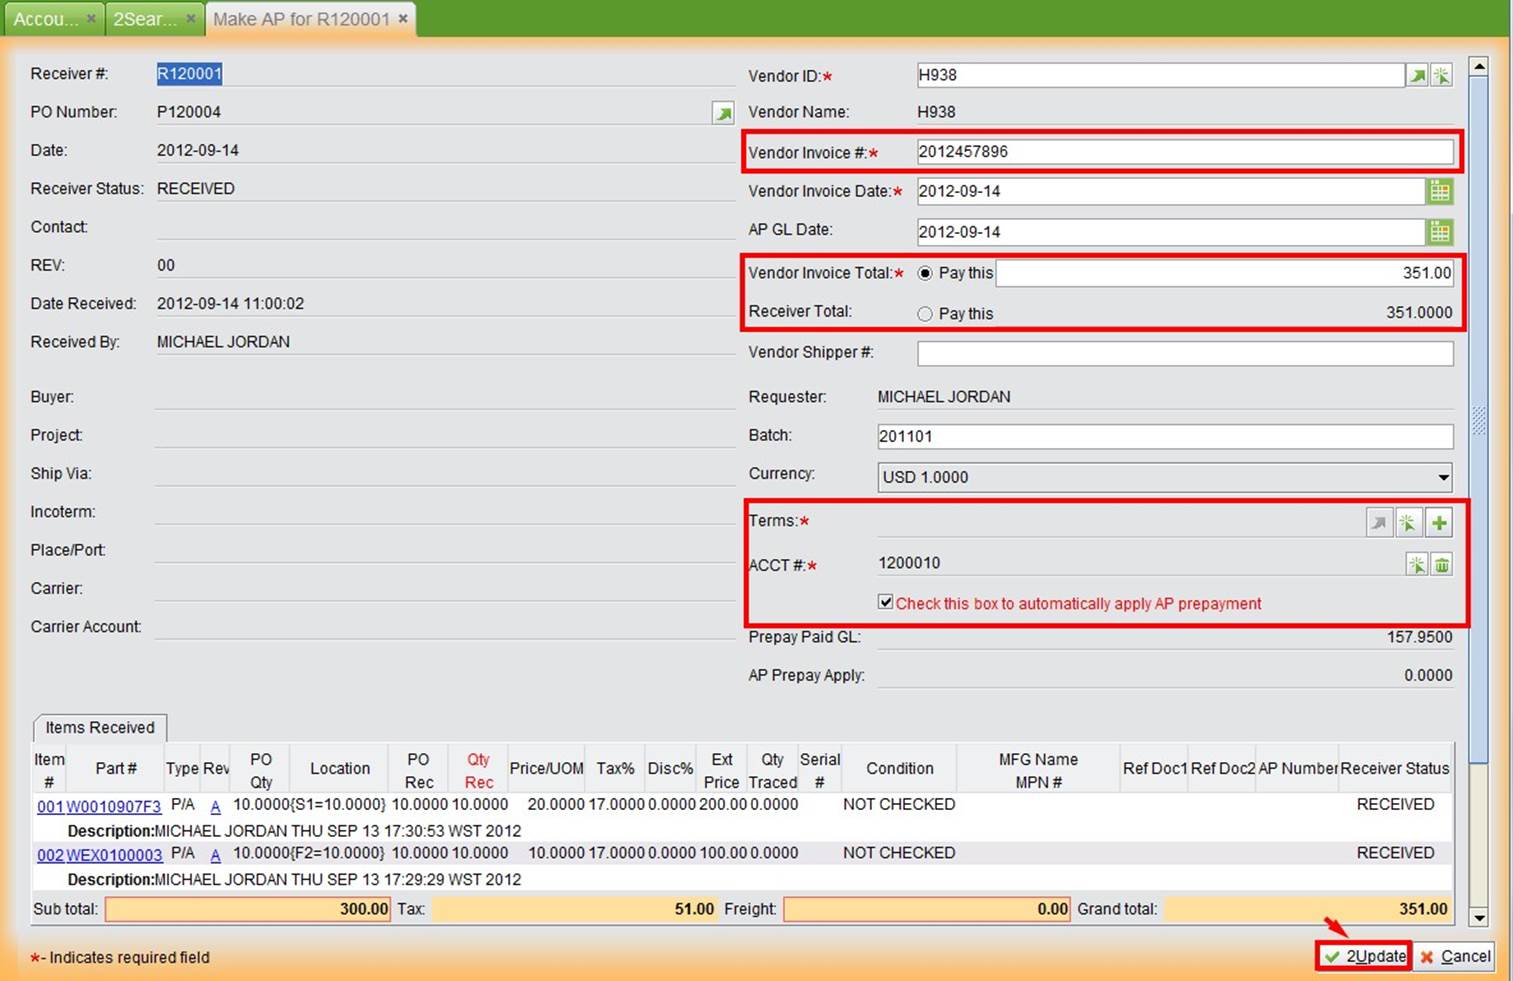 |
(Image 4-41)
Image 4-42 shows the open AP, in which related PO and Receiver is recorded. At the item window, you can click on “Transaction” and “Debits and Credits” tab to see the General Ledger. Click “Accounting Info” will show you the Total Paid and Total Due amount.
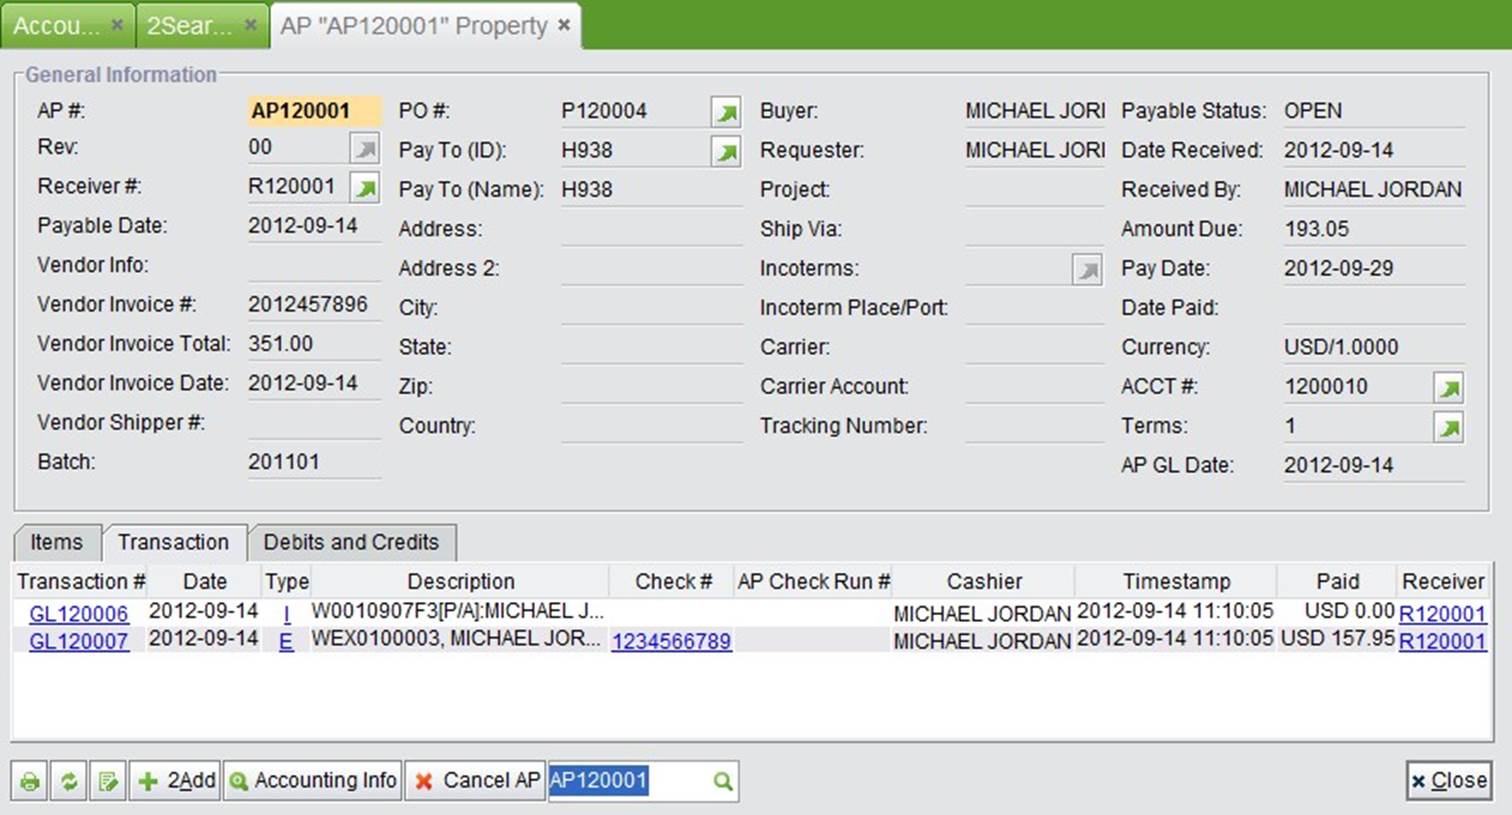 |
(Image 4-42)
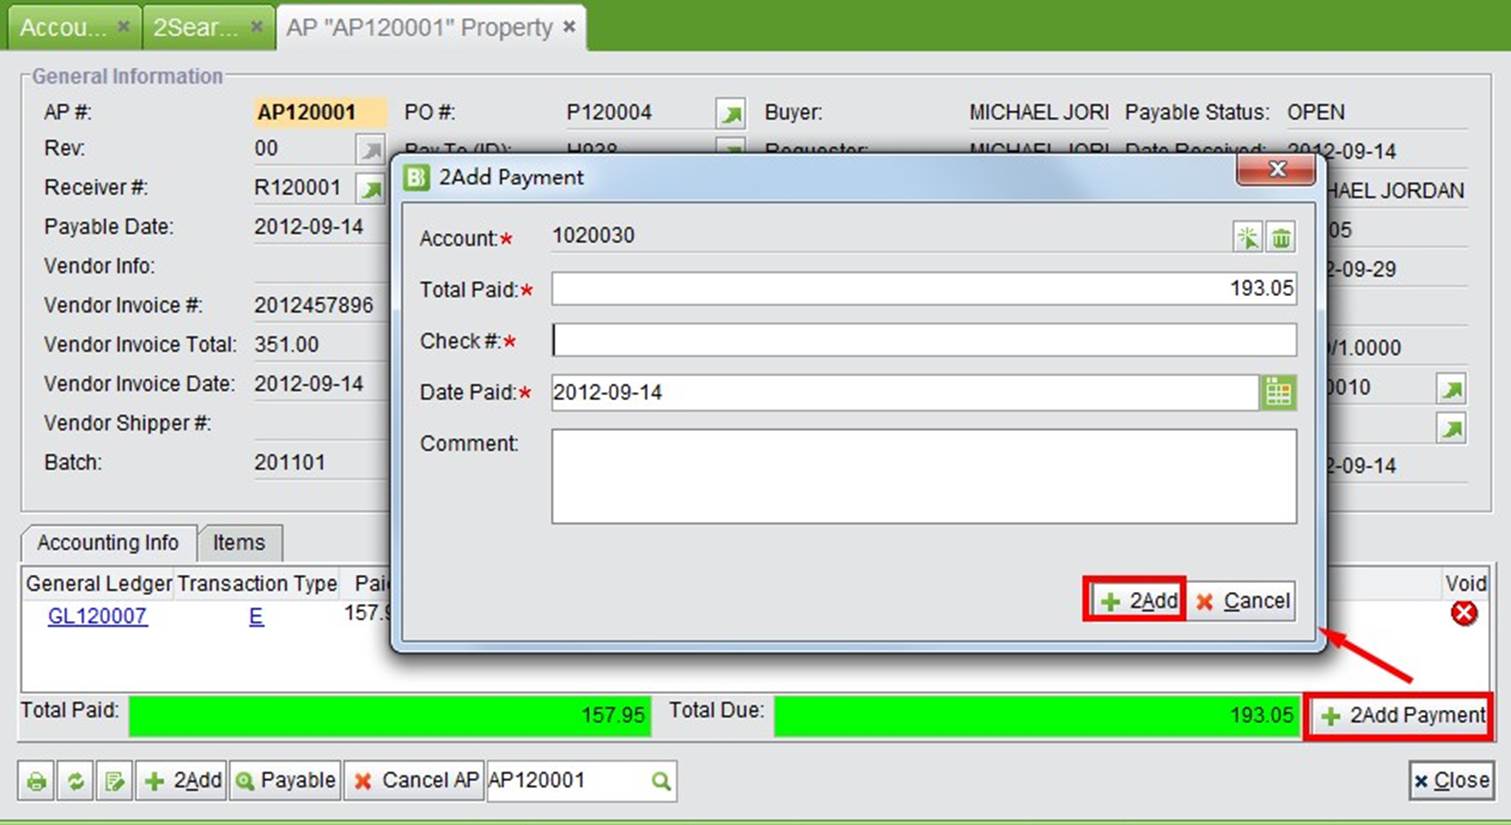
When the final payment is transferred to the vendor, first click "Accounting Info" at the bottom of AP, then click "2Add Payment" to open the adding window. As shown in Image 4-43, the prepayment has been deducted from “Total Paid” amount. Fill in the required information, and then click “2Add” to add the payment.
If you input wrong information, you can void the GL by clicking “Void” in the accounting info.
 |
(Image 4-43)
The AP payable status will become “Closed” when the Total Due turns to zero. By adding the payment, the AP is closed and the 2BizBox system generates all related transactions as shown in Image 4-44:
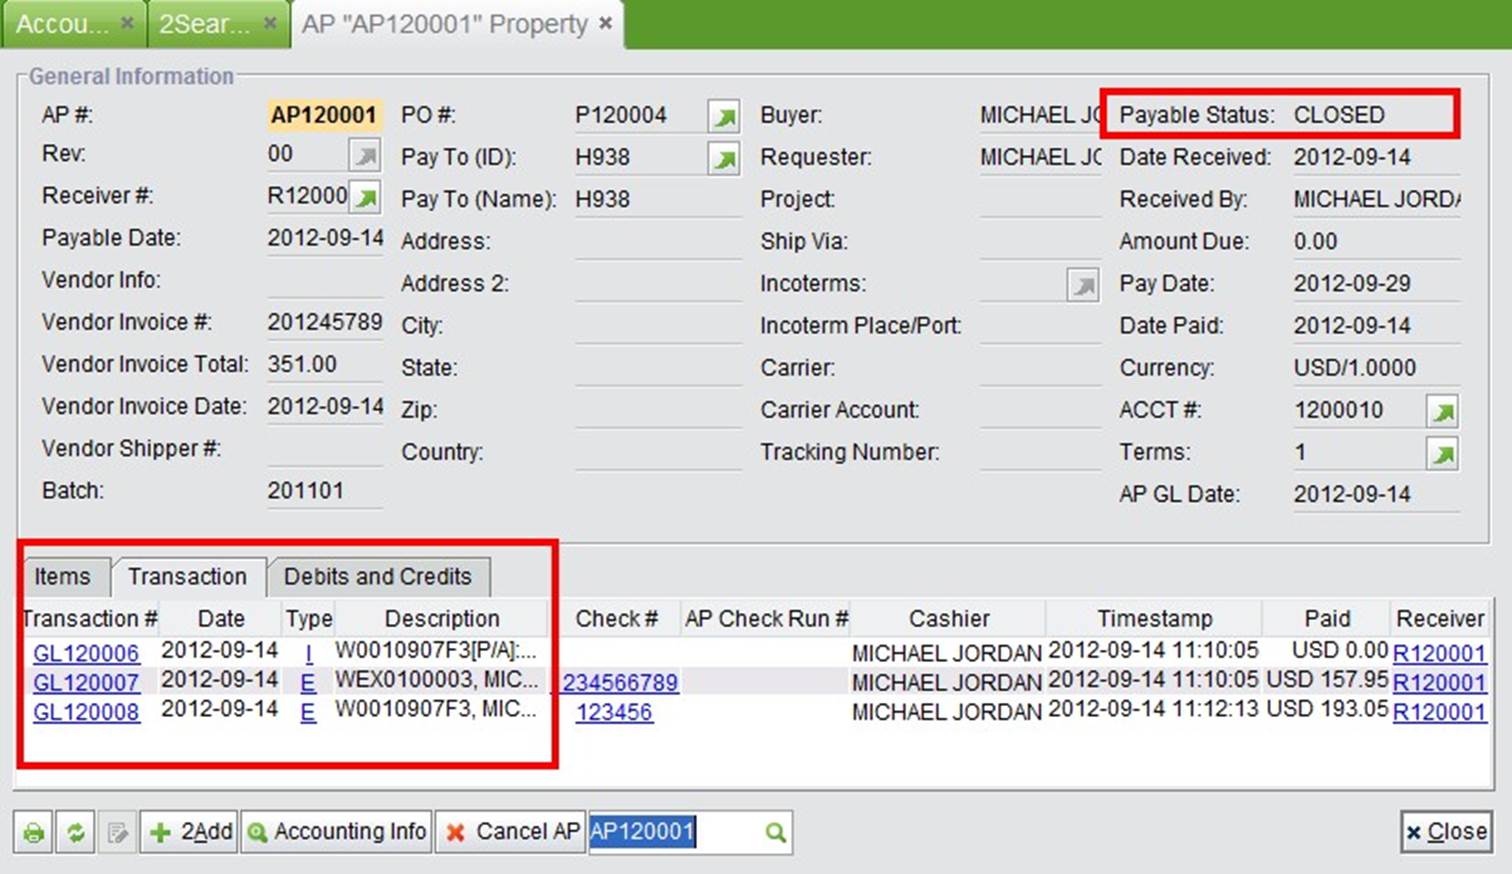 |
(Image 4-44)
Now, there are enough parts for production. In "Warehouse Box” – “Shipping,” find the "Issue Parts to WO" function as shown in Image 4-45 to issue raw materials to the Work Order.
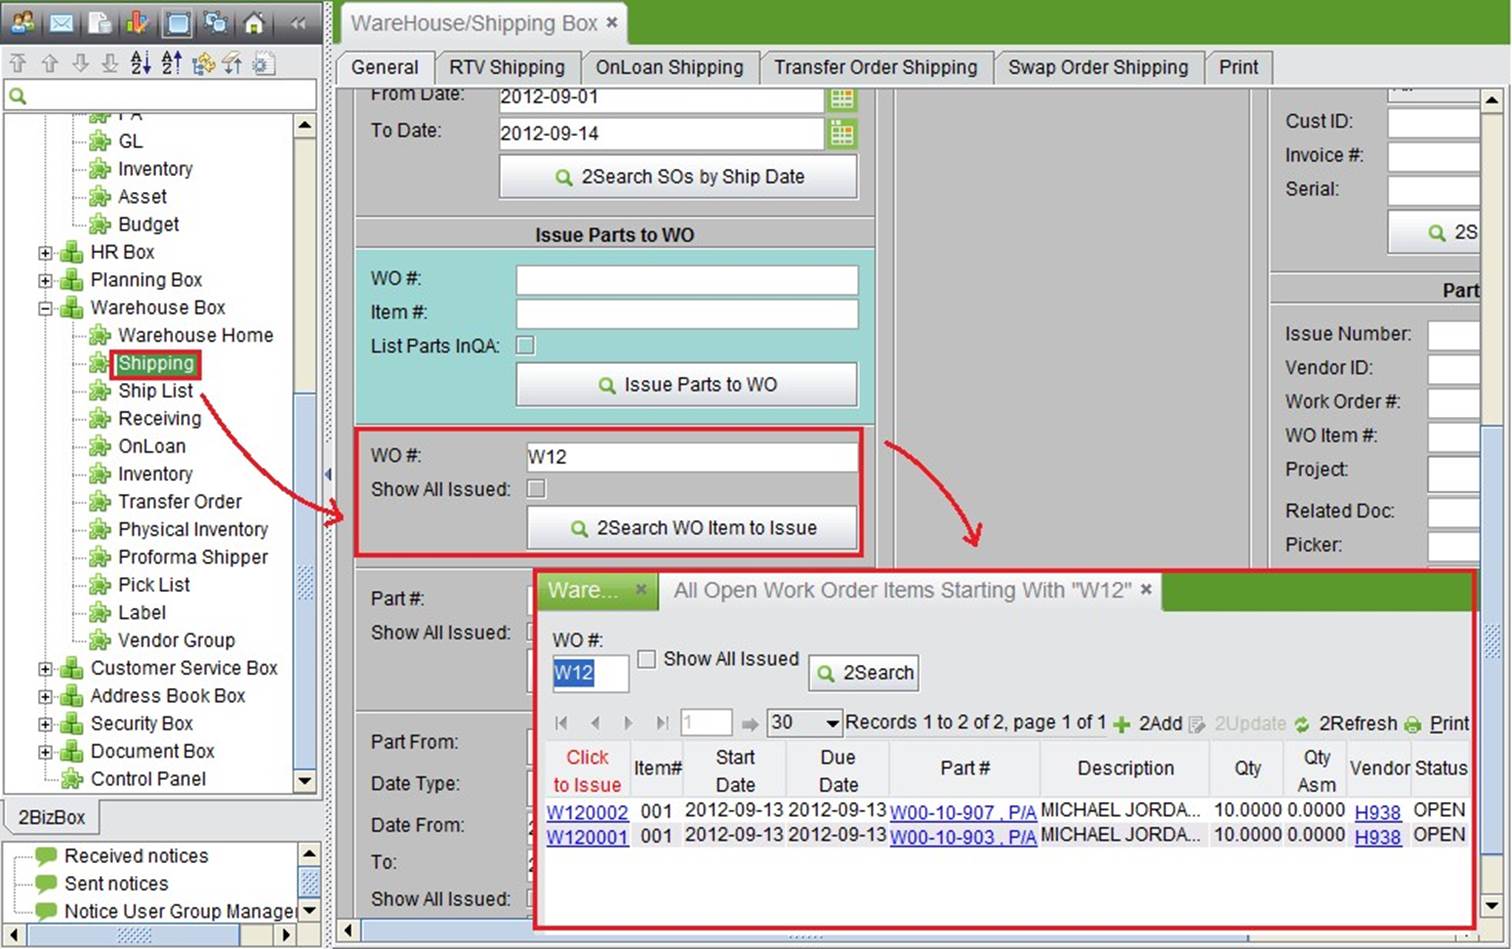 |
(Image 4-45)
You can either fill in the WO#/Item# to issue parts, or search WO Item to issue parts. Issue parts to the SubWork Order W120002 first. By issuing parts, the "Issue Parts to WO" interface will open. To issue parts to a WO, enter the quantity to issue in "New Qty Issued" and click "OK” at the bottom right corner. See Image 4-46:
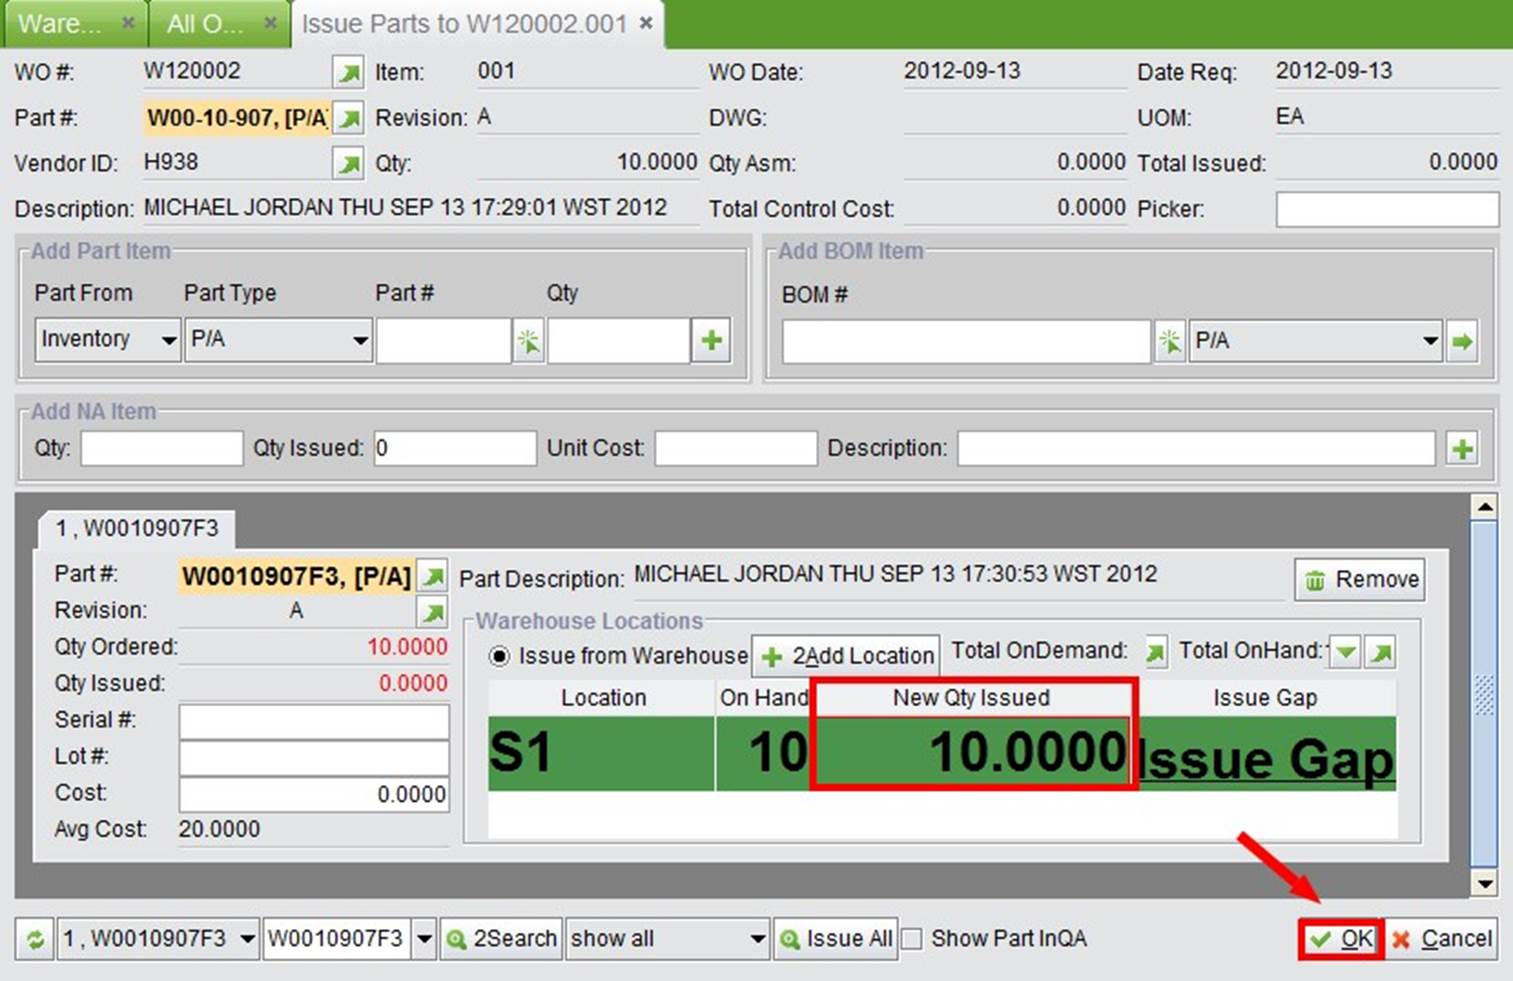 |
(Image 4-46)
When the Sub-Work Order mission is complete, we can directly receive the finished components of the main work order. Find the Sub-Work Order in "Warehouse Box” – “Receiving” –> “General” –> “Receive from WO.” See Image 4-47:
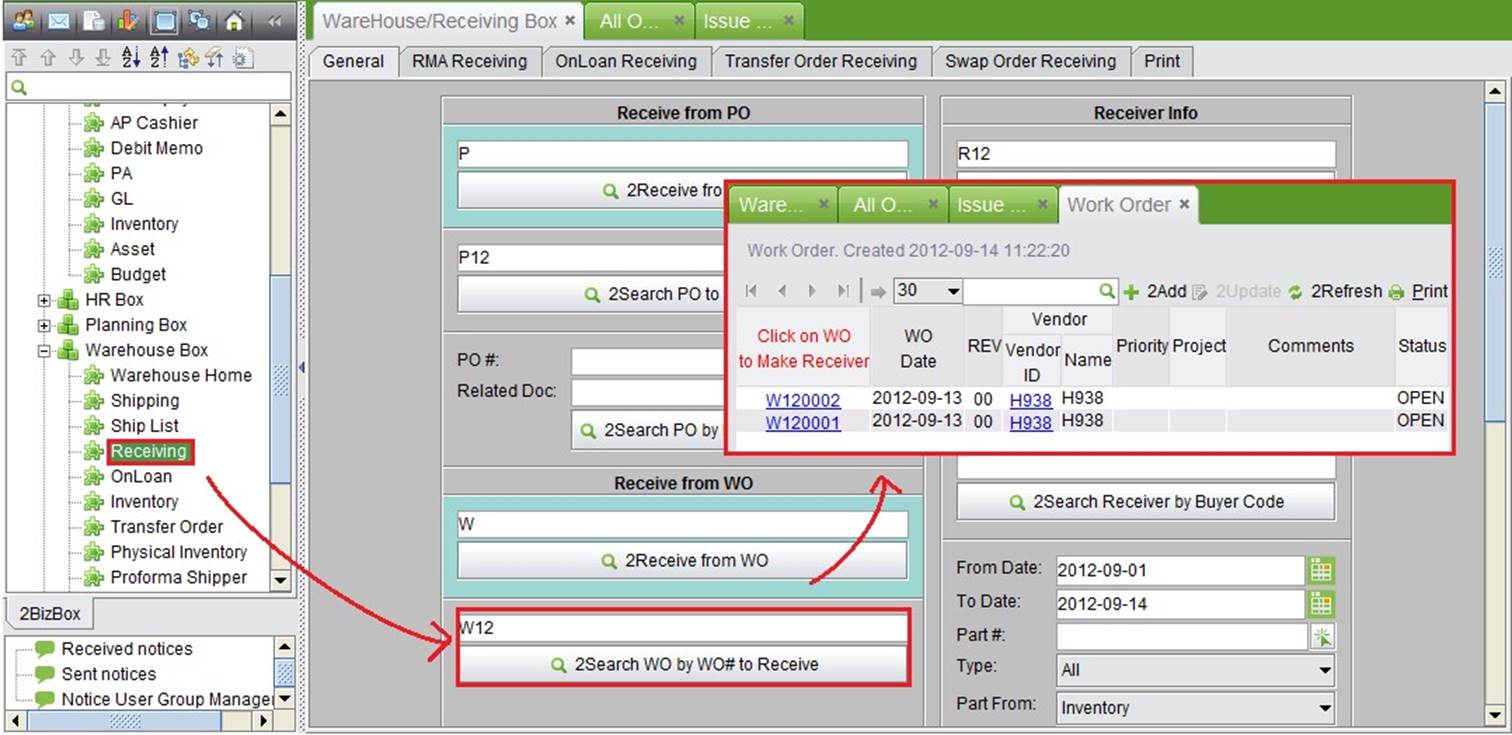 |
(Image 4-47)
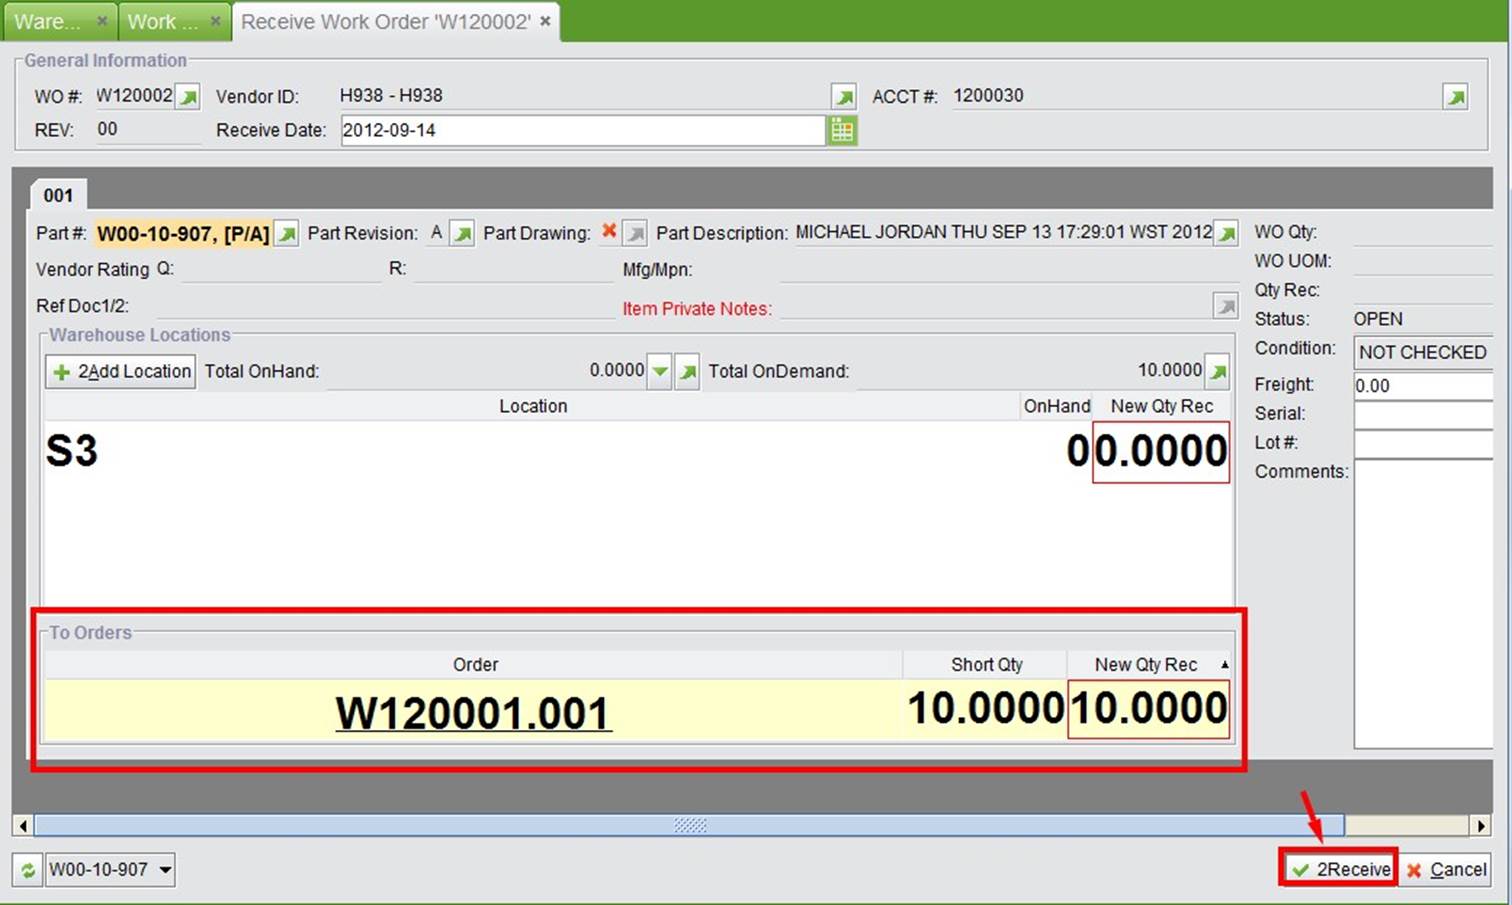
In the following "Receive Work Order" interface, you will find the following options: to receive to Warehouse Locations or receive to Orders.
If you receive to the warehouse, you will need to issue it to main work order. If you receive to the order, it means you've combined the steps of receiving and issuing. Fill in the quantity and receive the Sub-Work Order to the Main Work Order as shown in Image 4-48:
 |
(Image 4-48)
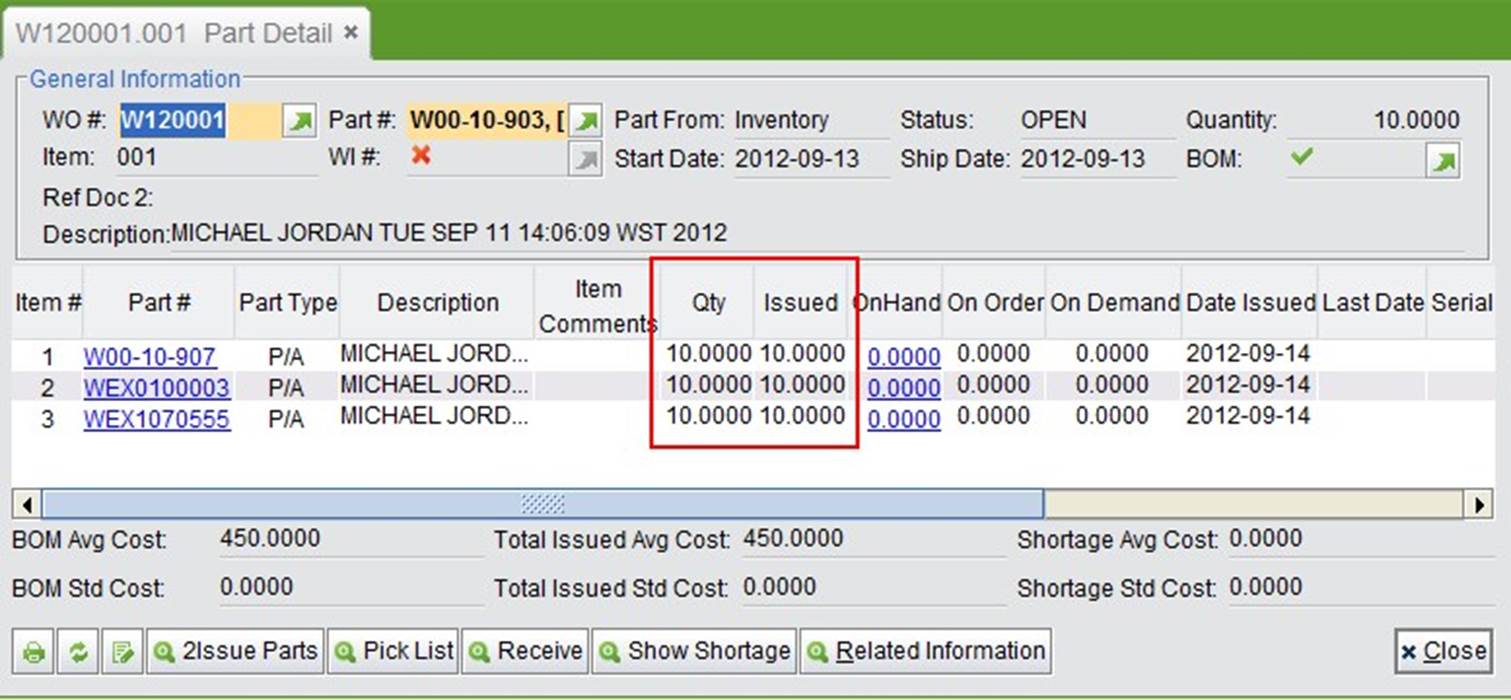
Now check the part detail of WO120001, you will see the Sub-Work Order component has been issued. Next, issue the rest of the parts to this WO. See Image 4-49:
 |
(Image 4-49)
Click "2Issue Parts" in the "WO Detail" interface to issue the remaining parts, or do it in the warehouse module following the same steps as in Chapter 4.11. Image 4-50 shows the part detail of the issued Work Order:
 |
(Image 4-50)
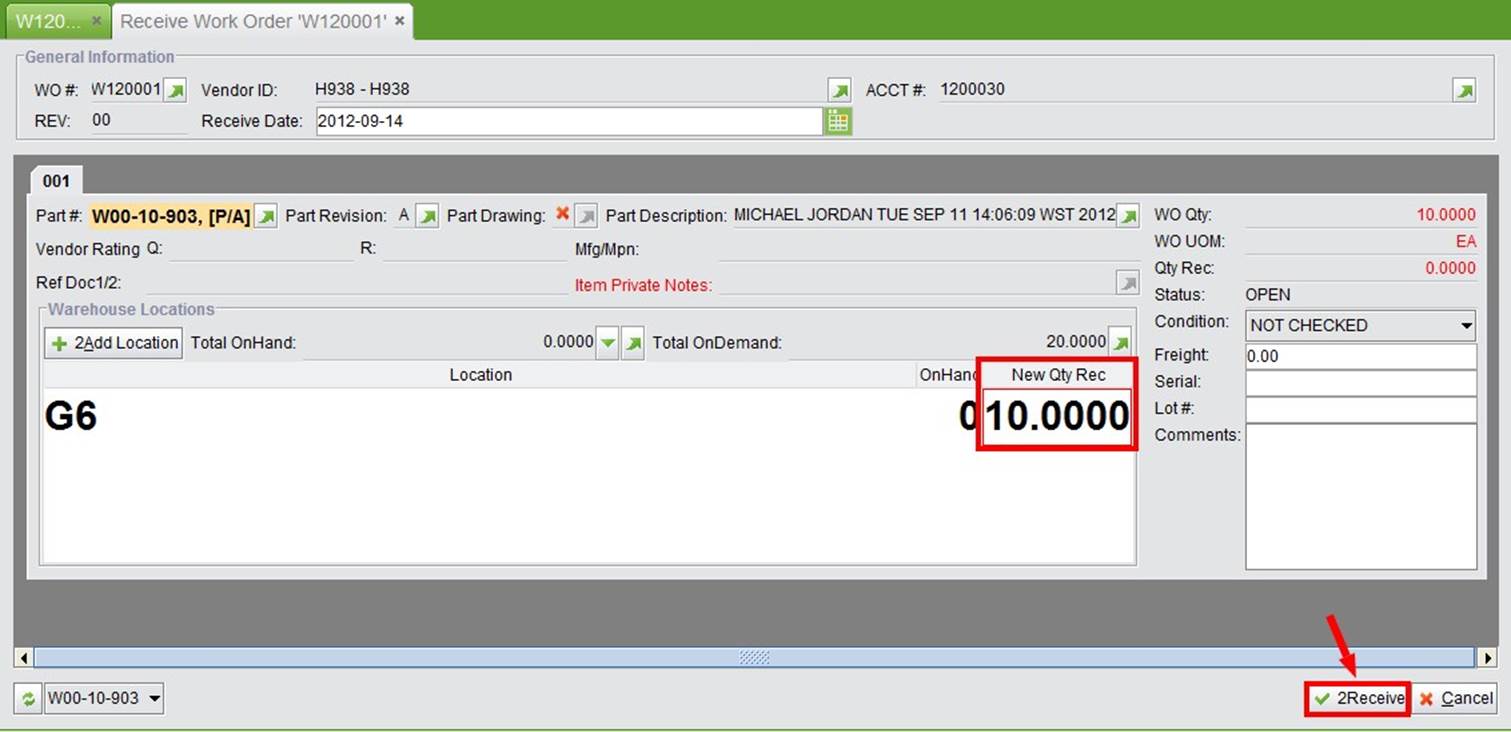
After the Main Work Order is finished, receive the product to the warehouse. This time, receive the work order to the warehouse location. See Image 4-51:
 |
(Image 4-51)
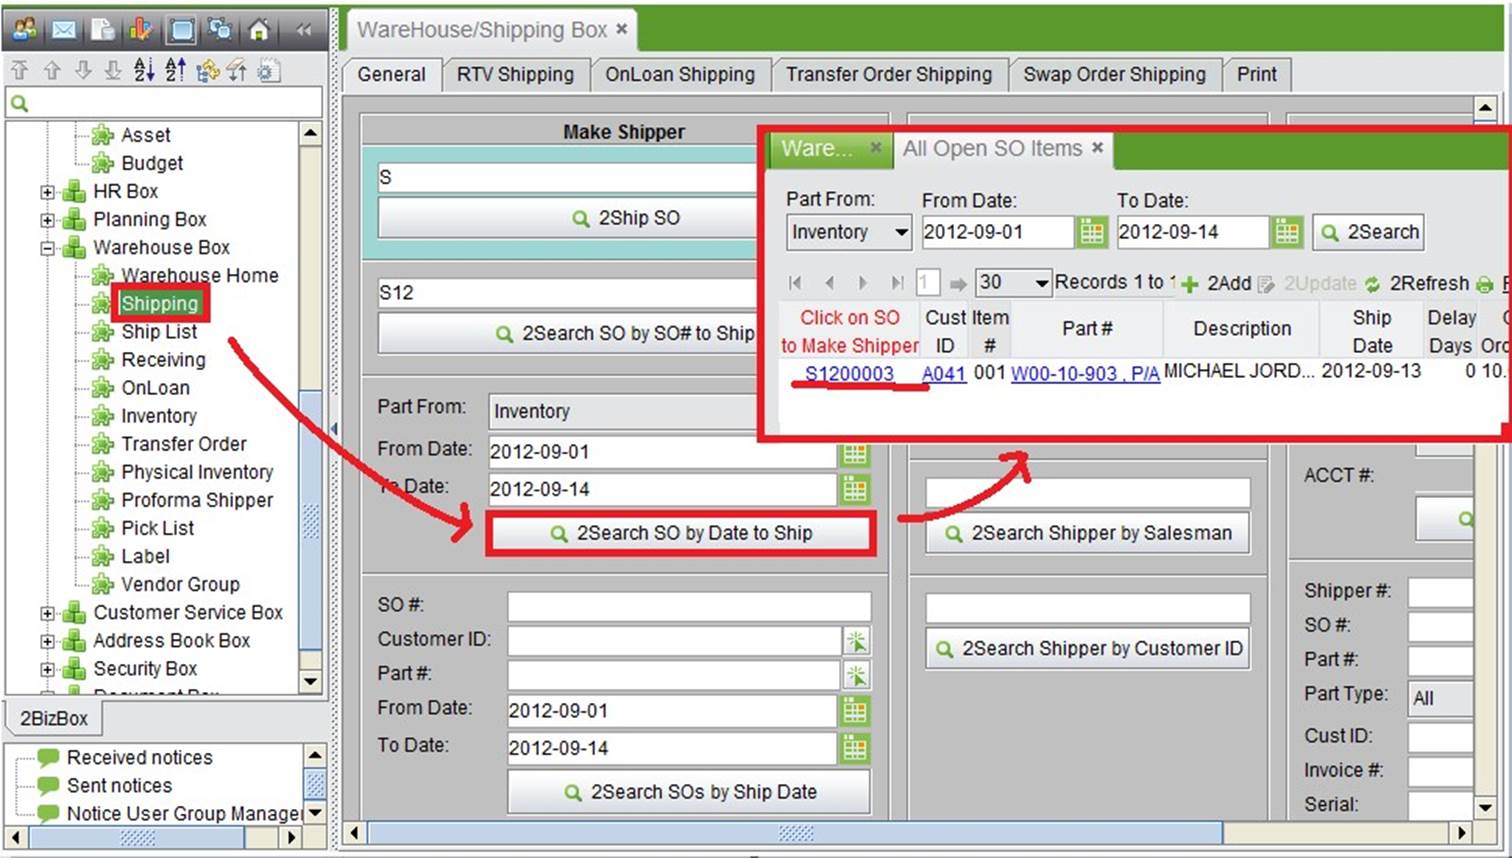
Notify the Warehouse of the SO# so that they can ship the product to the customer. In "Warehouse Box” –> “Shipping,” click "2Search SO by date to ship" to find the SO #. See Image 4-52:
 |
(Image 4-52)
Click on the SO # to ship. In the Ship SO interface, enter the product quantity for shipping, and click "2Ship.” See Image 4-53:
 |
(Image 4-53)
By clicking "2Ship,” the SO is closed and a Shipper is created. The 2BizBox system will generate a Shipper as shown in Image 4-54:
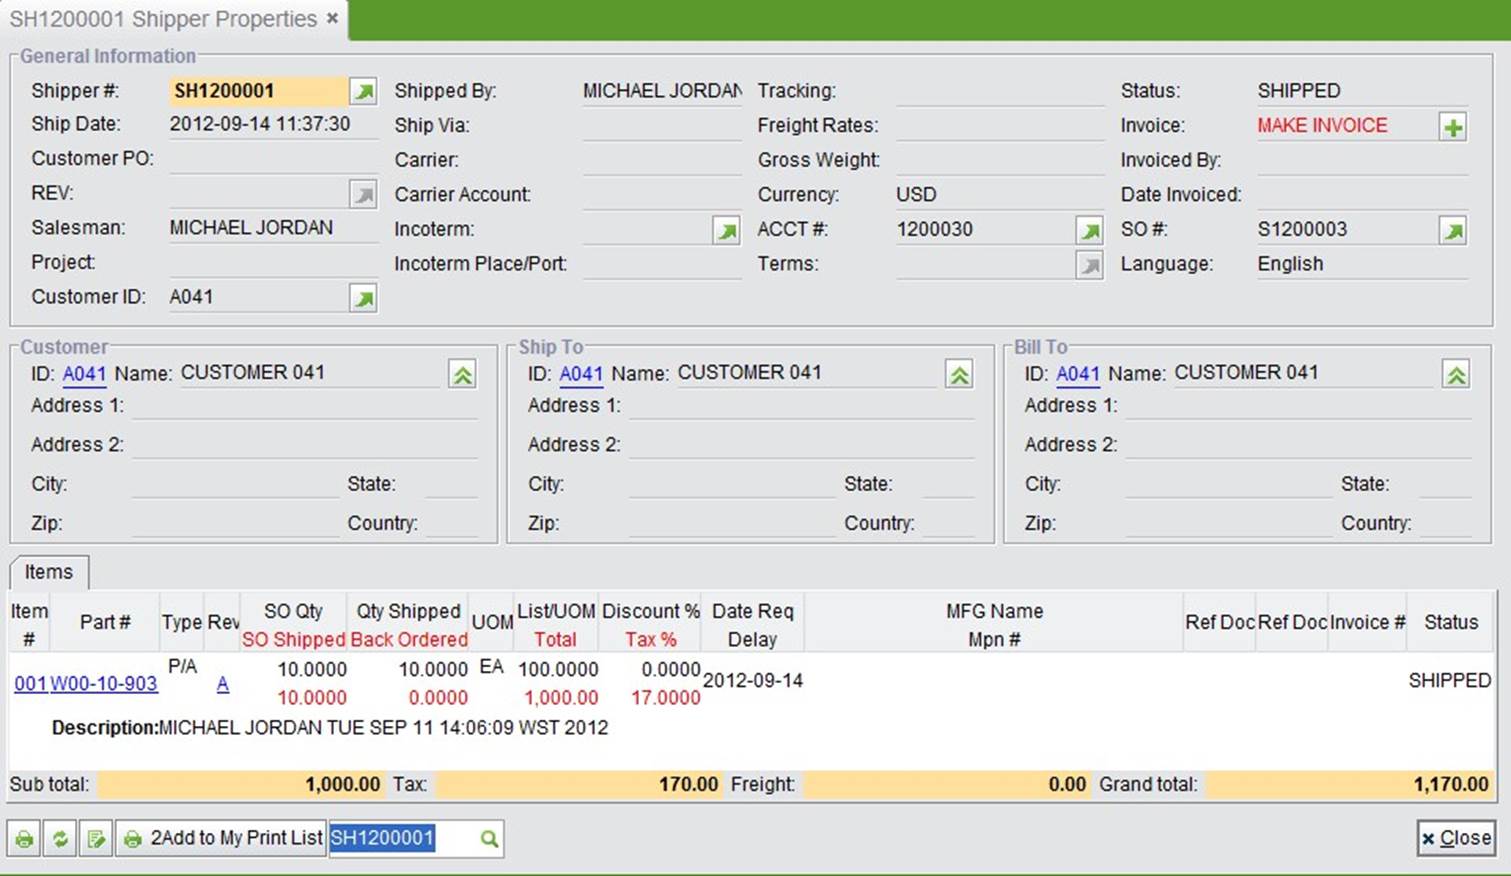 |
(Image 4-54)
To make the invoice (made by 2BizBox) for the customer after the Shipper is generated, go to "Accounting Box – AR - Make Invoice" and click "2Search Shipper without AR" as shown in Image 4-55:
 |
(Image 4-55)
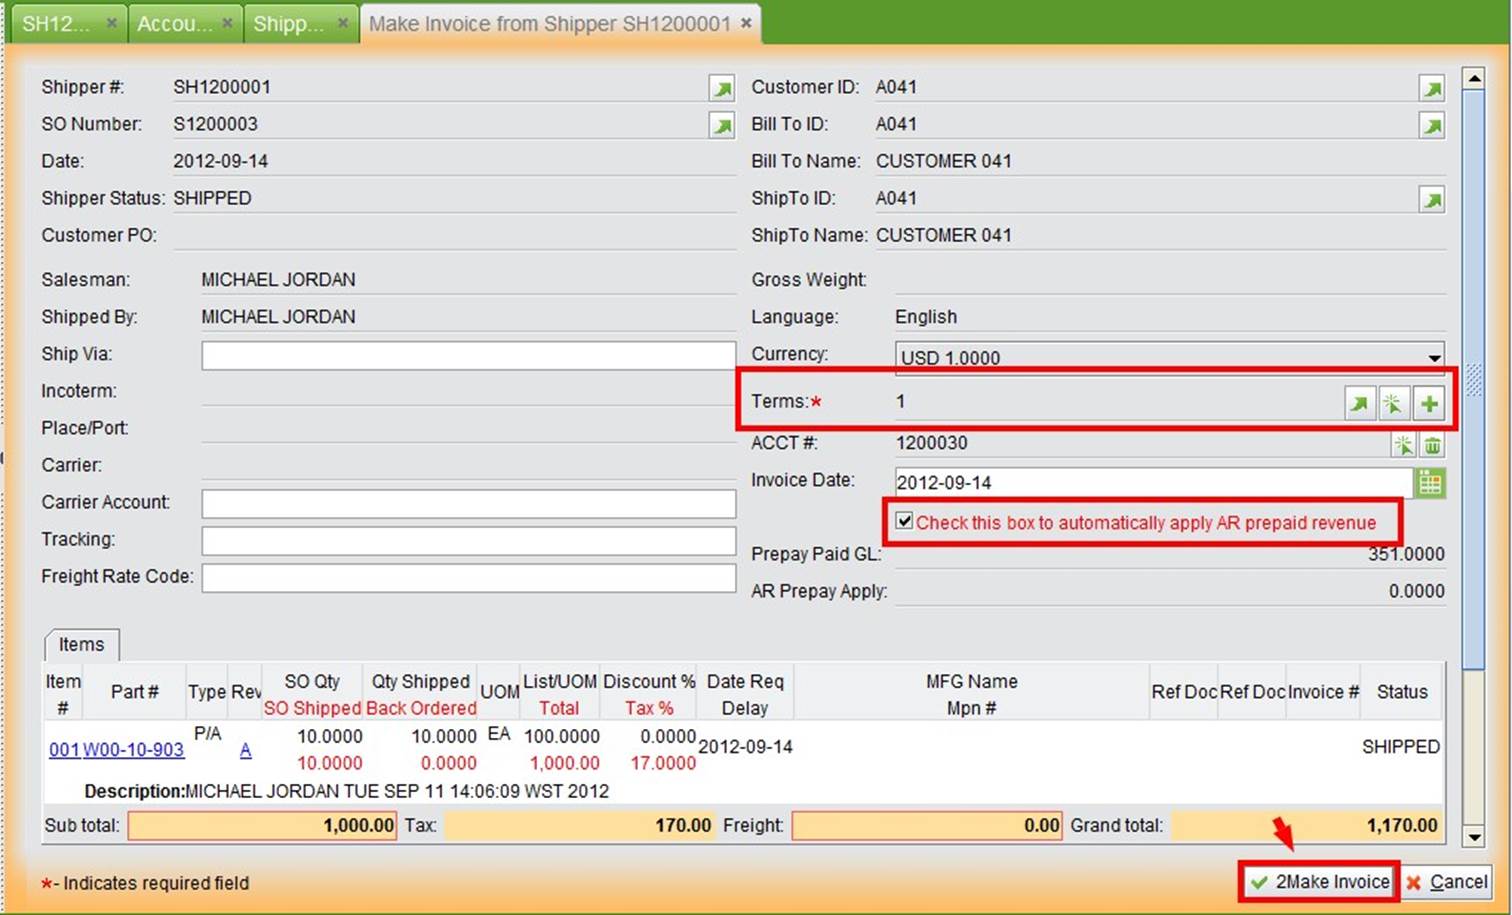
In search results, click on the Shipper# to enter the "Make Invoice from Shipper" interface.
In the “Make Invoice from Shipper” interface as shown in Image 4-56, you can check the option “Check this box to automatically apply AR prepaid revenue” if you have received partial payment from the customer. Then click “2Make Invoice” to submit.
 |
(Image 4-56)
Image 3-57 shows the open invoice generated. You can click “Transactions” and “Debits and Credits” to see details. Click “Accounting Info” at the bottom will show the Total Paid and Total Due.
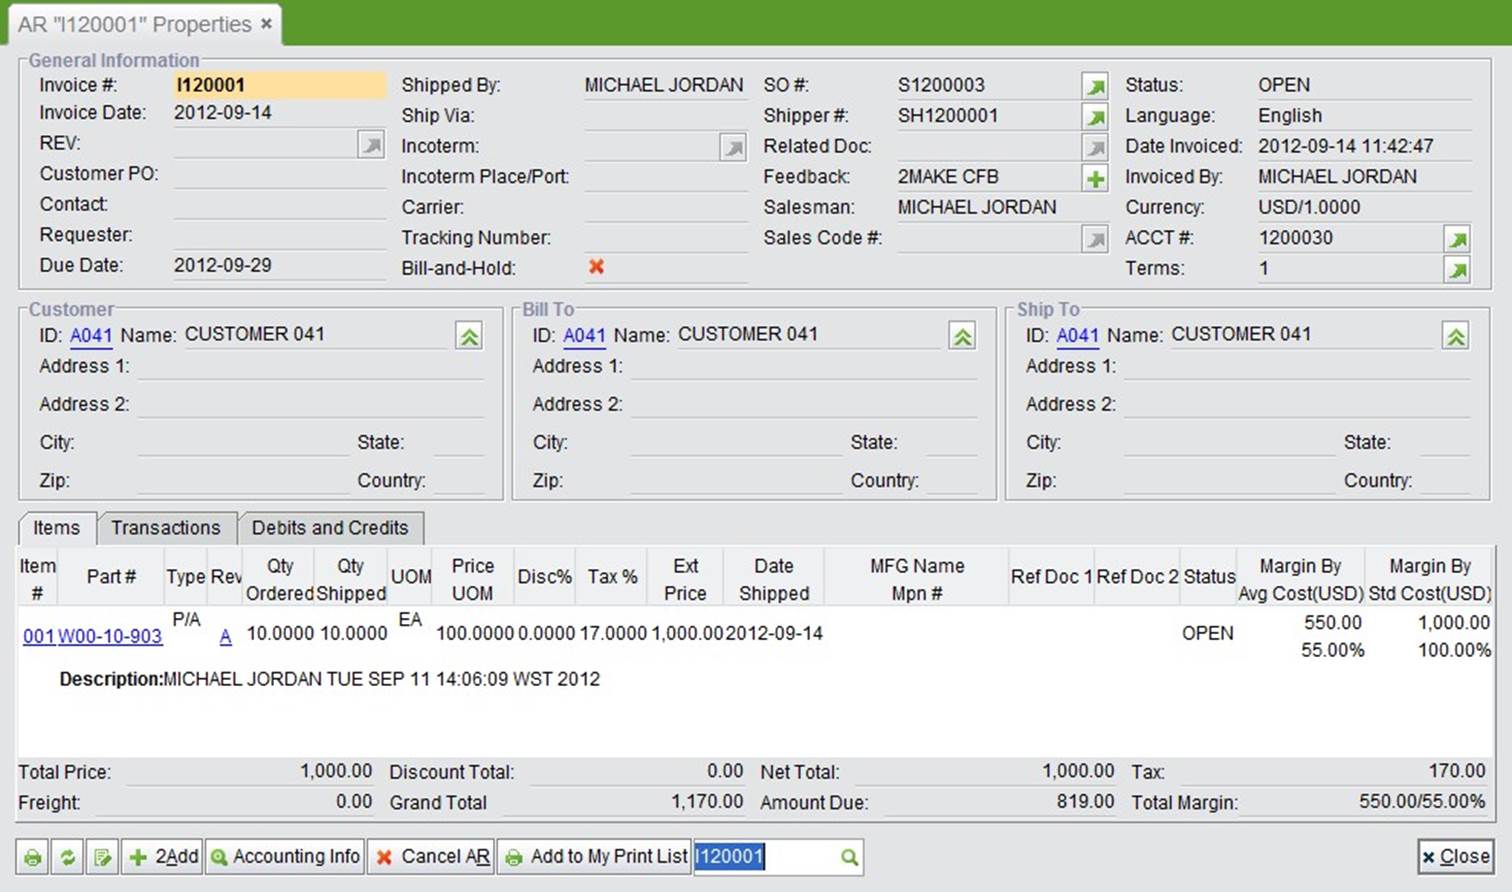 |
(Image 4-57)
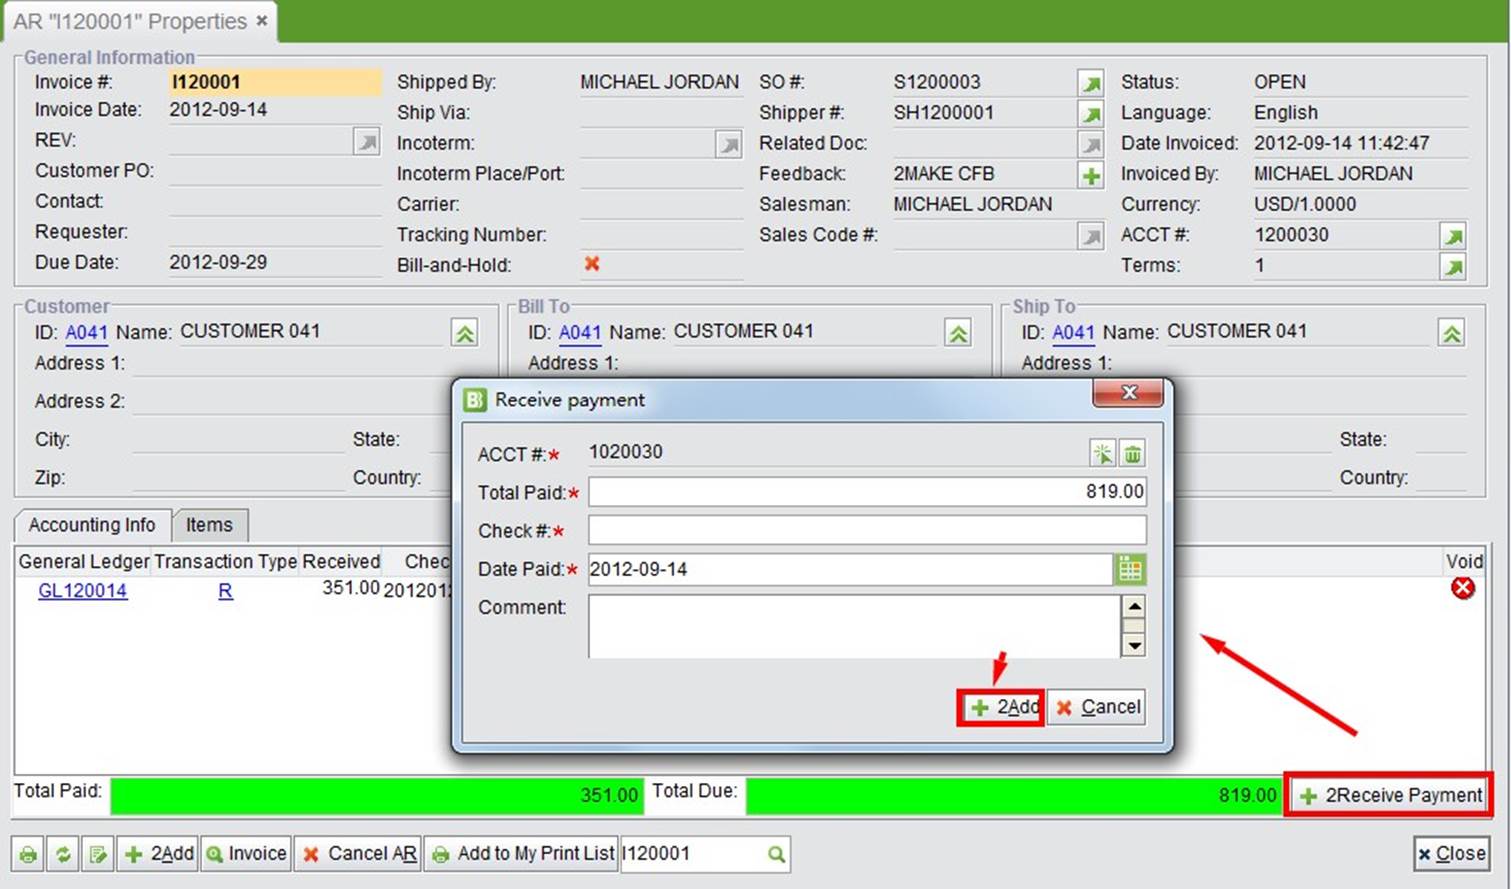
After the customer has made a payment, the accountant needs to find the related invoice to receive the payment in the system. Click “Accounting Info” at the bottom, and click “2Add Payment” to open the adding window. See Image 4-58:
 |
(Image 4-58)
Fill in the payment information and click "2Add" to add the payment. After that, the Invoice status becomes "closed" as shown in "Image 3-59." Also, you can look up the Transactions, Debits and Credits info here.
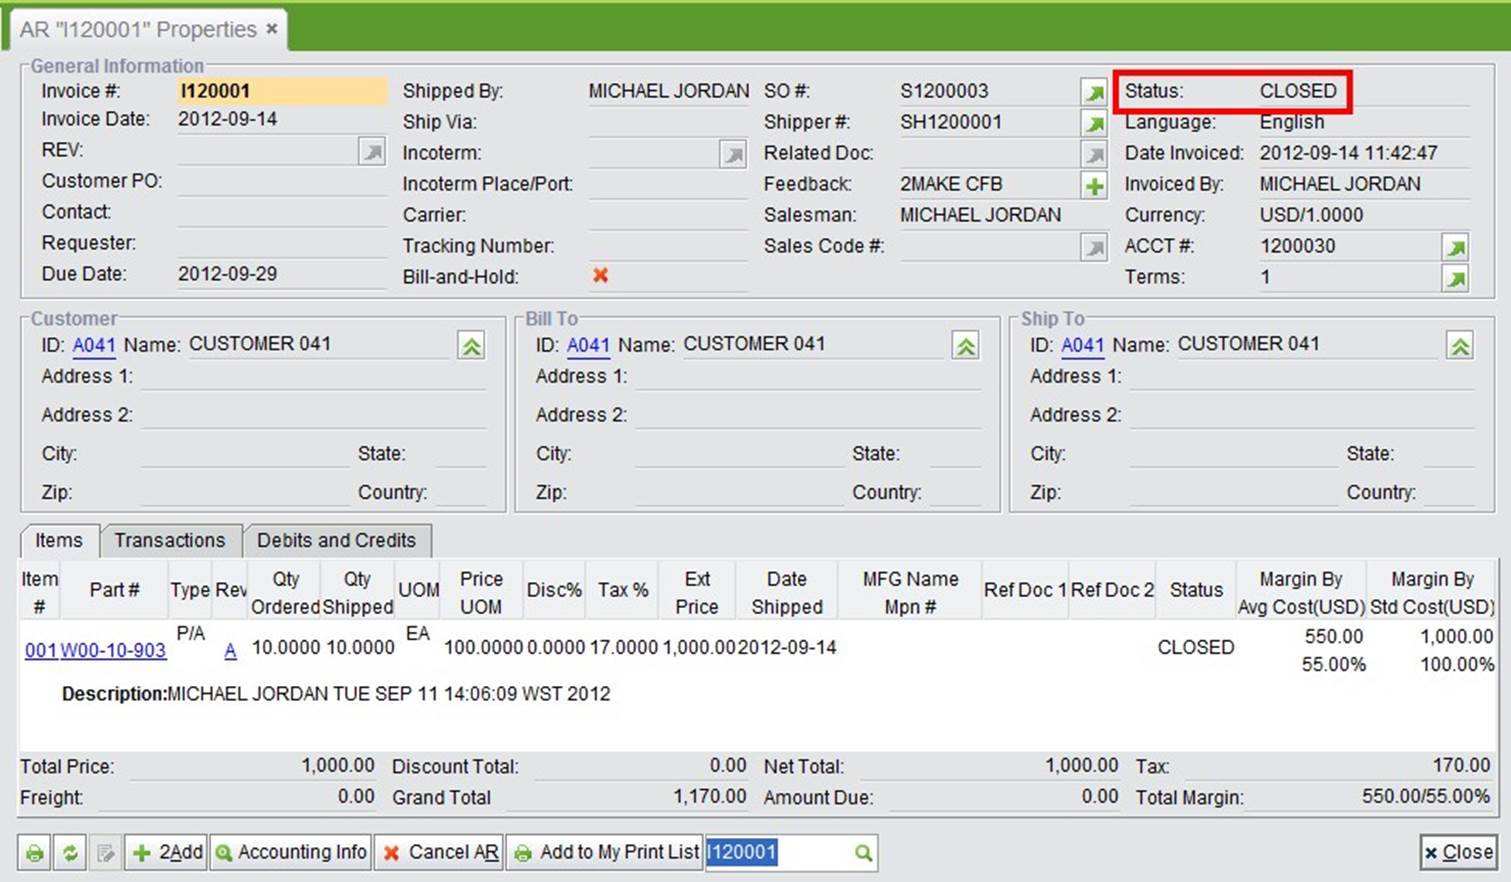 |
(Image 4-59)
You have now completed the Quick Start Tutorial! We hope that you are now familiar with the simple process and operation methods of 2BizBox ERP. In the following chapters, we will show you the comprehensive functions of 2BizBox step by step.